
1. Informació important de seguretat
Read and understand all safety warnings and instructions before using this product. Failure to follow these instructions may result in property damage, serious injury, or death.
- Always wear appropriate personal protective equipment, including safety glasses and gloves, when working with refrigerants and automotive AC systems.
- Work in a well-ventilated area to prevent the accumulation of refrigerant vapors.
- Refrigerants can cause frostbite upon contact with skin or eyes. In case of contact, flush with water and seek immediate medical attention.
- Never expose refrigerant containers to direct sunlight or temperatures above 120°F (49°C).
- Ensure all connections are tight before pressurizing the system to prevent leaks.
- Refer to your vehicle's service manual for specific AC system procedures and refrigerant capacities.
- Do not use this manifold gauge set for refrigerants other than R134a, R1234yf, and R404a.
2. Producte acabatview
The VIVOHOME HVAC Manifold Gauge Set is a comprehensive diagnostic tool designed for automotive air conditioning systems. It is compatible with R134a, R1234yf, and R404a refrigerants, making it suitable for a wide range of vehicle AC repair and maintenance tasks. This set allows for accurate pressure readings, vacuum diagnostics, refrigerant charging, and coolant recovery.
Característiques principals:
- Durable & Highly Accurate Gauges: The 3-way manifold gauge provides precise pressure readings essential for AC system diagnostics. It features a wear-resistant, impact-resistant gauge core and a dry dial optimized for cold environments. An easy-to-use calibration screw maintains precision within ±1.6%.
- Construcció Premium: Built with a robust aluminum body and premium brass fittings for long-term use and excellent resistance to rust and corrosion.
- 5-Foot Color-Coded Hoses: Includes three 5-foot PVC hoses with four reinforcement layers. Red indicates high-pressure, blue indicates low-pressure, and yellow is for charging. Each hose has a working pressure of 600 psi and a burst pressure of 3000 psi.
- Àmplia compatibilitat: Supports vacuum diagnostics, refrigerant recharging, and coolant recovery for automotive AC systems using R1234yf, R404a, and R134a.
- Portabilitat: Comes with a sturdy hanging hook for hands-free operation and a convenient carrying case for organized storage and easy transport.

Image: VIVOHOME HVAC Manifold Gauge Set with hoses and quick couplers.

Imatge: Detallada view of the manifold gauges highlighting features such as the hanging hook, rubber casing, calibration screw, sight glass, brass fittings, and unloading valve.

Image: Close-up of the 5-foot color-coded hoses, illustrating their 4-layer reinforced construction and pressure ratings.
3. Què hi ha a la caixa
Your VIVOHOME HVAC Manifold Gauge Set includes the following components:
- 1 x Triple-way Manifold Gauge
- 3 x Color-coded Hoses (Red, Blue, Yellow)
- 2 x R134a & R404a Quick Couplers
- 2 x R1234yf Quick Couplers
- 2 x R134a & R1234yf Self-Sealing Can Taps
- 2 x 1/4'' Male to 1/2'' Female Adapters (LH & RH threads)
- 1 x Valve Core Wrench

Image: All components included in the VIVOHOME HVAC Manifold Gauge Set.
4. Instruccions de configuració
Follow these steps to set up your manifold gauge set for use:
- Connect Hoses to Manifold: Securely attach the red hose to the high-pressure port (red knob), the blue hose to the low-pressure port (blue knob), and the yellow (charging) hose to the central service port on the manifold. Ensure all connections are hand-tight, then use a wrench to snug them slightly. Do not overtighten.
- Attach Quick Couplers: For R134a or R404a systems, attach the corresponding quick couplers to the ends of the red and blue hoses. For R1234yf systems, use the R1234yf quick couplers.
- Prepare Can Tap: If charging from a refrigerant can, attach the appropriate self-sealing can tap to the yellow hose. Ensure the can tap's piercing pin is retracted before connecting it to the refrigerant can.
- Connexió al vehicle: Connect the high-pressure quick coupler (red) to the vehicle's high-side service port and the low-pressure quick coupler (blue) to the vehicle's low-side service port. Ensure they click into place.
- Connect to Vacuum Pump/Refrigerant Source: Connect the free end of the yellow hose to your vacuum pump (for evacuation) or refrigerant source (for charging).
Video: This video demonstrates the setup and connection process for the VIVOHOME HVAC Manifold Gauge Set with R134a and R1234yf refrigerants.
5. Instruccions de funcionament
This manifold gauge set can be used for various AC system procedures. Always consult your vehicle's specific service manual for detailed pressure specifications and procedures.
5.1. Vacuum Diagnostics (Evacuation)
Evacuation removes air and moisture from the AC system, which is crucial for proper operation.
- Ensure all manifold valves (red and blue knobs) are closed.
- Connect the manifold set to the vehicle's high and low-side service ports and the yellow hose to a vacuum pump as described in the Setup section.
- Open both the high-side (red) and low-side (blue) manifold valves.
- Start the vacuum pump. The low-pressure gauge should drop into the vacuum range (below 0 psi).
- Run the vacuum pump for at least 30-60 minutes, or as specified by your vehicle's service manual, to ensure thorough evacuation.
- Once evacuation is complete, close both the high-side and low-side manifold valves.
- Turn off the vacuum pump. Observe the low-pressure gauge for at least 15-30 minutes. If the pressure rises, there is a leak in the system that needs to be addressed before proceeding.
5.2. Càrrega de refrigerant
Charging adds refrigerant to the AC system. Ensure the system has been properly evacuated and checked for leaks.
- With the system evacuated and manifold valves closed, connect the yellow hose to the refrigerant can tap and then to the refrigerant can.
- Slightly open the can tap valve to purge air from the yellow hose, then close it.
- Start the vehicle engine and turn on the AC to its maximum setting with the fan on high.
- Slowly open the low-side (blue) manifold valve to allow refrigerant to flow into the system. Monitor the low-pressure gauge.
- Periodically close the low-side valve and check the system's performance and pressure readings against your vehicle's specifications. Avoid overcharging.
- Once the desired charge is reached, close the low-side manifold valve and the can tap valve.
- Disconnect the quick couplers from the vehicle's service ports.
5.3. Coolant Recovery
Coolant recovery requires specialized equipment (a recovery machine) and should only be performed by trained individuals to prevent refrigerant release into the atmosphere.
- Connect the manifold set to the vehicle's high and low-side service ports.
- Connect the yellow hose to the inlet of a certified refrigerant recovery machine.
- Follow the recovery machine's instructions to initiate the recovery process.
- Open both the high-side (red) and low-side (blue) manifold valves to allow refrigerant to flow to the recovery machine.
- Monitor the gauges until the system pressure drops to the recommended vacuum level for recovery.
- Close the manifold valves and turn off the recovery machine.

Image: The manifold gauge set in various applications: diagnostic check with vacuum pump, HVAC recharge, and coolant recovery.
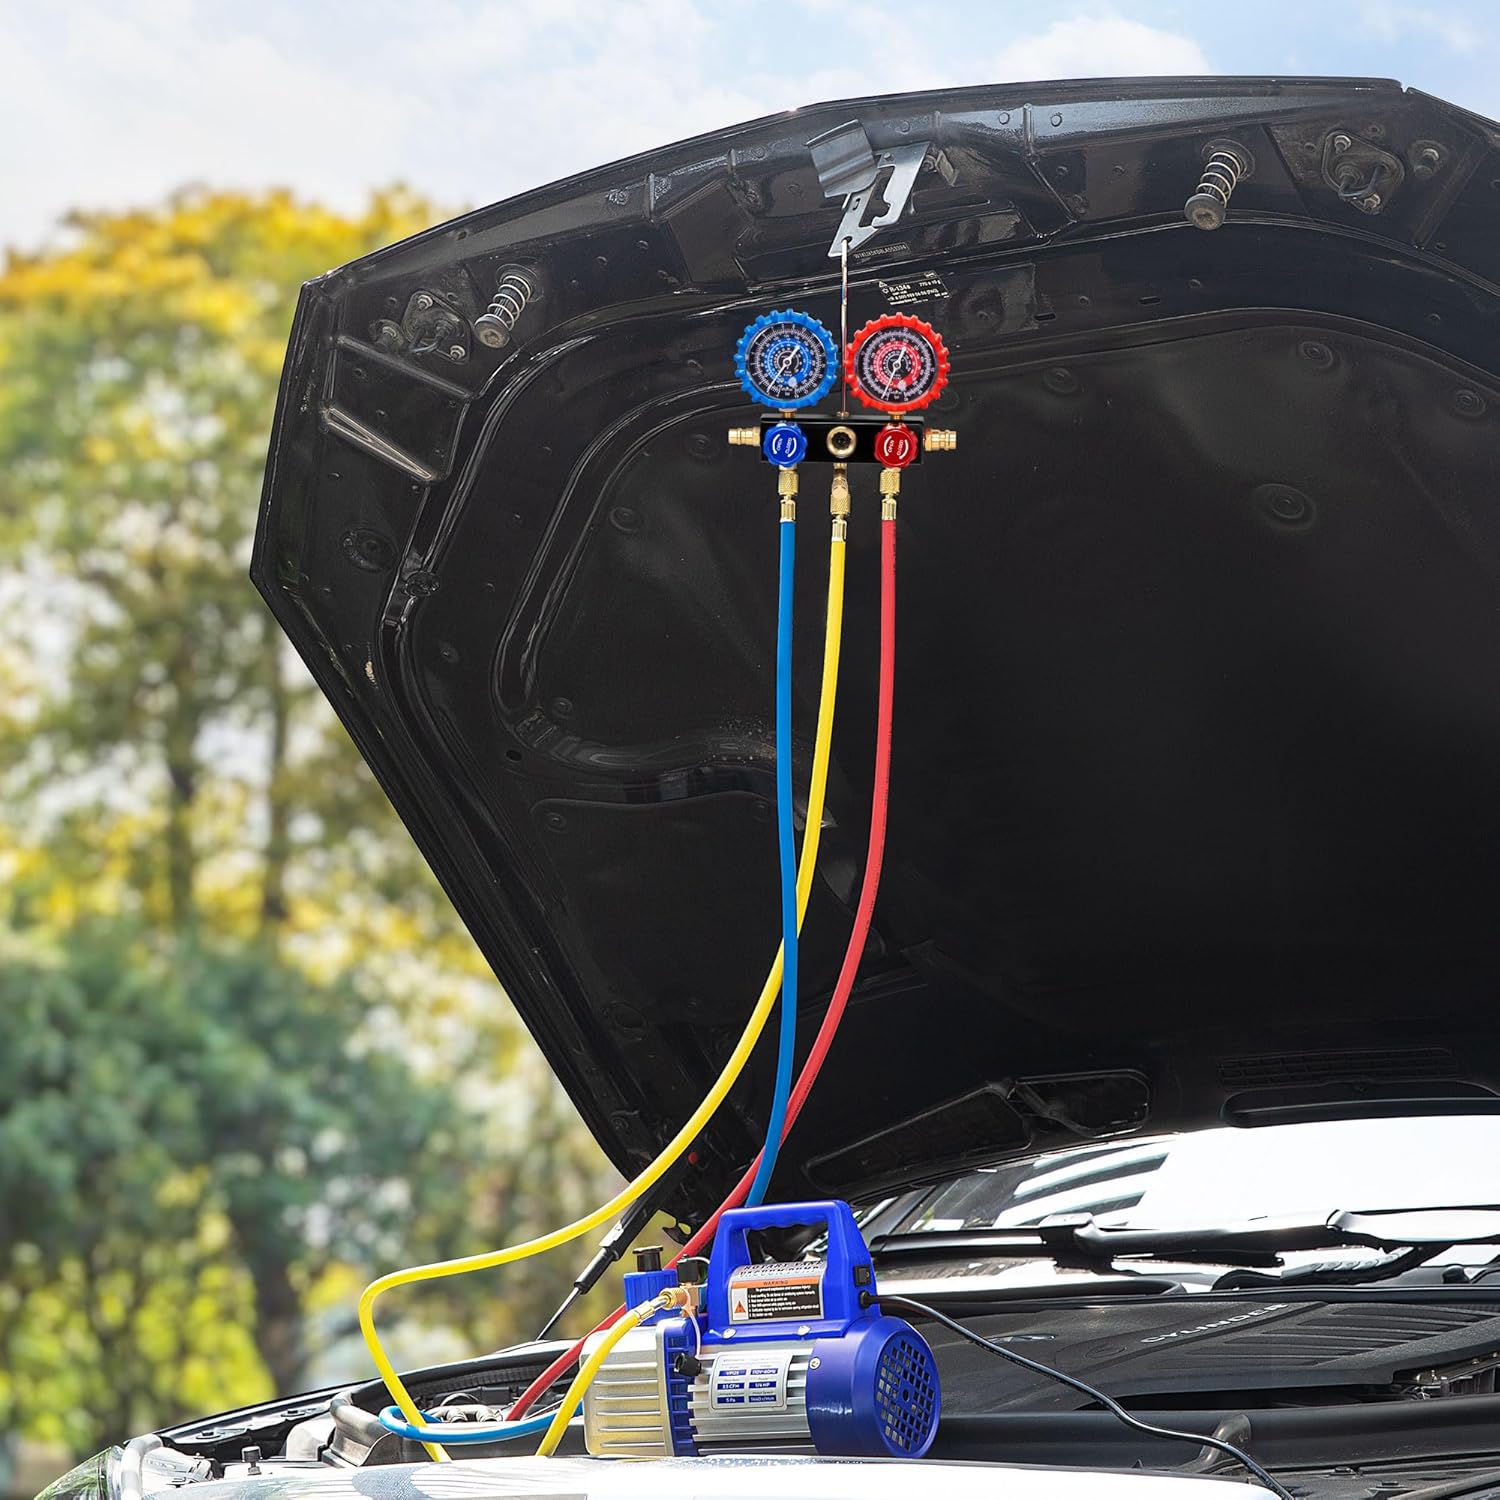
Image: Manifold gauge set connected to a vehicle's AC system and a vacuum pump for evacuation.
6. Manteniment
Proper maintenance ensures the longevity and accuracy of your manifold gauge set.
- Neteja: After each use, wipe down the gauges, hoses, and fittings with a clean, dry cloth to remove any refrigerant residue or dirt. Avoid using harsh chemicals that could damage the materials.
- Emmagatzematge: Store the manifold gauge set in its carrying case in a clean, dry environment away from direct sunlight and extreme temperatures. Ensure hoses are coiled neatly to prevent kinking.
- Calibració del calibre: The gauges feature a calibration screw. If you suspect inaccurate readings, refer to a professional for recalibration or follow industry-standard procedures for checking accuracy. The set is factory calibrated to ±1.6% accuracy.
- Inspecció de la mànega: Regularly inspect hoses for cracks, cuts, or signs of wear. Replace damaged hoses immediately to prevent refrigerant leaks.
- O-Ring/Gasket Check: Periodically check the O-rings and gaskets in the quick couplers and can taps for wear or damage. Replace them as needed to ensure a tight seal.
7. Solució De Problemes
Aquí teniu alguns problemes comuns i les seves possibles solucions:
| Problema | Causa possible | Solució |
|---|---|---|
| Fuga de refrigerant | Loose connections, damaged hoses, worn O-rings/gaskets. | Tighten all connections. Inspect hoses and replace if damaged. Replace worn O-rings or gaskets in couplers and can taps. Use a leak detector to pinpoint the source. |
| Inaccurate Gauge Readings | Gauge out of calibration, internal damage. | Check calibration screw. If persistent, consult a professional for recalibration or consider replacing the gauge. |
| Difficulty Connecting Quick Couplers | Incorrect coupler type, dirty service port, worn coupler. | Ensure you are using the correct quick coupler for the refrigerant type (R134a or R1234yf). Clean the vehicle's service port. Replace the quick coupler if it is worn or damaged. |
| Refrigerant Not Flowing During Charge | Manifold valve closed, can tap not fully engaged, low refrigerant in can. | Ensure the low-side manifold valve is open. Verify the can tap has pierced the refrigerant can. Check the refrigerant can for sufficient content. |
8. Especificacions
Technical specifications for the VIVOHOME HVAC Manifold Gauge Set VH1770:
- Model: VH1770
- Marca: VIVOHOMA
- Compatibilitat amb el refrigerant: R134a, R1234yf, R404a
- Interval de baixa pressió: -30 inHg to 260 psi (-1 to 18 Bars)
- Interval d'alta pressió: -30 inHg to 550 psi (-1 to 38 Bars)
- Precisió del calibre: ±1.6%
- Longitud de la mànega: 5 peus (aprox. 1.5 metres)
- Pressió de treball de la mànega: 600 psi
- Pressió d'esclat de la mànega: 3000 psi
- Pes de l'article: Aproximadament 6.6 lliures (3 kg)
- Dimensions del producte: Aproximadament 7.09 x 2.4 x 8.7 polzades (18 x 6.1 x 22.1 cm)

Image: Product dimensions and package weight information.
9. Garantia i Suport
VIVOHOME products are designed for quality and reliability. For specific warranty information, please refer to the warranty card included with your product or visit the official VIVOHOME website. If you encounter any issues or require technical assistance, please contact VIVOHOME customer service through their official channels.
Informació de contacte: Please refer to the VIVOHOME official weblloc web o la documentació de la compra per obtenir les dades de contacte d'atenció al client més actualitzades.