
Introducció
This manual provides comprehensive instructions for the installation, operation, and maintenance of your Vrabocry DC5V-24V Smart Tuya APP LED SPI Controller. This device is designed to control various SPI RGB/RGBW LED strips, offering versatile lighting effects through APP and music synchronization.
Què hi ha a la caixa
Si us plau, verifiqueu que tots els components siguin presents abans de continuar amb la instal·lació.
- 1 x Tuya SPI RGB/RGBW LED Controller (Colorful-X7)
- 1 x Manual d'usuari
- Necessary connection cables (as supplied)

Image: The Vrabocry LED SPI Controller, its accompanying cables, and a small screwdriver, laid out next to its packaging and a user manual. This illustrates the complete package contents.
Especificacions
| Característica | Detall |
|---|---|
| Nom del producte | Tuya SPI RGB/RGBW LED Controller |
| Voltage | DC 5~24V |
| Mètodes de control | APP (Smart Life or Tuya) or Music |
| Connectivitat | WiFi-IEEE 802.11b/g/n 2.4GHz, Bluetooth mesh |
| Sortida | 4A/canal (sortida total màxima 12A) |
| Supported LED Strip Types | All SPI RGB LED strips (WS/SK/SM/TX/LPD/TM series) |
| Temperatura de treball | -20 °C a 60 °C |
| Max Supported Pixel Number | 1024 píxels |
| Material | Plàstic |
| Ús interior/exterior | Interior |
Configuració
1. Connexió física
Ensure all power is disconnected before making any connections. Refer to the diagram below for proper wiring.
- Connect the DC 5-24V power supply to the controller's power input terminals (DC5-24V).
- Connect the LED strip to the controller's output terminals:
- GND: Ground connection for the LED strip.
- DAT: Data line for the LED strip.
- CLK: Clock line for the LED strip (if applicable for your strip type).
- VCC: Positive power supply for the LED strip.
- The AUX IN port is for external audio input for music synchronization.
- The SET button is used for pairing and mode selection.

Imatge: Una imatge detallada view of the Vrabocry Colorful-X7 Smart LED Music Controller, highlighting the DC5-24V power input, AUX IN, SET button, and the GND, DAT, CLK, VCC output terminals for LED strip connection.
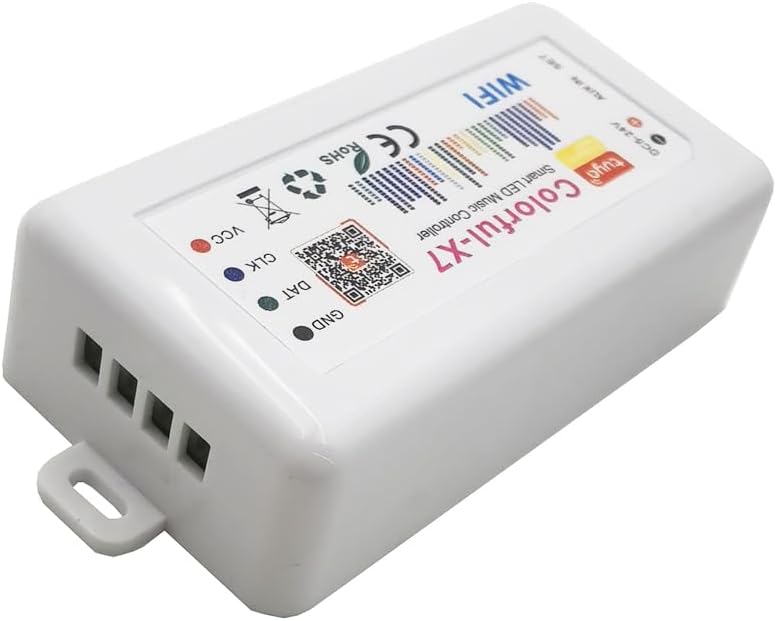
Image: An angled perspective of the Vrabocry Colorful-X7 LED controller, focusing on the output terminals (GND, DAT, CLK, VCC) where the LED strip connects.
2. Instal·lació de l'aplicació
Download the "Smart Life" or "Tuya" app from your mobile device's app store (iOS App Store or Google Play Store). Register or log in to your account.
3. Connexió WiFi
- Power on the LED controller.
- Open the Smart Life or Tuya app.
- Toqueu la icona "+" per afegir un dispositiu nou.
- Follow the in-app instructions to connect the controller to your 2.4GHz WiFi network. This typically involves putting the device into pairing mode (often by pressing and holding the SET button until an indicator light flashes).

Image: The Vrabocry LED controller shown alongside a smartphone displaying the Smart Life/Tuya control app interface, and two smart speakers, illustrating its smart home integration capabilities.
Instruccions de funcionament
1. Basic Control via APP
Once connected, you can control the LED strip directly from the Smart Life or Tuya app. The app allows you to:
- Encendre/apagar els llums.
- Adjust brightness and color.
- Select from 40 different dynamic lighting modes.
- Add up to 10 customized lighting modes.
2. Music Sync Control
The controller features a built-in microphone for music synchronization. The lights will react to the rhythm and beat of the music playing in the environment. For external audio input, connect an audio source to the AUX IN port.
3. Customization and Advanced Features
The app provides advanced tools for creating personalized lighting effects:
- DIY Dynamic Lighting: Utilize tools like Paint Bucket, Color Pen, and Eraser within the app to design unique lighting patterns.
- Device Name Modification: Rename your controller in the app for easier identification.
- Color Order Correction: Adjust the color order (RGB, GRB, etc.) to match your specific LED strip.
- Configuració de temporitzadors: Programa els llums perquè s'encenguin o s'apaguin a hores específiques.
Manteniment
To ensure the longevity and optimal performance of your LED SPI Controller, follow these maintenance guidelines:
- Keep the controller in a dry environment, away from moisture and extreme temperatures.
- Netegeu el dispositiu amb un drap suau i sec. No utilitzeu netejadors líquids ni materials abrasius.
- Ensure proper ventilation around the controller to prevent overheating.
- Regularly check connections for any signs of wear or looseness.
Resolució de problemes
| Problema | Causa possible | Solució |
|---|---|---|
| El controlador no s'encén. | Sense font d'alimentació; volum incorrectetage; faulty power adapter. | Check power connections. Ensure power supply is DC 5-24V. Test with a different power adapter if available. |
| LED strip not lighting up. | Incorrect wiring (GND, DAT, CLK, VCC); incompatible LED strip; faulty LED strip. | Verify all wiring connections are correct. Ensure your LED strip is an SPI type. Test the LED strip with another controller if possible. Check color order settings in the app. |
| No es pot connectar a la xarxa Wi-Fi. | Incorrect WiFi password; 5GHz WiFi network; controller not in pairing mode; weak signal. | Double-check WiFi password. Ensure you are connecting to a 2.4GHz network. Put the controller into pairing mode (refer to app instructions). Move controller closer to router. |
| La sincronització de música no funciona. | No music playing; music too quiet; microphone obstructed; incorrect AUX IN connection. | Ensure music is playing loudly enough near the controller. Check if the microphone port is clear. If using AUX IN, ensure the cable is properly connected and the audio source is active. |
Garantia i Suport
Vrabocry products are designed for reliability and performance. For warranty information and technical support, please refer to the contact details provided on the product packaging or visit the official Vrabocry weblloc. Conserveu el rebut de compra per a reclamacions de garantia.