
1. Introducció
This manual provides detailed instructions for the installation, operation, maintenance, and troubleshooting of your Wisoqu H511 Gaming Motherboard. This motherboard is designed to support 10th and 11th Generation Intel Core i3, i5, i7, i9, and Celeron series processors with an LGA 1200 socket, featuring dual-channel DDR4 memory support and various expansion options for a robust computing experience.
2. Informació de seguretat
- Desconnecteu sempre la font d'alimentació de l'ordinador abans d'instal·lar o treure qualsevol component.
- Porteu una corretja antiestàtica al canell o toqueu sovint un objecte metàl·lic connectat a terra per descarregar l'electricitat estàtica, que pot danyar els components electrònics sensibles.
- Handle the motherboard by its edges to avoid touching components or circuits.
- Keep the motherboard and other components away from moisture and extreme temperatures.
- Assegureu-vos de ventilar adequadament la carcassa de l'ordinador per evitar que s'escalfi.
- No intenteu reparar la placa base vosaltres mateixos. Consulteu personal de servei qualificat.
3. Contingut del paquet
Verifiqueu que tots els articles siguin presents al vostre paquet. Si falta algun article o està malmès, poseu-vos en contacte amb el vostre distribuïdor.
- Wisoqu H511 Gaming Motherboard
- Cables de dades SATA
- Escut d'E / S
- Manual d'usuari (aquest document)
- Driver CD/USB (may vary by package)
4. Producte acabatview
The Wisoqu H511 Gaming Motherboard features a robust design for 10th and 11th Gen Intel processors. Key features include:
- Compatibilitat de CPU: Supports 10th and 11th Gen Intel Core i3, i5, i7, i9, and Celeron processors (LGA 1200 socket).
- Memòria: Dual-channel DDR4 memory slots, supporting up to 64GB at speeds up to 3200 MHz.
- Emmagatzematge: 3 Serial ATA 3.0 ports and 2 NVME-M.2 interfaces for high-speed storage.
- Expansió: 1 PCI Express x16 slot for graphics cards and 1 PCI Express x1 slot for other expansion cards.
- Connectivitat: Integrated LAN, multiple USB ports (USB 3.0 and USB 2.0), and a dedicated WiFi interface.
- Sortida de vídeo: HD Multimedia Interfaces (HDMI, DP) for integrated graphics output (requires CPU with integrated graphics).

Figura 4.1: Frontal view of the Wisoqu H511 Gaming Motherboard, showcasing the LGA 1200 socket, DDR4 slots, and various connectors.

Figura 4.2: Mésview of the Wisoqu H511 Motherboard highlighting key ports and components such as USB 3.0, HD Multimedia Interfaces, DP, USB 2.0, and Audio ports.

Figura 4.3: Primer pla view of the LGA 1200 CPU socket, where the processor is installed.
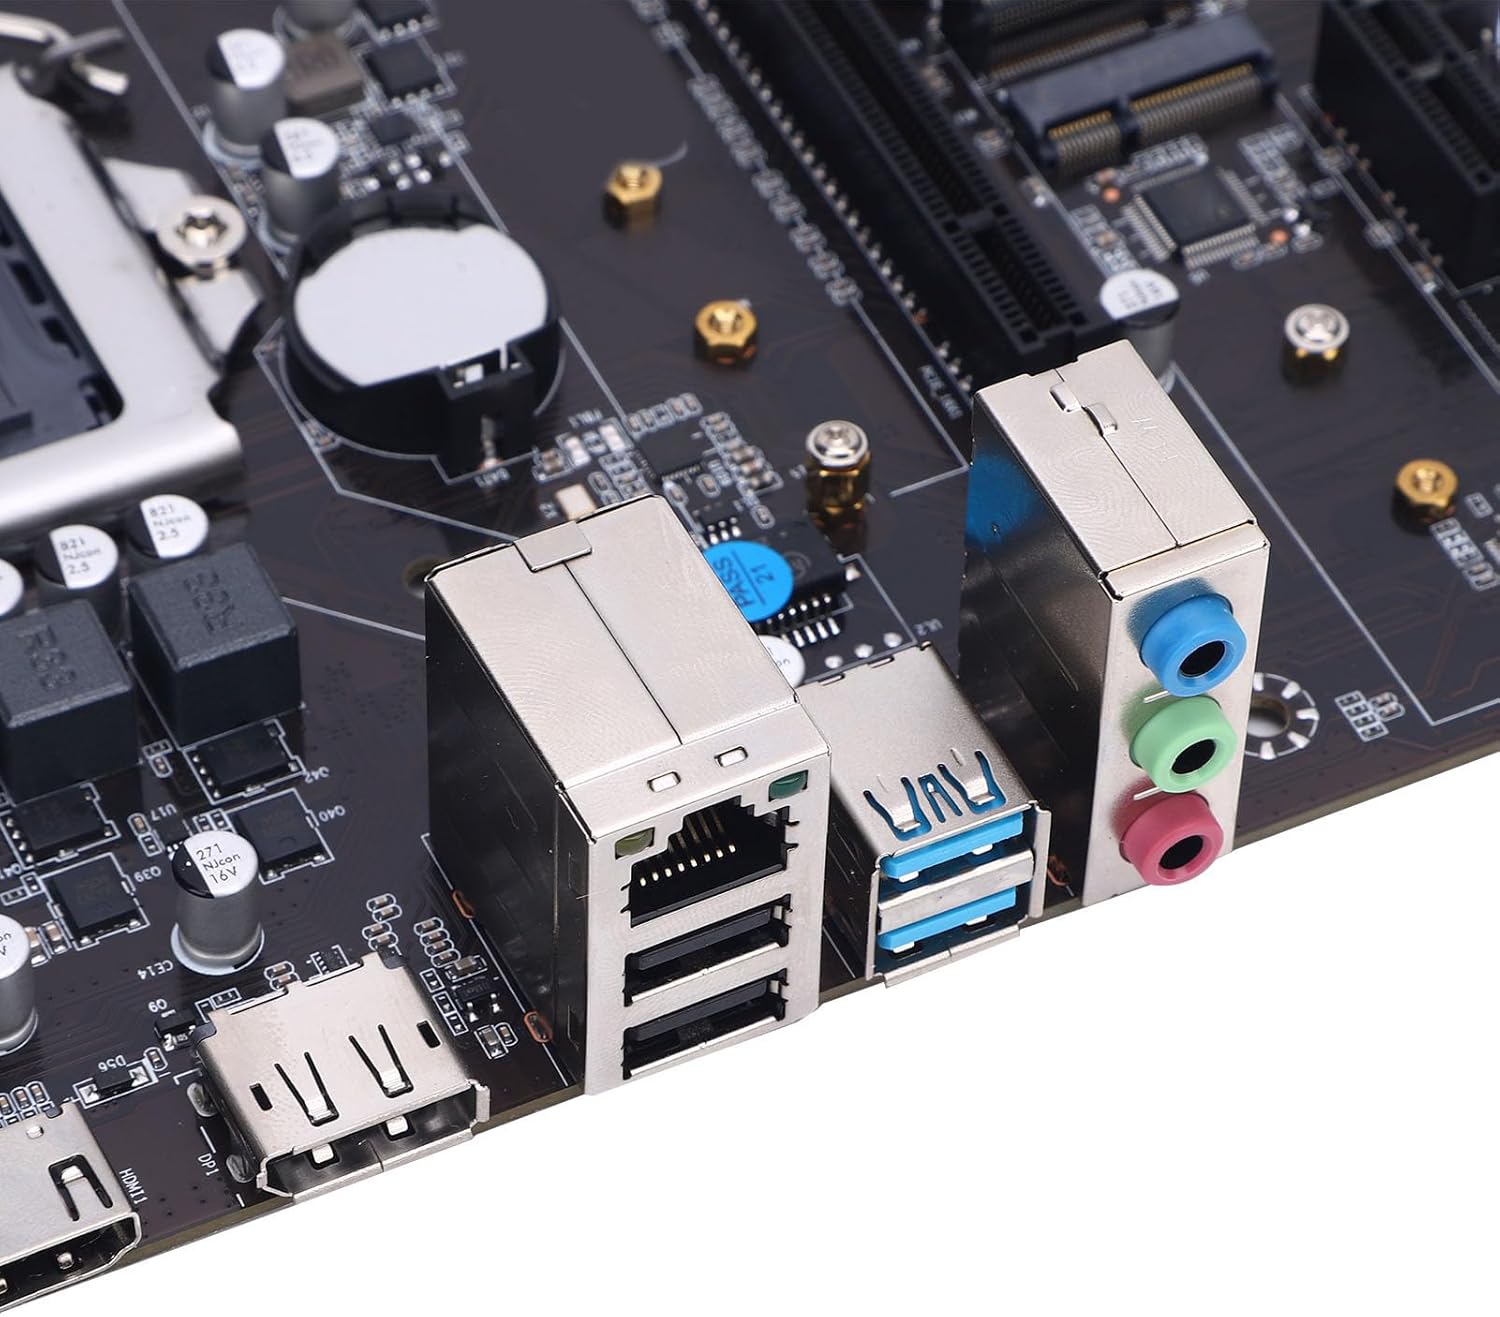
Figura 4.4: Detallada view of the rear I/O panel, showing LAN, USB, and audio ports.
5. Configuració i instal·lació
Follow these steps carefully to install your Wisoqu H511 Gaming Motherboard and its components.
5.1 Instal·lació de la CPU
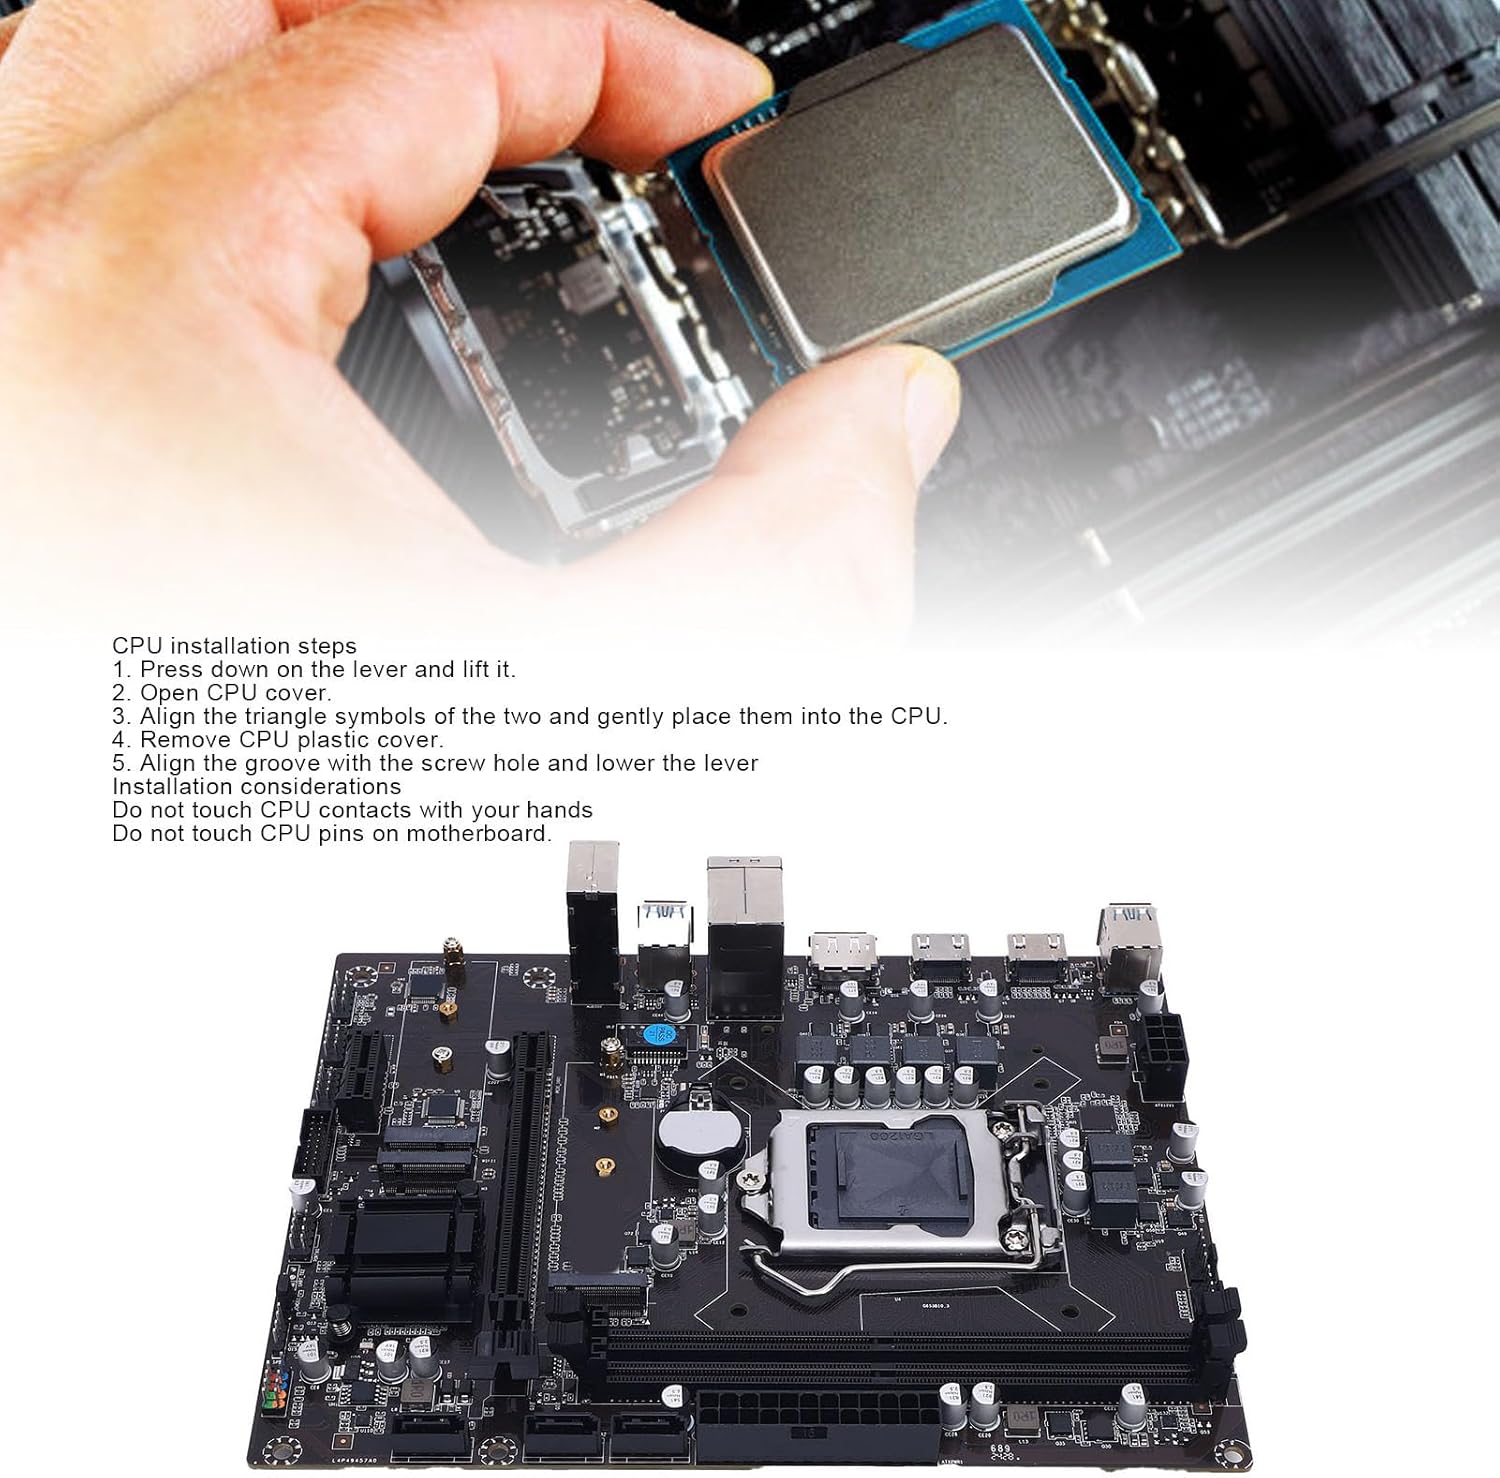
Figure 5.1: Illustrates the process of installing a CPU into the LGA 1200 socket.
- Obriu el sòcol de la CPU: Press down on the lever located next to the CPU socket and gently lift it to open the socket cover.
- Treure la coberta de plàstic: Carefully remove the plastic protective cover from the CPU socket.
- Alinear la CPU: Align the triangle symbols on the CPU and the socket. Gently place the CPU into the socket, ensuring it sits flush without force.
- Close Socket: Lower the metal cover and then press down the lever to secure the CPU in place.
Consideracions importants:
- Do not touch the CPU contacts with your hands.
- Do not touch the CPU pins on the motherboard socket.
- Apply thermal paste to the CPU surface before installing the CPU cooler.
5.2 Instal·lació de la memòria RAM
- Obriu els clips als dos extrems de les ranures de memòria DDR4.
- Alineeu l'osca del mòdul RAM amb la clau de la ranura de memòria.
- Premeu fermament els dos extrems del mòdul RAM fins que els clips encaixin al seu lloc.
5.3 Storage Device Installation (SATA & M.2)
Unitats SATA:
- Connecteu un extrem del cable de dades SATA a un port SATA 3.0 de la placa base.
- Connect the other end of the SATA data cable to your SSD or HDD.
- Connecteu un cable d'alimentació SATA de la font d'alimentació (PSU) a la unitat.
NVMe M.2 Drives:
- Locate the NVME-M.2 interface slots on the motherboard.
- Traieu el cargol del separador M.2.
- Insert the M.2 drive into the slot at a slight angle.
- Gently push down the M.2 drive and secure it with the standoff screw.
5.4 Connexions d'alimentació
- Connect the 24-pin ATX main power connector from your PSU to the corresponding port on the motherboard.
- Connect the 8-pin (or 4-pin) ATX 12V CPU power connector from your PSU to the port near the CPU socket.
5.5 Targeta gràfica i targetes d'expansió
- Insert your PCI Express x16 graphics card into the primary PCIe x16 slot. Ensure it is seated firmly and secured with the case latch or screw.
- Connecteu els cables d'alimentació PCIe necessaris de la font d'alimentació a la targeta gràfica.
- Install any other PCI Express x1 expansion cards into the available slots as needed.
5.6 Connectors del panell frontal
Connect the front panel cables from your computer case (power button, reset button, HDD LED, power LED, front USB, front audio) to the corresponding headers on the motherboard. Refer to the motherboard diagram for exact pin locations.
6. Instruccions de funcionament
6.1 Primer arrencada i configuració de la BIOS
- Després de muntar tots els components, connecteu el monitor, el teclat i el ratolí.
- Power on your computer. Immediately press the DEL or F2 key (common BIOS entry keys) repeatedly to enter the BIOS/UEFI setup utility.
- A la BIOS, verifiqueu que tots els components instal·lats (CPU, RAM, unitats d'emmagatzematge) s'hagin detectat correctament.
- Definiu l'ordre d'arrencada per prioritzar els suports d'instal·lació del sistema operatiu (unitat USB o DVD).
- Desa els canvis i surt de la BIOS. El sistema es reiniciarà.
6.2 Instal·lació del sistema operatiu
Follow the on-screen instructions to install your preferred operating system (e.g., Windows, Linux). Ensure you install the OS on your primary storage drive.
6.3 Instal·lació del controlador
After installing the operating system, install the necessary drivers for your motherboard components. These typically include chipset drivers, LAN drivers, audio drivers, and any specific drivers for integrated WiFi (if applicable). Drivers can usually be found on the manufacturer's website or on the provided driver CD/USB.
7. Manteniment
7.1 Neteja
- Regularly clean the interior of your computer case to prevent dust buildup, which can lead to overheating.
- Use compressed air to remove dust from heatsinks, fans, and motherboard components.
- Assegureu-vos que l'ordinador estigui apagat i desendollat abans de netejar-lo.
7.2 Actualitzacions de la BIOS/UEFI
Periodically check the Wisoqu support website for updated BIOS/UEFI versions. BIOS updates can improve system stability, compatibility, and performance. Follow the instructions provided by Wisoqu carefully when performing a BIOS update to avoid system damage.
7.3 Actualitzacions de controladors
Keep your system drivers updated to ensure optimal performance and compatibility with new hardware or software. You can usually find the latest drivers on the Wisoqu website or the component manufacturers' websites (e.g., Intel for chipset drivers).
8. Solució De Problemes
Aquesta secció ofereix solucions a problemes comuns que podeu trobar.
8.1 No Power / System Does Not Boot
- Assegureu-vos que tots els cables d'alimentació (ATX de 24 pins, CPU de 8 pins) estiguin connectats correctament a la placa base i a la font d'alimentació.
- Check that the PSU is switched on and connected to a working power outlet.
- Verify that the front panel power button cable is correctly connected to the motherboard header.
- Prova d'arrencar només amb els components essencials (CPU, una memòria RAM, targeta gràfica si no hi ha gràfica integrada) per aïllar el problema.
8.2 Sense sortida de pantalla
- Ensure your monitor is connected to the correct video output port (either on the graphics card or the motherboard's integrated graphics ports).
- Si feu servir gràfics integrats, assegureu-vos que la CPU els admeti.
- Reseat the graphics card and check its power connections.
- Prova un altre cable de pantalla o monitor.
8.3 Inestabilitat / Fallades del sistema
- Check RAM modules are properly seated. Test with one RAM stick at a time.
- Ensure CPU cooler is properly installed and thermal paste is applied. Monitor CPU temperatures.
- Update motherboard chipset drivers and graphics card drivers.
- Check for BIOS updates.
8.4 WiFi Connectivity Issues
- Ensure the WiFi module (if external) is correctly installed in the dedicated WiFi interface slot.
- Install the correct WiFi drivers for your operating system.
- Check if the WiFi antenna(s) are securely connected.
- Verify that WiFi is enabled in the operating system and BIOS/UEFI settings.
- If experiencing persistent issues, consider using a wired LAN connection or an alternative WiFi adapter.
8.5 Missing Parts / Used Appearance
If your product arrived with missing parts, an unsealed box, or appears used, immediately contact your retailer or the seller for assistance. Do not attempt to use or install the product if it seems tampered with or incomplete.
9. Especificacions
| Característica | Descripció |
|---|---|
| Marca | Wisoqu |
| Nom del model | H511 (Wisoquf4m67wrhin) |
| Socket de CPU | LGA 1200 |
| Processadors compatibles | Intel Core i3/i5/i7/i9 (10th & 11th Gen), Intel Celeron (10th & 11th Gen) |
| Tipus de xipset | Intel |
| Tecnologia de memòria RAM | DDR4 |
| Ranures de memòria | 2 x 288-pin DDR4 (Dual Channel) |
| Capacitat màxima de memòria | 64 GB |
| Velocitat de rellotge de memòria | Up to 3200 MHz (D3200/2933/2800/2666/2400/2133 MHz) |
| Interfície de la targeta gràfica | PCI Express x16 |
| Ranures d'expansió | 1 x PCI Express x16, 1 x PCI Express x1 |
| Interfícies d'emmagatzematge | 3 x Serial ATA 3.0 ports, 2 x NVME-M.2 interfaces |
| Xarxa | Integrated LAN, 1 x WiFi interface |
| Ports USB | Total 6 USB ports (various USB 3.0 and USB 2.0) |
| Sortida de vídeo | HD Multimedia Interfaces (requires CPU with integrated graphics) |
| Connector d'alimentació principal | 24-pins |
| Factor de forma | ATX |
10. Informació de la garantia
Wisoqu products are covered by a standard manufacturer's warranty. The specific terms and duration of the warranty may vary by region and retailer. Please retain your proof of purchase for warranty claims. For detailed warranty information, refer to the warranty card included with your product or visit the official Wisoqu weblloc.
Extended protection plans may be available for purchase separately through your retailer.
11. Suport tècnic
If you encounter issues that cannot be resolved using the troubleshooting guide, please visit the official Wisoqu support website for FAQs, driver downloads, and further assistance. You may also contact your retailer for support.
Wisoqu Official Weblloc: Wisoqu Store on Amazon (for product information and potential support links)