
1. Introducció
Gràcies per la compraasing the suptek MD01AW Gas Spring Monitor Arm. This monitor arm is designed to enhance your workspace ergonomics and efficiency by providing flexible monitor positioning. It replaces traditional monitor stands, freeing up valuable desk space.
This manual provides detailed instructions for the safe and correct installation, operation, and maintenance of your monitor arm. Please read it thoroughly before installation and keep it for future reference.

Figura 1.1: The suptek monitor arm helps save desk space, allowing for a cleaner and more organized workstation. A monitor is mounted on the arm, with a laptop and keyboard placed underneath, demonstrating efficient space utilization.
2. Informació de seguretat
Si us plau, observeu les següents precaucions de seguretat durant la instal·lació i l'ús:
- Do not exceed the maximum load capacity of 9kg (19.8 lbs). Exceeding this weight may result in serious injury or equipment damage.
- Ensure your monitor is within the supported size range of 13-32 inches.
- Verify that your monitor has VESA mounting holes (75x75mm or 100x100mm).
- During gas spring adjustment, always keep the arm in a horizontal position to prevent sudden movement and potential damage to the monitor or mount.
- Assegureu-vos que la superfície de l'escriptori sigui estable i prou resistent per suportar el pes combinat del braç del monitor i del monitor.
- Mantingueu els nens i les mascotes allunyats durant la instal·lació.
- Use only the provided hardware. If any parts are missing or damaged, contact suptek customer support.
3. Contingut del paquet
Before installation, please check that all components are present and undamaged. If anything is missing or damaged, please contact customer support.
(A detailed list of parts with corresponding labels would typically be included here. As specific part names/quantities are not in the JSON, this section is generalized.)
4. Especificacions
| Característica | Especificació |
|---|---|
| Número de model | MD01AW |
| Color | Blanc |
| Material | Acer d'aliatge |
| Mida de monitor compatible | 13 - 32 polzades |
| Capacitat de càrrega | 2 - 9 kg (4.4 - 19.8 lliures) |
| Compatibilitat VESA | 75x75mm, 100x100mm |
| Tipus de muntatge | Escriptori Clamp or Grommet Base |
| Interval d'inclinació | ±90° |
| Gamma giratòria | ±180° |
| Rotació | 360° |
| Escriptori Clamp Gruix | 10 - 70 mm |
| Diàmetre del forat del grommet | ≥10 mm |

Figura 4.1: Detailed specifications and dimensions of the monitor arm. This image illustrates the compatible monitor sizes (13-32 inches), load capacity (2-9kg), VESA standards (75x75mm, 100x100mm), and various adjustment ranges for tilt, swivel, and rotation, along with arm extension measurements.

Figura 4.2: Pre-purchase compatibility check. This visual guide helps users confirm their monitor's size (13-32 inches), weight (2-9kg), VESA mounting pattern (75x75mm or 100x100mm), and desk thickness for clamp (10-70mm) or grommet (hole diameter ≥10mm) installation.
5. Configuració i instal·lació
The suptek MD01AW monitor arm offers two installation methods: Desk Clamp i base amb ullets. Trieu el mètode que millor s'adapti al vostre escriptori.
5.1. Trieu el mètode de muntatge

Figura 5.1: Two installation options: Clamp style (left) for desk edges and Grommet style (right) for desks with a pre-drilled hole. Both methods are suitable for desk thicknesses between 10-70mm.
- Escriptori Clamp: Ideal for desks with an edge where the C-clamp can be securely attached. Suitable for desk thicknesses of 10-70mm.
- Grommet Base: Suitable for desks that have a bolt-through hole. The minimum hole diameter required is 10mm. Also suitable for desk thicknesses of 10-70mm.
5.2. Passos d'instal·lació
- Adjunteu Clamp or Grommet to Desk: Securely fasten either the desk clamp or the grommet base to your desk according to your chosen method. Ensure it is tightened firmly to provide a stable foundation for the monitor arm.
- Enganxeu el braç: Slide the main arm assembly onto the pole of the installed clamp or grommet base. Ensure it is seated correctly and tighten any securing screws if applicable.
- Muntar el monitor: Attach the VESA plate to the back of your monitor using the appropriate screws. Then, slide the monitor (with the VESA plate attached) onto the arm's mounting head. Secure it with the provided bolts.

Figura 5.2: Step-by-step installation process. This image visually guides users through attaching the mounting base (clamp or grommet) to the desk, then connecting the arm to the base, and finally securing the monitor to the arm's VESA plate.
Nota: The product assembly video can be referenced for visual guidance. (No video URL provided in JSON, so this is a general statement.)
6. Funcionament i ajustos
The suptek MD01AW monitor arm offers extensive adjustability for optimal viewcomoditat i avantatges ergonòmics.
6.1. Multi-Angle Adjustment
The innovative multi-axis design allows for flexible positioning of your monitor:
- Inclinació: Adjust the screen 90° upwards or 90° downwards.
- Girar: Rotate the screen 180° left or right.
- Rotació: Rotate the screen 360° for landscape or portrait orientation.

Figura 6.1: Multi-angle adjustment capabilities. This image shows a user adjusting the monitor, highlighting the ±90° tilt, ±180° swivel, and 360° rotation features for versatile screen positioning.
6.2. Height and Length Adjustment
The gas spring system allows for smooth and effortless adjustment of the monitor's height and extension.

Figura 6.2: Height and length adjustment. This diagram illustrates the maximum extension length of 534mm and a height adjustment range of 140-450mm, allowing users to position their monitor at an ideal ergonomic level.
6.3. Ajust de la tensió de la molla de gas
The gas spring tension needs to be adjusted to match the weight of your monitor. This ensures the arm holds its position securely and allows for smooth movement.
Important: To prevent damage to the monitor or mount, always keep the arm in a horizontal position during gas spring adjustment. Gas pressure cannot be adjusted without a monitor attached.
- Situation 1: Arm Sinks Down
If the arm sags or does not hold its position, turn the bolt clockwise (towards the "+" direction) with the included wrench to increase the gas spring tension until the arm stays in the desired position.
- Situation 2: Arm Rises or Cannot Be Pushed Down
If the arm rises too easily or cannot be pushed down, turn the bolt counter-clockwise (towards the "-" direction) with the included wrench to decrease the gas spring tension until the arm stays in the desired position.

Figura 6.3: Gas spring adjustment mechanism. This image illustrates the adjustment point on the arm where a wrench is used to turn a bolt. Turning towards '+' increases tension (for heavier monitors), and turning towards '-' decreases tension (for lighter monitors), ensuring the arm holds its position.
6.4. Gestió de cables
The monitor arm includes cable clips to help organize and protect your cables, contributing to a tidy workspace.
- Open the cable covers on the arm.
- Route your monitor cables (power, video, etc.) through the designated channels.
- Close the cable covers to secure the cables neatly within the arm.
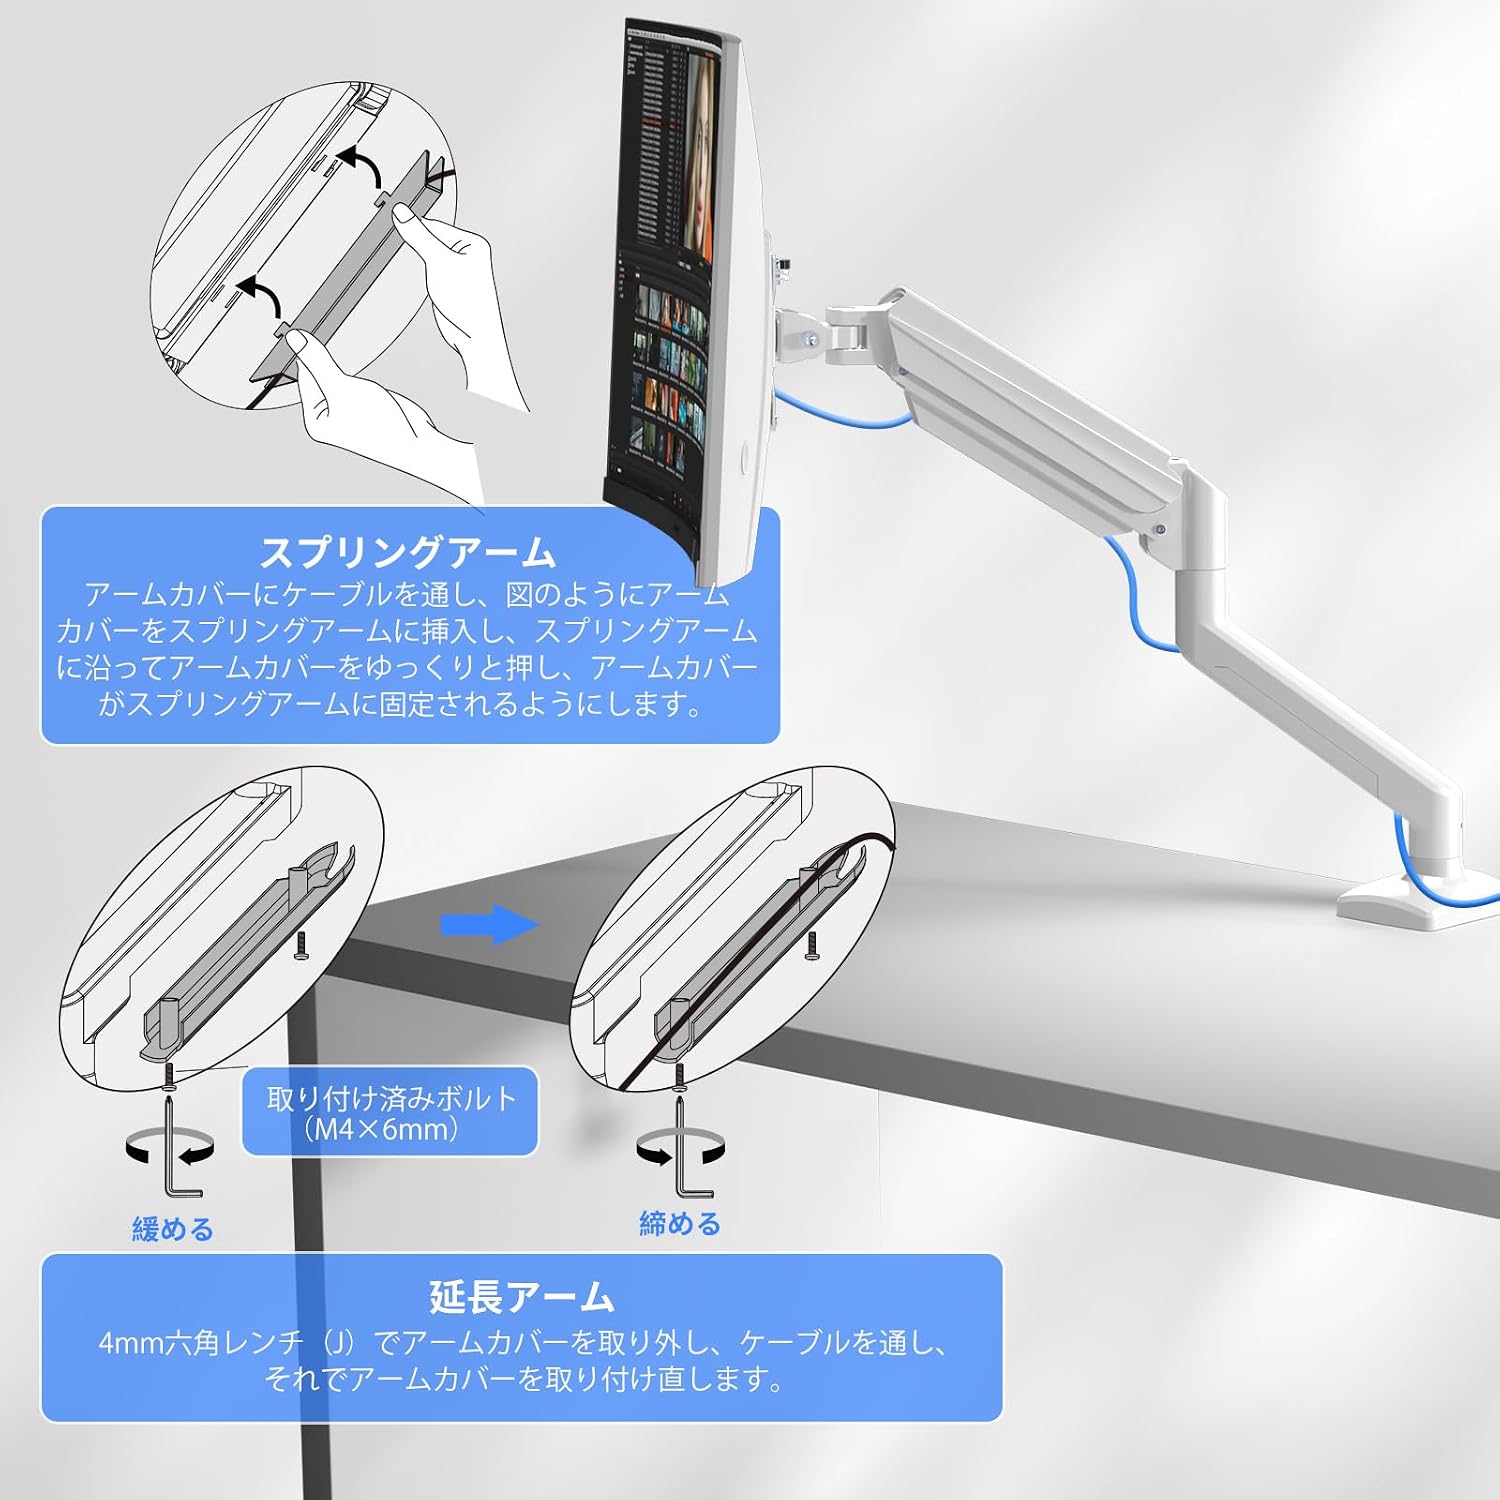
Figura 6.4: Cable management system. This image demonstrates how to open the arm covers, route cables through the internal channels, and then close the covers to keep cables organized and out of sight, contributing to a clean desk setup.
7. Manteniment
To ensure the longevity and optimal performance of your suptek monitor arm, follow these simple maintenance guidelines:
- Neteja regular: Netegeu el braç amb un drap suauamp drap per eliminar la pols i la brutícia. Eviteu productes de neteja o dissolvents abrasius.
- Comproveu les connexions: Periodically check all screws and bolts to ensure they are tight and secure. Re-tighten if necessary.
- Ajust de la molla de gas: If you change your monitor or notice the arm not holding its position correctly, re-adjust the gas spring tension as described in Section 6.3.
- Eviteu la sobrecàrrega: Never exceed the specified weight capacity of 9kg to prevent damage to the arm and your monitor.
8. Solució De Problemes
If you encounter any issues with your monitor arm, refer to the following common problems and solutions:
| Problema | Causa possible | Solució |
|---|---|---|
| Arm sags or won't stay up. | La tensió de la molla de gas és massa baixa per al pes del monitor. | Increase gas spring tension (turn '+' on the adjustment bolt). Refer to Section 6.3. |
| Arm is too stiff or won't go down. | Gas spring tension is too high for the monitor weight. | Decrease gas spring tension (turn '-' on the adjustment bolt). Refer to Section 6.3. |
| El monitor trontolla o es nota inestable. | Mounting screws are loose, or desk clamp/grommet is not secure. | Check and tighten all mounting screws, including the VESA plate screws and the desk attachment. |
| El monitor no encaixa amb la placa VESA. | Incorrect VESA pattern or monitor size. | Ensure your monitor has a 75x75mm or 100x100mm VESA pattern and is between 13-32 inches. |
If the problem persists, please contact suptek customer support.
9. Garantia i Suport
suptek provides a one-year warranty from the date of purchase for any malfunctions or defects in suptek products.
If you experience any issues or require assistance, please contact us with your order number through the following steps:
- Ves a "Servei de comptes" a Amazon.
- Navigate to "Order History".
- Find your order for the suptek monitor arm.
- Feu clic a l'enllaç "Venedor".
- Select "Ask a Question" to contact our support team.
Our team is committed to providing prompt and sincere assistance to resolve your concerns.
10. Vídeos oficials de productes
No official product videos from the seller were found in the provided product data. Please refer to the images and text instructions for guidance.