
1. Introducció
This manual provides detailed instructions for the installation, operation, and maintenance of your Petokix V1 1080P Mini Car Dashboard Camera. Please read this manual thoroughly before using the device to ensure proper functionality and safety.
2. Què hi ha a la caixa
Verifiqueu que tots els elements siguin presents al paquet:
- Dash Cam V1
- Targeta microSD de 64 GB
- Cable de càrrega USB
- ACC Charging Cable (Hardwire Kit)
- Manual d'usuari
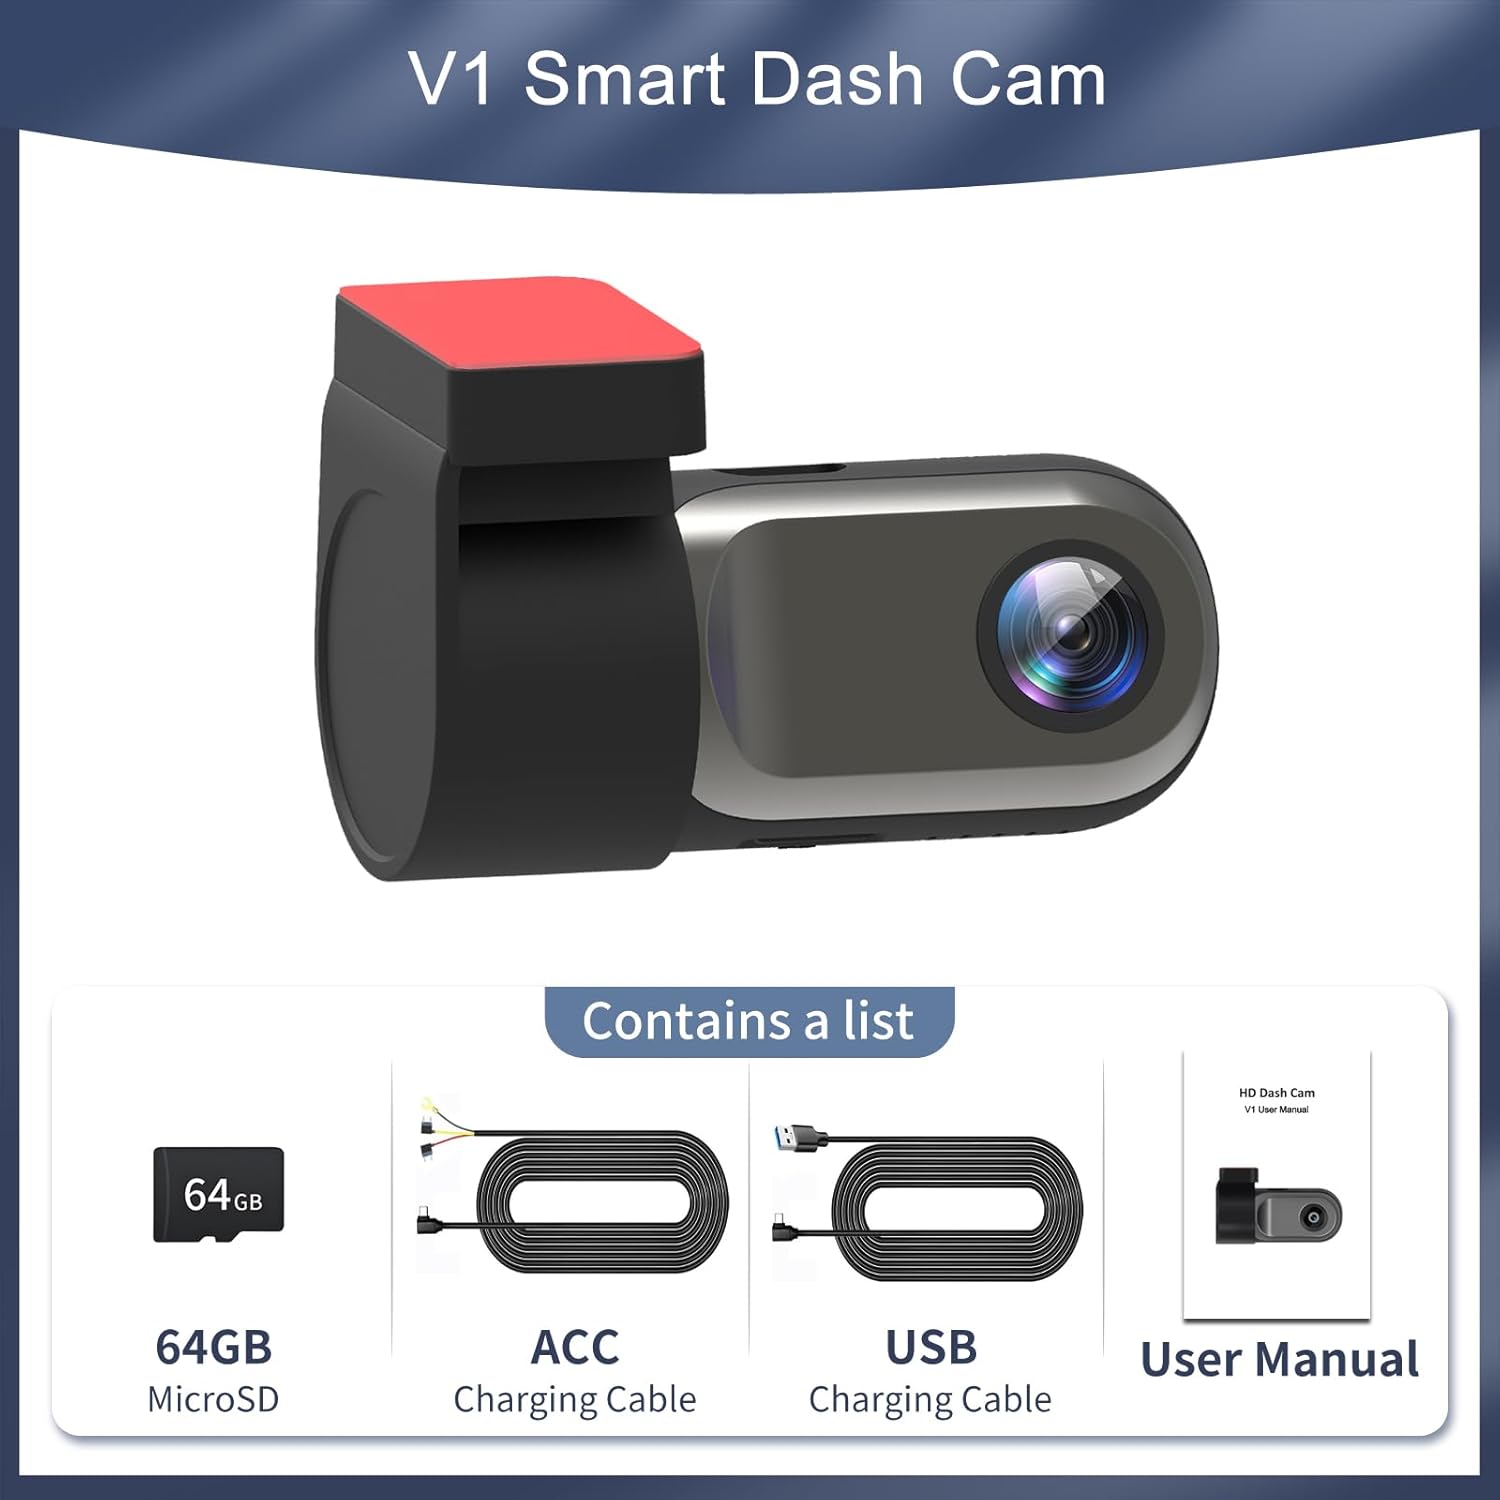
Figure 2.1: Package Contents. The image displays the Petokix V1 Dash Cam, a 64GB microSD card, a USB charging cable, an ACC charging cable (hardwire kit), and the user manual.
3. Producte acabatview
The Petokix V1 is a compact 1080P Full HD car dashboard camera designed for discreet installation and reliable recording. It features a heat-resistant metal shell, adjustable camera angle, and WiFi connectivity for app control.
Característiques principals:
- 1080P Full HD Recording: Captures clear video at 1920x1080P resolution.
- Lent gran angular de 120°: Provides broad road coverage.
- Angle de càmera ajustable: Allows for optimal positioning.
- Visió nocturna i WDR: Enhances clarity in low-light conditions.
- WiFi App Control: View viu footage, download, and manage settings via a smartphone app.
- Enregistrament en bucle: Sobreescriu automàticament els més antics files quan la targeta de memòria està plena.
- Sensor G: Detects collisions and locks current video files per evitar la sobreescriptura.
- Mode d'aparcament 24/7: Records motion or impacts when the vehicle is parked (requires ACC hardwire kit).
- Compact & Hidden Design: Small form factor (2.9"x1.4"x1.8") for discreet placement behind the rearview mirall.
- Construcció resistent a la calor: Durable ABS plastic and metal shell for stable operation in various temperatures.
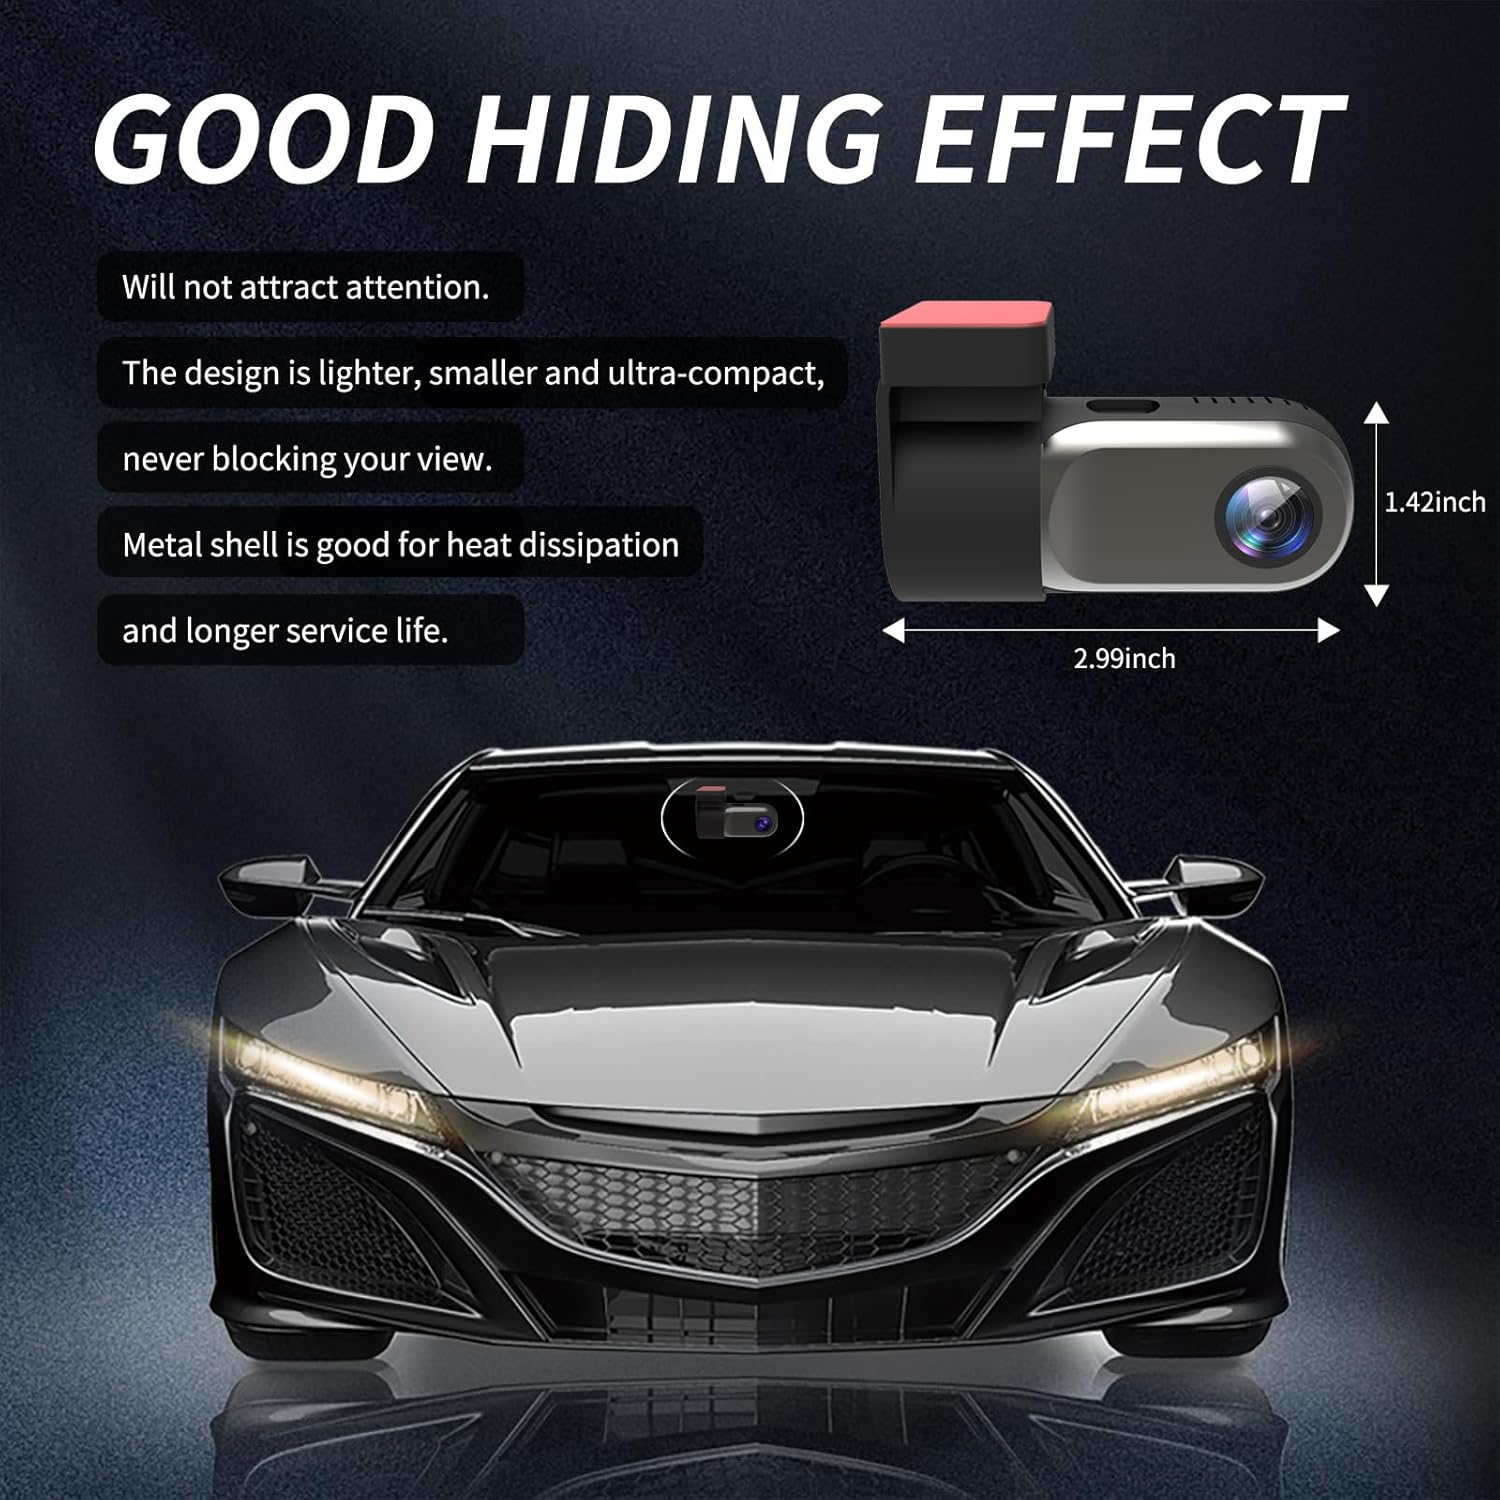
Figure 3.1: Compact Design. The image illustrates the small dimensions of the dash cam, highlighting its ability to be discreetly hidden.

Figure 3.2: Adjustable Lens. The camera lens can rotate 360 degrees, allowing for flexible recording angles.
4. Configuració i instal·lació
4.1 Instal·lació de la targeta SD
- Locate the microSD card slot on the dash cam.
- Insert the provided 64GB microSD card into the slot until it clicks into place. Ensure the card is inserted correctly.
- If using a different microSD card (up to 128GB supported), ensure it is a high-speed Class 10 or U3 card and format it within the app or on a computer before first use.
Video 4.1: Petokix V1 Dash Cam Overview and SD Card Insertion. This video demonstrates the physical features of the dash cam, including how to insert the microSD card, and provides a general overview de les seves capacitats.
4.2 Muntatge de la càmera del salpicader
- Clean the area on your windshield where you intend to mount the dash cam. Ensure it is free of dust and grease.
- Peel off the protective film from the adhesive pad on the mounting bracket.
- Attach the dash cam to the windshield, ideally behind the rearview mirror, to avoid obstructing your view. Apply firm pressure for a few seconds to ensure a secure bond.
- Adjust the camera lens angle as needed. The lens can rotate 360 degrees for optimal recording coverage.
4.3 Connexió d'alimentació
The Petokix V1 Dash Cam offers two power connection methods:
- USB Installation (Driving Mode): Connect the USB Charging Cable to the dash cam and plug the other end into a car USB port or cigarette lighter adapter. The camera will power on and record when the vehicle is running and turn off when the vehicle is off.
- ACC Hardwire Kit Installation (24/7 Parking Mode): Use the ACC Charging Cable to connect the dash cam directly to your car's fuse box. This enables the 24/7 parking monitoring feature. Consult a professional if you are unsure about hardwiring.
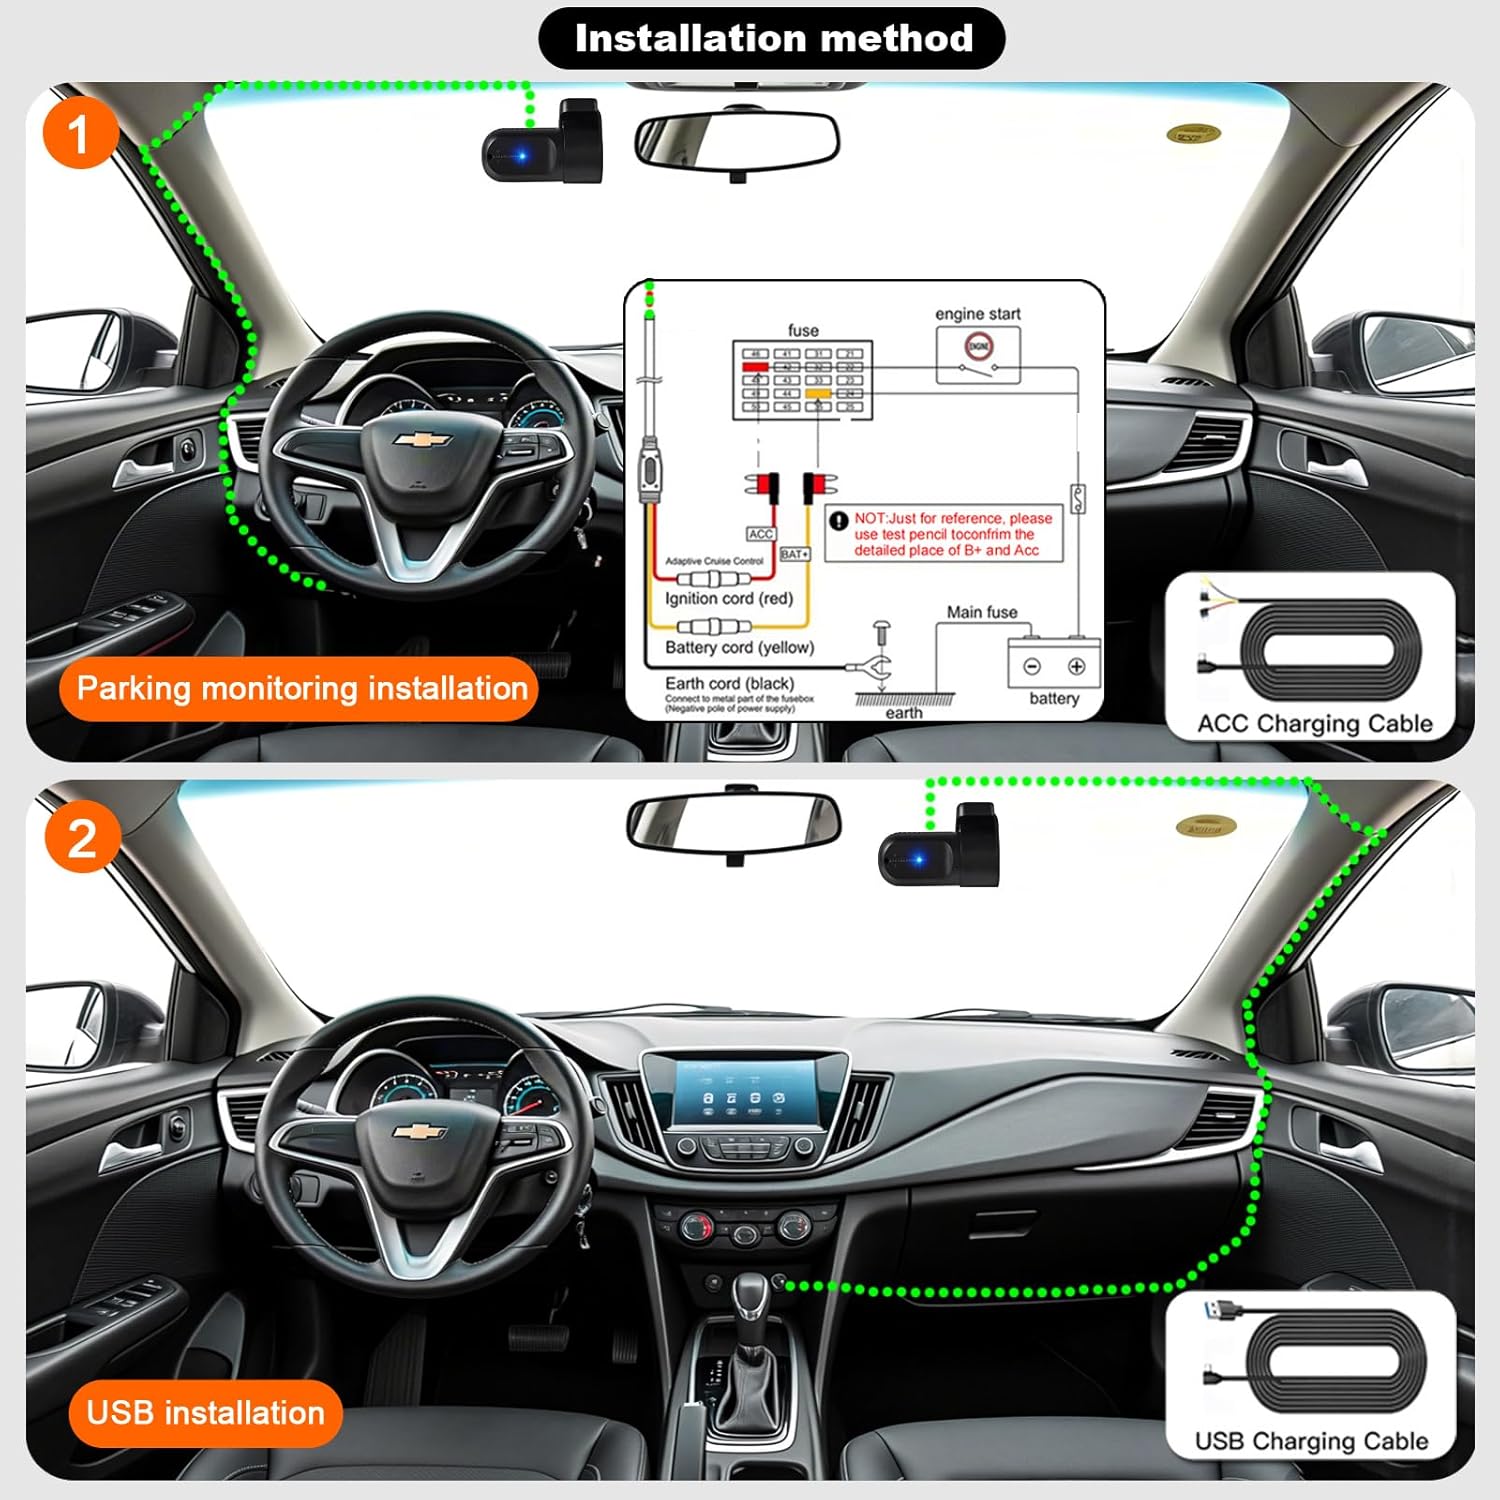
Figure 4.1: Installation Methods. This diagram illustrates how to install the dash cam using either the ACC hardwire kit for parking monitoring or the USB charging cable for standard operation.
5. App Installation and WiFi Connection
The Petokix V1 Dash Cam connects to your smartphone via WiFi for live viewing, video playback, and settings management.
5.1 Descàrrega de l'aplicació
Download the "CarDV" or "Vidure" app from your smartphone's app store (iOS App Store or Google Play Store).
5.2 Connexió mitjançant WiFi
- Assegureu-vos que la càmera del salpicader estigui engegada.
- On your smartphone, go to WiFi settings.
- Look for a WiFi network named "CarDV_XXXX" (where XXXX is a unique identifier) and connect to it.
- Open the downloaded app. The app should automatically detect and connect to the dash cam.
- Un cop connectat, pots view viu footage, accedir als vídeos gravats i ajustar la configuració de la càmera.

Figure 5.1: WiFi App Control. This image displays the smartphone app interface, demonstrating real-time viewing and control over the dash cam via WiFi.
Video 5.1: Petokix Dash Cam App Connection. This video demonstrates the process of connecting the dash cam to a smartphone via WiFi and accessing live footagi a través de l'aplicació.
6. Instruccions de funcionament
6.1 Enregistrament automàtic
Once powered on, the dash cam will automatically begin recording. The recording will stop when the power is disconnected (e.g., when the car engine is turned off, unless 24/7 parking mode is active).
6.2 Enregistrament en bucle
The dash cam continuously records video in short segments (e.g., 1, 3, or 5 minutes). When the microSD card is full, the oldest unlocked video files will be automatically overwritten by new recordings. This ensures continuous recording without manual intervention.
6.3 Sensor G (bloqueig d'emergència)
The built-in G-sensor detects sudden impacts or collisions. When triggered, it automatically locks the current video segment, preventing it from being overwritten by loop recording. These locked files are stored in a separate folder on the microSD card.

Figure 6.1: G-Sensor Emergency Lock. This image visually represents how the G-sensor detects impacts and locks video footage per protegir-lo que no se sobreescrigui.
6.4 Mode d'aparcament 24/7
When the dash cam is connected using the ACC hardwire kit, it can monitor your vehicle even when parked. If motion is detected or an impact occurs, the camera will automatically start recording. This feature provides continuous surveillance for theft prevention and vandalism monitoring.

Figure 6.2: 24-Hour Parking Monitoring. This image illustrates the dash cam's ability to monitor the vehicle continuously while parked, accessible via the mobile app.
6.5 Visió nocturna i WDR
The dash cam is equipped with enhanced night vision capabilities and Wide Dynamic Range (WDR) technology. These features work together to improve video clarity and detail in low-light conditions, ensuring license plates and road signs are visible both day and night.

Figure 6.3: WDR Technology. This image demonstrates the improvement in video quality when Wide Dynamic Range (WDR) is enabled, providing better exposure balance in challenging lighting conditions.

Figure 6.4: 1080P Video Clarity. This image highlights the superior detail captured at 1080P resolution compared to 720P, particularly for identifying elements like license plates.
7. Manteniment
7.1 Formatting the MicroSD Card
It is recommended to format the microSD card regularly (e.g., once a month) to maintain optimal recording performance and prevent data corruption. This can usually be done through the dash cam's mobile app settings.
7.2 Neteja de la lent
Gently wipe the camera lens with a soft, lint-free cloth to ensure clear video recordings. Avoid using abrasive materials or harsh chemicals.
8. Solució De Problemes
| Problema | Causa possible | Solució |
|---|---|---|
| La càmera del salpicader no s'encén. | No hi ha font d'alimentació; cable defectuós. | Check power connection. Ensure the car's ignition is on if using USB power. Test with a different cable if available. |
| App fails to connect to the camera. | Outdated app; incorrect WiFi connection; interference. |
|
| Vídeo footage és borrós o poc clar. | Lent bruta; pel·lícula protectora encara a la lent; enfocament incorrecte. | Clean the lens with a soft cloth. Remove any protective film. Ensure the lens is properly adjusted. |
| MicroSD card error or recording stops. | Card full; card not formatted; incompatible card; faulty card. | Format the microSD card via the app. Ensure the card is Class 10 or U3. Replace the card if the issue persists. |
| El mode d'aparcament no funciona. | Incorrect wiring; feature not enabled. | Ensure the dash cam is connected using the ACC hardwire kit. Check app settings to confirm parking mode is enabled. |

Figure 8.1: App Connection Troubleshooting. This image provides a visual guide for updating the mobile application, a common solution for connection problems.
9. Especificacions
| Característica | Detall |
|---|---|
| Nom del model | V1 |
| Resolució de captura de vídeo | 1080p |
| Camp de View | 120 graus |
| Tecnologia de connectivitat | Wi-Fi |
| Característica especial | App Control, Night Vision, Loop Recording, G-Sensor, Parking Monitor |
| Tipus de muntatge | Windshield Mount (Adhesive) |
| Dimensions del producte | 1.42 x 2.99 x 1.8 polzades |
| Pes de l'article | 0.12 unces |
| Suport d'emmagatzematge | 64GB microSD included, supports up to 128GB |
| Opcions d'energia | USB Charging Cable, ACC Charging Cable (Hardwire Kit) |
| Temperatura de funcionament | Fins a 176 °F (80 °C) |
10. Garantia i Suport
For warranty information and technical support, please refer to the contact details provided with your product packaging or visit the official Petokix weblloc web. Conserveu el rebut de compra com a comprovant de compra per a reclamacions de garantia.