
1. Producte acabatview
This manual provides essential information for the safe and efficient operation of your Sunster 8KW Portable Diesel Heater. This 12V/24V diesel air heater features an upgraded design with AC 110-240V power adapter, turbo heat, ventilation mode, automatic start/stop, and APP control, suitable for various applications including vans, RVs, trucks, and campers

Figure 1: Sunster 8KW Portable Diesel Heater with accessories.
2. Informació de seguretat
Read all safety warnings and instructions carefully before use. Failure to follow these instructions may result in fire, electric shock, or serious injury.
- Assegureu-vos que hi hagi una ventilació adequada quan feu servir l'escalfador per evitar l'acumulació de monòxid de carboni.
- No bloquegeu les reixetes d'entrada ni d'extracció d'aire.
- Mantingueu els materials inflamables a una distància segura de l'escalfador.
- Always use the specified fuel type (diesel).
- Ensure all connections are secure and free from leaks.
- No feu funcionar l'escalfador en espais tancats i sense ventilació.
- This heater is equipped with multiple safety protection functions, including overheating, short circuit, reverse connection, and overvoltagprotecció.
3. Contingut del paquet
Verify that all items are present after unpacking:
- Diesel heater (with LCD control panel)
- Interruptor a distància
- AC power supply (110-240V)
- Installation Accessories (including exhaust pipe, intake pipe, air filter, silencer, clamps, screws, battery power cord, foot stand, fixed plate)
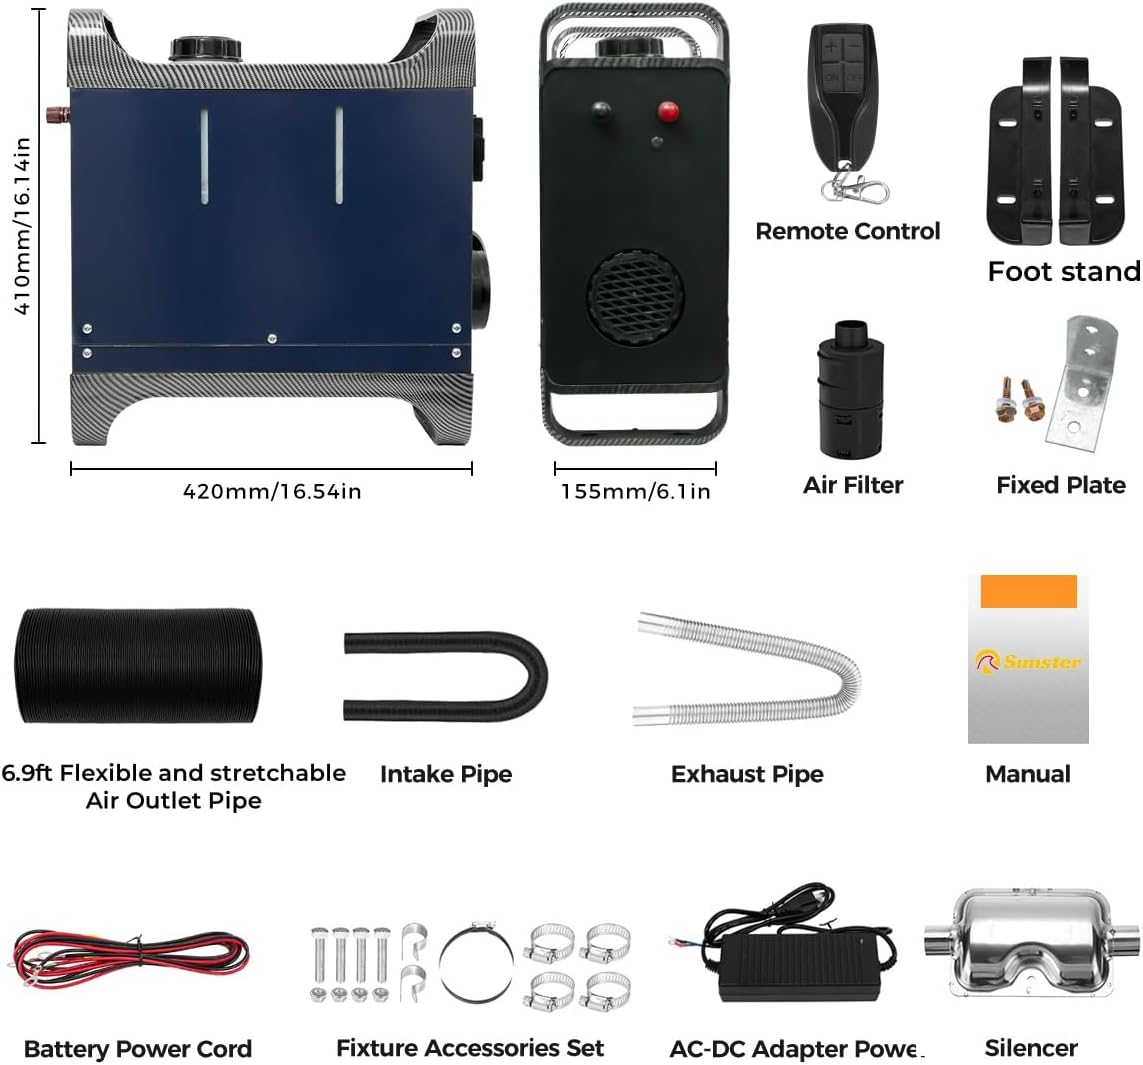
Figura 2: Components i accessoris inclosos.
4. Característiques del producte
- Upgraded Smart Panel: Provides constant temperature control (Automatic Start&Stop), timing function, ventilation mode, and turbo heat mode.
- Control de l'aplicació Bluetooth: Adjust settings, create heating plans, and monitor performance via the 'Sunster' app.
- Doble font d'alimentació: Equipped with 12/24V DC and 110-240V AC wiring options for vehicle and household use.
- Funció de ventilació: Circulates air when not heating, useful in warmer conditions.
- Inici/Parada automàtica: Shuts off when the set temperature is reached and reactivates when the temperature drops, ensuring consistent heat and energy efficiency.
- Double Noise Reduction: Features a silent fan and upgraded silent oil pump for quiet operation.
- Protecció de seguretat: Includes overheating, short circuit, reverse connection, and overvoltagprotecció.

Figure 3: Intelligent LCD Panel and Remote Control.

Figure 4: Dual Power Supply Coverage for versatile use.
5. Especificacions
| Característica | Especificació |
|---|---|
| Marca | Solster |
| Model | 8KW Portable Diesel Heater |
| Wattage | 8 KW |
| Tipus de combustible | Dièsel |
| Font d'alimentació | 12V/24V CC, 110-240V CA |
| Configuració de la temperatura mínima | 8 graus centígrads |
| Configuració de la temperatura màxima | 36 graus centígrads |
| Nombre de velocitats | 10 |
| Pes de l'article | 21.4 lliures |
| Dimensions del paquet | 20 x 19.5 x 9 polzades |
| Característiques especials | Auto Climate Control, Automatic Start & Stop, Bluetooth APP Function, Turbo Heat Mode, Ventilation Function |
6. Configuració i instal·lació
Follow these steps for proper setup and installation of your diesel heater. Refer to the installation video for visual guidance.
- Desembalatge: Verify all accessories are complete as per the package contents list.
- Attach Bottom Supports: Align the bottom corner supports with the holes on both sides of the machine's base. Use a soft hammer to gently tap them into place.
- Preparació de la superfície de muntatge: Measure the distance between the intake and exhaust pipe ports on the heater. Mark and drill corresponding holes on your mounting surface (e.g., floor of a vehicle, workbench).
- Connect Exhaust and Intake Pipes:
- Straighten the flexible exhaust pipe.
- Posa un clamp on one end of the exhaust pipe and screw it into the bottom-left interface of the heater. Tighten the clamp de forma segura.
- Take out the intake pipe, place a clamp on one end, and screw it into the bottom-right interface. Tighten the clamp.
- Insert both pipes through the drilled holes in your mounting surface.
- Secure Heater: Mark the positions for the bottom corner holes on the mounting surface. Drill pilot holes and secure the heater using the provided screws and nuts.
- Install Air Filter: Posa un clamp on one end of the intake pipe. Screw the air filter onto the intake pipe and tighten the clamp. Use a fixing plate on the intake pipe sleeve and secure it with screws in the desired position.
- Install Silencer: Posa un clamp on one end of the exhaust pipe. Screw the silencer onto the exhaust pipe and tighten the clamp. Attach the fixing screw and right-angle fixing plate to the silencer and secure it.
- Heating Duct Installation: Open the heating duct. Place a clamp at the duct interface and install it at the air outlet interface of the heater. Tighten the clamp to fix the heating duct.
- Connexió d'alimentació:
- Remove the machine terminal position cover.
- For AC power: Connect the AC power adapter to the heater's power input and then to a 110-240V AC outlet.
- For DC power: Place the red (positive) and black (negative) copper rings of the battery power cord into the corresponding terminals on the heater and tighten them. Connect the other end to your 12V or 24V battery, ensuring correct polarity.
Video 1: Sunster Diesel Heater Installation Operation. This video demonstrates the step-by-step process of assembling and installing the diesel heater, including connecting pipes, mounting, and power connections.
Important: Flammable objects in contact with the exhaust pipe need to be filled with thermal insulation material. The exhaust pipe should be kept straight and not tilted upward to ensure smooth exhaust.
7. Guia de funcionament
Your Sunster diesel heater can be controlled via the LCD panel, remote control, or Bluetooth APP. This section details the functions of the LCD control panel.
Video 2: 2302B LCD Switch Operation. This video provides a detailed walkthrough of the LCD control panel's functions, including power, gear adjustment, numerical settings, and various modes.
7.1 Encès/Apagat
- Encendre: In shutdown state, press the [ON/OFF] button on the remote or the red button on the LCD panel.
- Per apagar: In power-on state, press the [ON/OFF] button on the remote or the red button on the LCD panel.
7.2 Gear Adjustment (Mode Switching)
In power-on state, press the [knob] on the LCD panel to switch between modes:
- Mode de control de temperatura: Adjusts heating based on a set temperature.
- Mode de temperatura constant: Maintains a consistent temperature.
- Mode d'engranatge: Adjusts heating power by gear level.
7.3 Numerical Adjustment
In power-on state, rotate the [knob] to adjust values:
- Rotate clockwise to increase gear/temperature (+1), up to 10 gears / 36°C.
- Rotate counterclockwise to decrease gear/temperature (-1), minimum to 1 gear / 8°C.
7.4 Basic Settings (Base Model)
In power-on state, long press the [ON/OFF] button for 3 seconds to enter the basic settings interface. The upper left corner shows setting items (F0-FC). Rotate the [knob] to navigate and adjust settings. Press the [knob] again to confirm modification.
| Element de configuració | Descripció | Adjustment Range/Options |
|---|---|---|
| F0 | Hora actual | Ajustable |
| F1 | Hora de posada en marxa | 30 minutes is 1 unit, 0-10 hours |
| F2 | Running Time (After starting) | 30 minutes is 1 unit, 0-10 hours |
| F3 | Self-starting Switch Settings | ON (open) / OFF (closed) |
| F4 | Canvi d'idioma | Chinese/English/Russian/Voice off |
| F5 | Compensació de temperatura | -9 ~ 9 °C |
| F6 | Volum del dipòsit de combustible | 5L is 1 unit, 5-50L |
| F7 | Tipus de bomba d’oli | Adjustable (e.g., 16U, 22U, 32U) |
| F8 | Constant Temperature Heating | ON (open) / OFF (closed) |
| F9 | Temperature Switching Unit | ° F / ° C |
| FA | Brillantor de la pantalla | 5-100 |
| FB | Full Tank (Reset) | Long press [knob] to reset after prompt tone. |
| FC | CO Numerical Detection | Press [knob] twice to check CO value. |
7.5 Engineering Mode
In power-on state, long press the [knob] for 5 seconds to enter the engineering mode. The upper right corner shows the current project (E0-E9). Rotate the [knob] to adjust the item to view dades.
- E0: Heater main board version number
- E1: Fault code
- E2: Shell temperature
- E3: Supply voltage
- E4: Heater running gear
- E5: Cab temperature
- E6: Altitude
- E8: Remote control matching
- E9: Bluetooth matching
7.6 Coincidència de control remot
- In shutdown state, press the [knob] three times in a row. The screen will display 'P-1'.
- Press any button on the remote control. If the match is successful, the interface will automatically exit. The remote can now operate the heater.
- To clear matching data: Please press and hold the [ON/OFF] button when powered on. Wait for the interface to show that 'CLr' becomes 'SUC'.
7.7 Manual Fuel Pumping
Long press the [knob] for 5 seconds when powered on and turned off for the first time. The screen flashes and shows a 300-second countdown. Wait for the countdown to end or press [ON/OFF] to end pumping oil.
7.8 Connexió Bluetooth
- Open your mobile device's APP Store and search for 'Sunster' (or 'airHeaterByBLE' if 'Sunster' is not found). Download and install the app.
- In power-on state, long press the [knob] for 5 seconds to enter the engineering mode. Adjust to 'En09' to view the Bluetooth code.
- Open the mobile APP and turn on Bluetooth on your device.
- Cerca Bluetooth devices within the app and connect to your heater.
- Once connected, the heater can be operated through the mobile APP.
8. Manteniment
Regular maintenance ensures optimal performance and longevity of your diesel heater.
- Neteja: Netegeu periòdicament l'exterior de l'escalfador amb un drap suau i sec.amp cloth. Ensure no water enters the internal components.
- Filtre d'aire: Check and clean the air filter regularly. Replace if heavily soiled or damaged.
- Sistema de combustible: Use clean, high-quality diesel fuel. Avoid using contaminated fuel, which can lead to blockages and damage.
- Sistema d'escapament: Inspect the exhaust pipe and silencer for any blockages, damage, or leaks. Ensure the exhaust path is clear.
- Connexions elèctriques: Comproveu periòdicament totes les connexions elèctriques per comprovar si estan ben ajustades i si hi ha signes de corrosió.
9. Solució De Problemes
Si teniu problemes amb el vostre escalfador, consulteu els passos habituals següents per a la resolució de problemes:
| Problema | Causa possible | Solució |
|---|---|---|
| L'escalfador no s'engega | No power, low fuel, clogged fuel line, faulty glow plug | Check power connections, refill fuel, inspect/clean fuel line, consult service for glow plug replacement |
| Sense sortida de calor | Incorrect mode, low fan speed, air intake/exhaust blocked | Verify operating mode, increase fan speed, clear blockages |
| Fum excessiu | Poor fuel quality, incorrect fuel/air mixture, carbon buildup | Use clean diesel, check air filter, perform maintenance to remove carbon |
| Soroll inusual | Loose components, fan obstruction, worn bearings | Inspect for loose parts, clear fan area, consult service for worn parts |
| Es mostra el codi d'error | Error específic del sistema | Refer to the Engineering Mode (E1) for fault code details and consult the manufacturer's support. |
10. Informació de la garantia
This product is covered by a manufacturer's warranty. Please retain your proof of purchase for any warranty claims. For specific warranty terms and conditions, or to inquire about extended protection plans, please contact Sunster customer support or refer to the product's official documentation at the time of purchase.