1. Introducció
This manual provides essential information for the safe and efficient operation of your GROWNEER 12 Inch Shutter Exhaust Fan with Temperature Humidity Controller. This fan is designed to improve air quality and regulate environmental conditions in various spaces such as greenhouses, garages, and sheds.
The fan features a 1200 CFM airflow capacity, capable of ventilating areas up to 1400 sq. ft. It includes an intelligent remote control for convenient adjustment of temperature, humidity, and fan speed settings.
2. Informació de seguretat
Llegiu atentament totes les instruccions de seguretat abans de la instal·lació i el funcionament. Si no seguiu aquestes instruccions, podeu patir descàrregues elèctriques, incendis o lesions greus.
- Assegureu-vos que la font d'alimentació coincideixi amb el volum del ventiladortage requirements (120 Volts AC).
- Disconnect power before installing, cleaning, or performing any maintenance.
- No feu funcionar el ventilador amb un cable o un endoll danyats.
- Mantingueu les mans, els cabells i la roba ampla allunyats de les peces mòbils durant el funcionament.
- Install the fan in a location where it is protected from direct water exposure, unless specifically designed for such conditions. The fan is designed to resist moisture intrusion, but proper installation is key.
- Aquest aparell no està pensat per ser utilitzat per persones (inclosos nens) amb capacitats físiques, sensorials o mentals reduïdes, o amb manca d'experiència i coneixements, tret que hagin rebut la supervisió o instruccions sobre l'ús de l'aparell per una persona responsable de la seva seguretat. .
3. Contingut del paquet
Verifiqueu que tots els components siguin presents al paquet:
- Ventilador d'extracció d'obturador de 12 polzades
- Controlador de temperatura i humitat
- Manual d'instal·lació
- Expansion bolts (5 pieces, 4 required + 1 spare)

Figura 3.1: Contents of the GROWNEER 12 Inch Shutter Exhaust Fan package.
4. Especificacions
| Característica | Especificació |
|---|---|
| Marca | CREIXADOR |
| Número de model | AX252303002 |
| Dimensions del producte (P x A x A) | 14.96 "P x 14.96" W x 7.48" H |
| Voltage | 120 Volts |
| Wattage | 30 watts |
| Capacitat de cabal d'aire | 1200 peus cúbics per minut (CFM) |
| Nivell de soroll | 50 decibels |
| Nombre de velocitats | 10 |
| Mètode de control | Control remot |
| Material | Acer d'aliatge |
| Ús interior/exterior | Interior, Exterior |

Figura 4.1: Dimensions del producte i especificacions clau.
5. Configuració i instal·lació
The GROWNEER Shutter Exhaust Fan is designed for straightforward installation in various locations such as attics, sheds, or walls. Ensure you have the necessary tools and follow local electrical codes.
5.1 Muntatge del ventilador
- Tria la ubicació: Select a suitable location for the fan, ensuring adequate space for airflow and access for maintenance.
- Preparació de l'obertura: Create an opening in the wall or structure that matches the fan's dimensions.
- Ventilador segur: Mount the fan securely using the provided expansion bolts. Ensure the fan is level and firmly attached to prevent vibration and noise.
- Connexió d'alimentació: Plug the fan into a compatible 120V AC power outlet. The fan comes with a 2-meter long power cord for flexible placement.

Figura 5.1: Example installation and remote control range.
5.2 Emparellament del control remot
The fan operates wirelessly with the included temperature and humidity controller. Follow these steps to pair the controller with the fan:
- Introduïu les piles al comandament a distància (no incloses).
- Ensure the fan is plugged into a power source.
- Press the power button on the remote control. The fan should respond by turning on. If not, ensure the remote is within the 20-meter operating range and try again.
Nota: There is no manual switch on the fan unit itself. All operations are controlled via the wireless remote. If pairing issues persist, ensure batteries are correctly inserted and fully charged, and that there are no significant obstructions between the remote and the fan.
Vídeo 5.1: Demonstration of fan installation and remote control pairing and operation.
6. Instruccions de funcionament
The intelligent remote control allows for precise management of your exhaust fan. Familiarize yourself with the control panel layout:
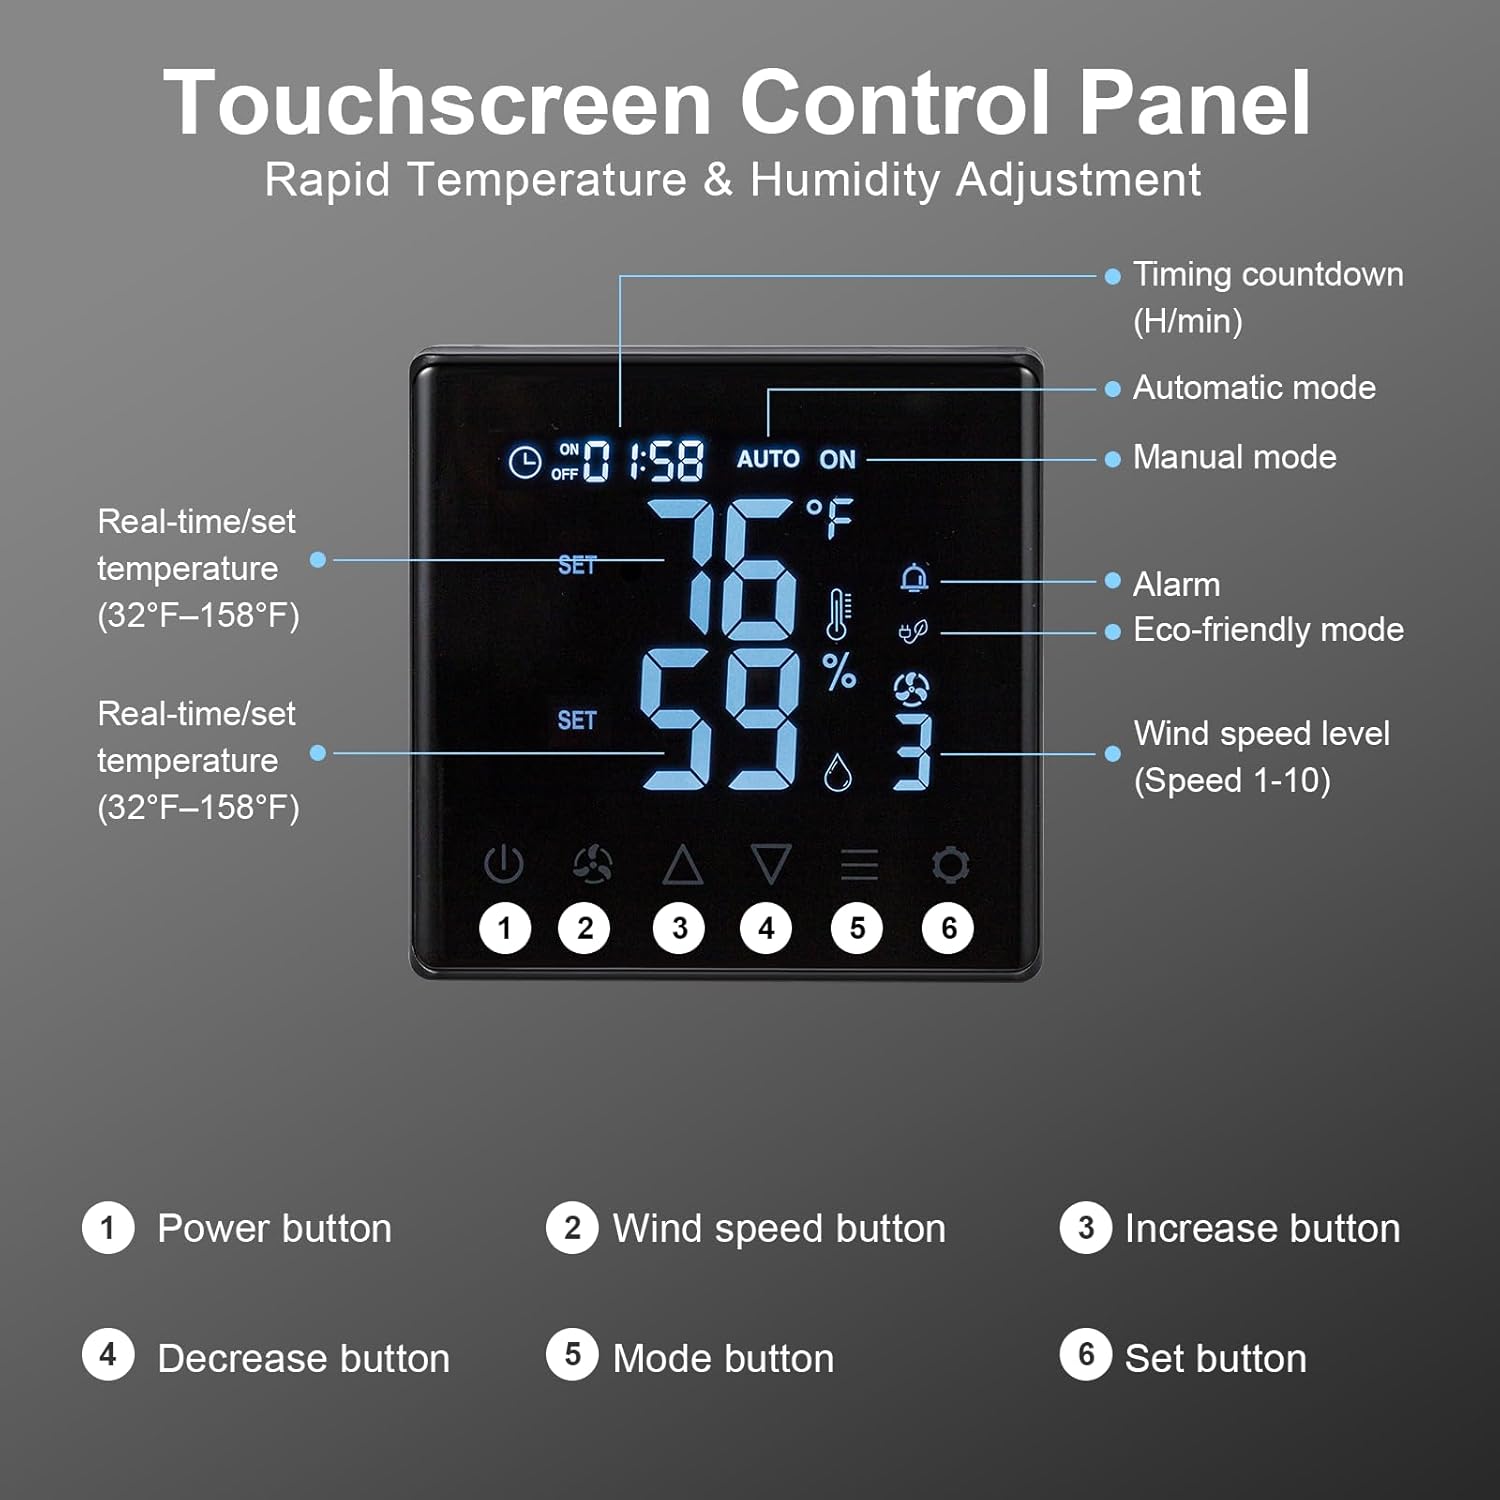
Figura 6.1: Touchscreen Control Panel overview.
- Botó d'encesa: Encén o apaga el ventilador.
- Botó de velocitat del vent: Cycles through 10 adjustable fan speeds.
- Botons d'augment/disminució: Adjust temperature, humidity, or timer settings upwards or downwards.
- Botó de mode: Selects between operating modes:
- Mode manual: Fan operates continuously at the set speed.
- Mode automàtic: Fan automatically turns ON/OFF based on set temperature and humidity thresholds.
- Eco-friendly Mode: Optimizes fan operation for energy efficiency based on environmental conditions.
- Botó de configuració: Confirms selected settings for temperature, humidity, or timer.
To set desired temperature and humidity, enter Auto mode, then use the Increase/Decrease buttons to adjust the target values, and the Set button to confirm.

Figura 6.2: Fan operating with 10-level wind control.
7. Manteniment
Un manteniment regular garanteix un rendiment òptim i una llarga vida útil del ventilador.
- Neteja: Periodically clean the fan blades and housing to prevent dust and debris buildup, which can reduce efficiency and increase noise. Desconnecteu sempre l'alimentació abans de netejar. Utilitzeu un suau, damp tela. No utilitzeu netejadors abrasius.
- Shutter Inspection: Check the automatic gravity shutters for smooth operation. Ensure they open and close freely without obstruction to protect the fan from rain and debris when off.
- Cable d'alimentació: Inspect the power cord for any signs of damage. If damaged, contact customer support for replacement.

Figura 7.1: Automatic gravity shutters protecting the fan from elements.
8. Solució De Problemes
If you encounter issues with your GROWNEER exhaust fan, refer to the following common problems and solutions:
| Problema | Causa possible | Solució |
|---|---|---|
| El ventilador no s'encén. | No power; Remote not paired; Dead remote batteries. | Check power connection. Ensure remote batteries are fresh and correctly inserted. Re-attempt pairing as described in Section 5.2. |
| El comandament a distància no respon. | Out of range; Obstruction; Low/dead batteries. | Move closer to the fan (within 20m). Remove any large obstructions. Replace remote batteries. |
| Low airflow or unusual noise. | Fan blades or shutters obstructed; Dust buildup. | Disconnect power and inspect fan blades and shutters for obstructions. Clean any dust or debris. |
| Automatic mode not activating. | Temperature/humidity settings not met; Sensor issue. | Verify the set temperature and humidity thresholds. Ensure the sensor on the remote is not covered or obstructed. |
9. Garantia i Suport
GROWNEER products are manufactured to high-quality standards. For warranty information, technical support, or replacement parts, please contact GROWNEER customer service. Keep your purchase receipt as proof of purchase.
For further assistance, visit the official GROWNEER store: GROWNEER Store on Amazon