
1. Introducció
Thank you for choosing the Kanto SUB6 Sealed Powered Subwoofer. This manual provides essential information for the proper setup, operation, and maintenance of your new audio device. The SUB6 is engineered to deliver precise and impactful low-frequency sound, enhancing your music, movies, and gaming experiences without occupying excessive space.
Key features of the Kanto SUB6 include:
- Disseny ultracompacte: Its small footprint allows for versatile placement, fitting comfortably in various environments.
- Low-Frequency Precision: A sealed enclosure design ensures accurate and distortion-free bass reproduction.
- Room-Filling Power: Equipped with a 100 W RMS (200 W Peak) Class-D amplifier and a 6-inch paper cone driver for dynamic bass.
- Integració perfecta: Features an adjustable crossover filter (40 Hz - 175 Hz) and a 0°/180° phase switch for optimal matching with your existing audio system.
- Construcció duradora: Built with acoustic-grade MDF cabinets for long-lasting quality and aesthetic appeal.
2. Instruccions de seguretat importants
Please read all instructions carefully before operating your SUB6 subwoofer. Retain this manual for future reference.
- Font d'alimentació: Connect the subwoofer only to an AC power source as indicated on the unit.
- Ventilació: Assegureu-vos que hi hagi una ventilació adequada al voltant de la unitat. No bloquegeu cap obertura de ventilació.
- Aigua i humitat: Do not expose the unit to water, rain, or moisture. Do not place objects filled with liquids, such as vases, on the unit.
- Calor: Mantingueu la unitat allunyada de fonts de calor com ara radiadors, registres de calor, estufes o altres aparells que produeixin calor.
- Neteja: Netegeu-ho només amb un drap sec. Desendolleu la unitat de la presa de corrent abans de netejar-la.
- Manteniment: No intenteu atendre aquest producte vosaltres mateixos. Consulteu tots els serveis a personal de servei qualificat.
- cables: Eviteu que el cable d'alimentació sigui trepitjat o pessigat, especialment als endolls, els endolls i el punt on surten de l'aparell.
3. Què hi ha a la caixa
Verifiqueu que tots els components siguin presents abans de continuar amb la configuració:
- Kanto SUB6 Powered Subwoofer
- Cable d'alimentació
- Manual d'usuari
4. Configuració
4.1 Col·locació
The compact design of the SUB6 allows for flexible placement. Consider the following guidelines:
- Near Main Speakers: Placing the subwoofer near your main speakers can help create a more cohesive soundstage.
- Room Corners: Corners often provide the most bass output, but can sometimes lead to boomy or uneven bass. Experiment with distance from the corner.
- Posició d'escolta: The "subwoofer crawl" method can help find the best placement. Place the subwoofer at your primary listening position, then crawl around the room to find where the bass sounds best. Place the subwoofer in that spot.
- Under Desks or Furniture: Its small size makes it ideal for discreet placement in smaller rooms or under furniture.

4.2 Connexions
The SUB6 connects to your audio system via RCA cables.
- Apagar: Ensure your audio receiver/amplifier and the SUB6 are powered off before making any connections.
- Entrada RCA: Connect an RCA cable from the "SUB OUT" or "LFE OUT" port on your receiver/amplifier to the "SUB IN" (L or R) port on the SUB6. If your receiver has a single LFE output, you can use either the L or R input on the SUB6. For stereo RCA outputs, connect both L and R inputs.
- Connexió d'alimentació: Connect the provided power cord to the AC input on the SUB6 and then to a wall outlet.
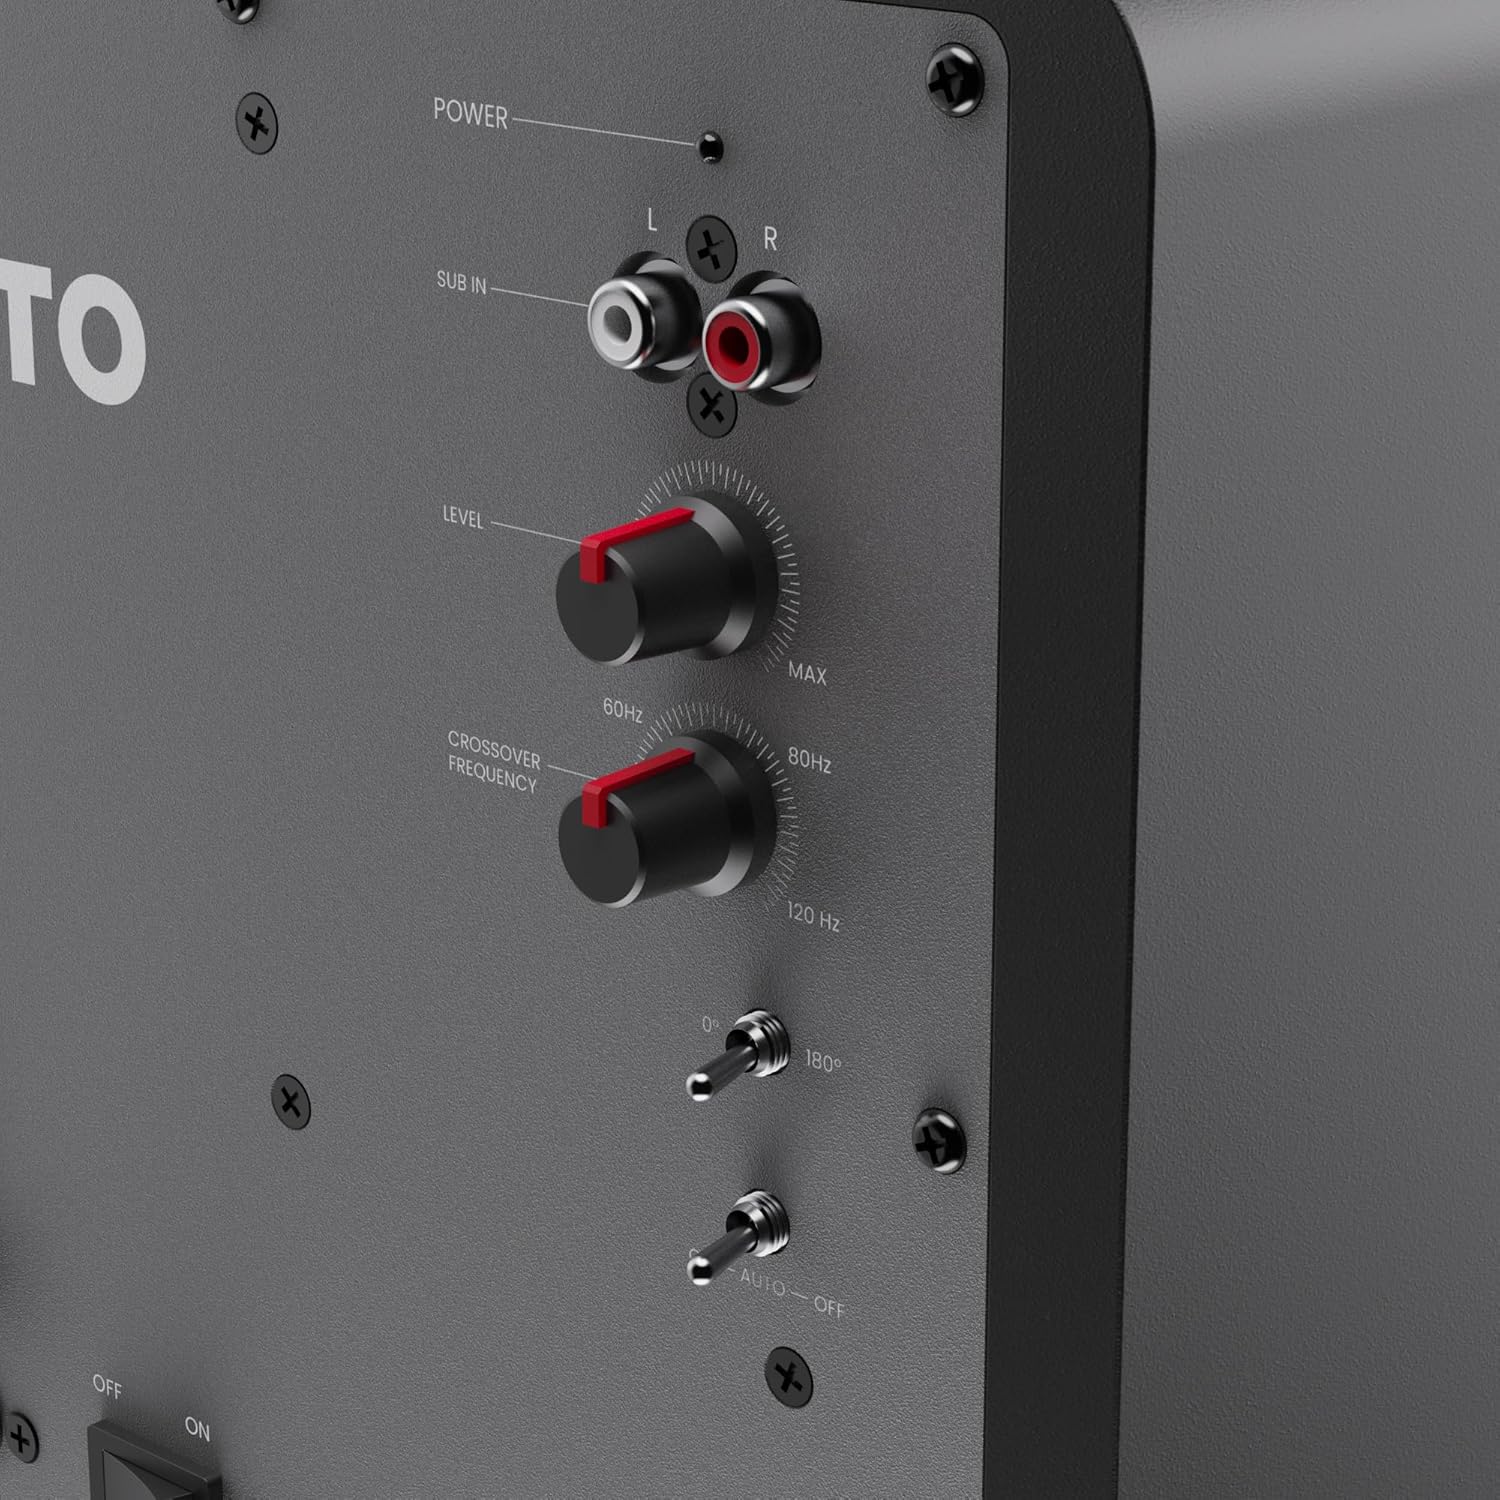
4.3 Initial Adjustments
After connecting, you will need to adjust the subwoofer's settings to blend it seamlessly with your main speakers.
- Level (Volume): Start with the 'LEVEL' knob set to its minimum position.
- Freqüència d'encreuament: Set the 'CROSSOVER FREQUENCY' knob to match the low-frequency extension of your main speakers. A common starting point is 80 Hz. If your main speakers are small, you might set it higher (e.g., 100-120 Hz). If they are larger, you might set it lower (e.g., 60 Hz). If your receiver has an LFE output and manages the crossover, set the SUB6 crossover to its maximum (175 Hz).
- Interruptor de fase: Set the 'PHASE' switch to 0°. You may experiment with 180° later to see which setting provides more impactful and coherent bass at your listening position.
- Auto-Off Switch: Set the 'AUTO-OFF' switch to 'ON' for automatic power management, or 'OFF' for continuous power.
5. Operating Your SUB6 Subwoofer
5.1 Encès/Apagat
Once connected, power on your receiver/amplifier first, then the SUB6. If the 'AUTO-OFF' switch is set to 'ON', the subwoofer will automatically enter standby mode after approximately 15 minutes of no audio signal and will power on when a signal is detected. If set to 'OFF', the subwoofer will remain on continuously.
5.2 Fine-Tuning the Sound
Play some familiar music or movie scenes with strong bass content and adjust the following:
- Nivell: Slowly increase the 'LEVEL' knob until the subwoofer's bass output blends smoothly with your main speakers. The subwoofer should not overpower the main speakers but rather extend their low-frequency response.
- Freqüència d'encreuament: Adjust the 'CROSSOVER FREQUENCY' knob up or down. The goal is to find a setting where the bass transitions seamlessly from your main speakers to the subwoofer, without any noticeable gaps or overlaps in frequency.
- Interruptor de fase: Toggle the 'PHASE' switch between 0° and 180°. Listen for the setting that provides the most impactful and coherent bass at your listening position. This adjustment helps ensure the subwoofer's sound waves are in sync with your main speakers.

6. Manteniment
Proper care will ensure the longevity and optimal performance of your SUB6 subwoofer.
- Neteja: Use a soft, dry cloth to clean the cabinet. Avoid using abrasive cleaners, waxes, or solvents as they may damage the finish.
- Pols: Regularly dust the unit to prevent accumulation, especially around the driver and rear panel.
- Col·locació: Avoid placing the subwoofer in direct sunlight or near sources of excessive heat or moisture.
- Manipulació: When moving the subwoofer, lift it carefully from the base. Avoid dropping or subjecting it to strong impacts.
7. Solució De Problemes
If you encounter issues with your SUB6, refer to the following common problems and solutions:
| Problema | Causa possible | Solució |
|---|---|---|
| No hi ha so del subwoofer |
|
|
| Baixos distorsionats o retumbants |
|
|
| Weak or thin bass |
|
|
| So de brunzit o brunzit |
|
|
8. Especificacions
| Característica | Detall |
|---|---|
| Marca | Kanto |
| Número de model | SUB6VMB |
| Tipus d'altaveu | Subwoofer |
| Diàmetre del woofer | 6 polzades |
| Potència de sortida màxima dels altaveus | 200 watts (màxim) / 100 watts (RMS) |
| Resposta de freqüència | 40 Hz - 175 Hz |
| Tecnologia de connectivitat | RCA |
| Mode de sortida d'àudio | Stereo (with subwoofer) |
| Tipus de muntatge | Terra de peu |
| Material de tancament | Acoustic grade MDF cabinets, sealed construction |
| Característiques addicionals | 0° and 180° Phase Switch, Adjustable Crossover Filter, Class D Ampmés viu |
| Mètode de control | Knobs, Switches |
| Impedància | 3 ohms |
| Dimensions de l'article (D x W x H) | 8.7 "P x 8.7" W x 9.5" H |
| Pes de l'article | 5 quilos |
| Font d'alimentació | AC |
9. Informació de la garantia
Kanto Living Inc. (Kanto) warrants the equipment it manufactures to be free from defects in material and workmanship for a limited warranty period. The specific duration of the warranty may vary by region and product. Please refer to the official Kanto website or your purchase documentation for detailed warranty terms and conditions applicable to your SUB6 subwoofer.
This warranty covers parts and labor for repair or replacement of the product. It does not cover damages resulting from misuse, improper installation, accident, neglect, or unauthorized modification. Proof of original purchase is required for warranty service.
10. Atenció al client
If you have any questions, require technical assistance, or need to arrange for warranty service, please contact Kanto customer support:
- Weblloc: Visita www.kantoaudio.com per a preguntes freqüents, articles de suport i informació de contacte.
- Correu electrònic: Refer to the support section of the Kanto weblloc web per obtenir l'adreça de correu electrònic adequada.
- Telèfon: Contact details for regional support lines can be found on the Kanto weblloc.
Please have your product model (SUB6) and serial number ready when contacting support.