AZZUNO MIG-145L
AZZUNO MIG Welder 145A & Welding Helmet User Manual
Model: MIG-145L
1. Introducció
This manual provides comprehensive instructions for the safe and effective operation, setup, and maintenance of your AZZUNO MIG Welder 145A and accompanying Auto-Darkening Welding Helmet. Please read this manual thoroughly before using the equipment to ensure proper function and personal safety.

Figure 1: AZZUNO MIG Welder 145A and Auto-Darkening Welding Helmet. This image displays the complete welding system, including the main welder unit and the auto-darkening helmet, ready for use.
2. Informació de seguretat
ADVERTÈNCIA: La soldadura pot ser perillosa. Seguiu sempre les precaucions de seguretat per evitar lesions o la mort.
- Descàrrega elèctrica: Can kill. Ensure proper grounding. Do not touch live electrical parts. Wear dry gloves.
- Fums i gasos: Pot ser perillós per a la salut. Mantingueu el cap allunyat dels fums. Utilitzeu la ventilació o l'extracció per eliminar els fums de la zona de respiració.
- Raigs d'arc: Can burn eyes and skin. Wear a welding helmet with a proper shade filter to protect your eyes and face. Wear appropriate protective clothing.
- Incendi i explosió: Les espurnes de soldadura poden causar incendis o explosions. Mantingueu els materials inflamables allunyats de la zona de soldadura. Tingueu a mà un extintor.
- Parts calentes: Pot causar cremades greus. Deixeu que l'equip es refredi abans de tocar-lo.
- Soroll: El soroll excessiu pot danyar l'oïda. Feu servir protecció auditiva.
Always consult local safety regulations and standards before operating welding equipment.
3. Contingut del paquet
Verify that all items listed below are included in your package. If any items are missing or damaged, contact AZZUNO customer support.

Figure 2: Included Accessories. This image illustrates the various components and accessories that come with the AZZUNO MIG Welder 145A, such as the electrode holder, ground clamp, MIG torch, contact tips, hose bands, drive roller, hammer, gas hose, flux wire, solid wire, and 110V~220V adapter cord.
- AZZUNO MIG-145L Welder Unit
- Auto-Darkening Welding Helmet (AZNH-1098)
- Portaelèctrodes
- Terra Clamp
- Torxa MIG (14AK)
- Contact Tips (x2)
- Hose Bands (x2)
- Corró d'accionament
- Martell
- Mànega de gas
- Flux Wire (1lb)
- Solid Wire (1lb)
- Cable adaptador de 110V~220V
4. Característiques del producte
- Capacitat de soldadura 4 en 1: Supports Gas MIG, Gasless Flux Core MIG, Lift TIG, and Stick welding modes.
- Dual Voltage Entrada: Compatible with both 110V and 220V power sources.
- Large Clear LED Display: Upgraded oversized screen for intuitive operation and setting adjustments.
- Control sinèrgic: Automatically adjusts settings for optimal welding performance.
- Modes de soldadura: Includes 2T (manual), 4T (continuous), and SPOT (timed) weld settings.
- Manual Wire Feed Button: For quick wire feeding.
- Auto-Darkening Welding Helmet:
- True Color Large Viewing: Main lens (3.94"×3.82") with 1/1/1/1 optical clarity.
- lateral Viewing: Two 1.97"×3.82" side lenses (DIN5, non auto-darkening).
- Advanced Auto-Darkening: 4 premium arc sensors for rapid transition from light to dark (1/30000s).
- Pantalla ajustable: Dark shade range 5-8/9-13 (Grind mode 4).

Figure 3: Four Welding Modes. This image visually represents the four distinct welding processes supported by the AZZUNO MIG-145L: Flux MIG, Gas MAG, Stick, and Lift TIG.

Figure 4: Large LED Display. This image highlights the welder's large LED display, showing voltage, amperage, and various setting indicators, along with control knobs and buttons for adjustment.
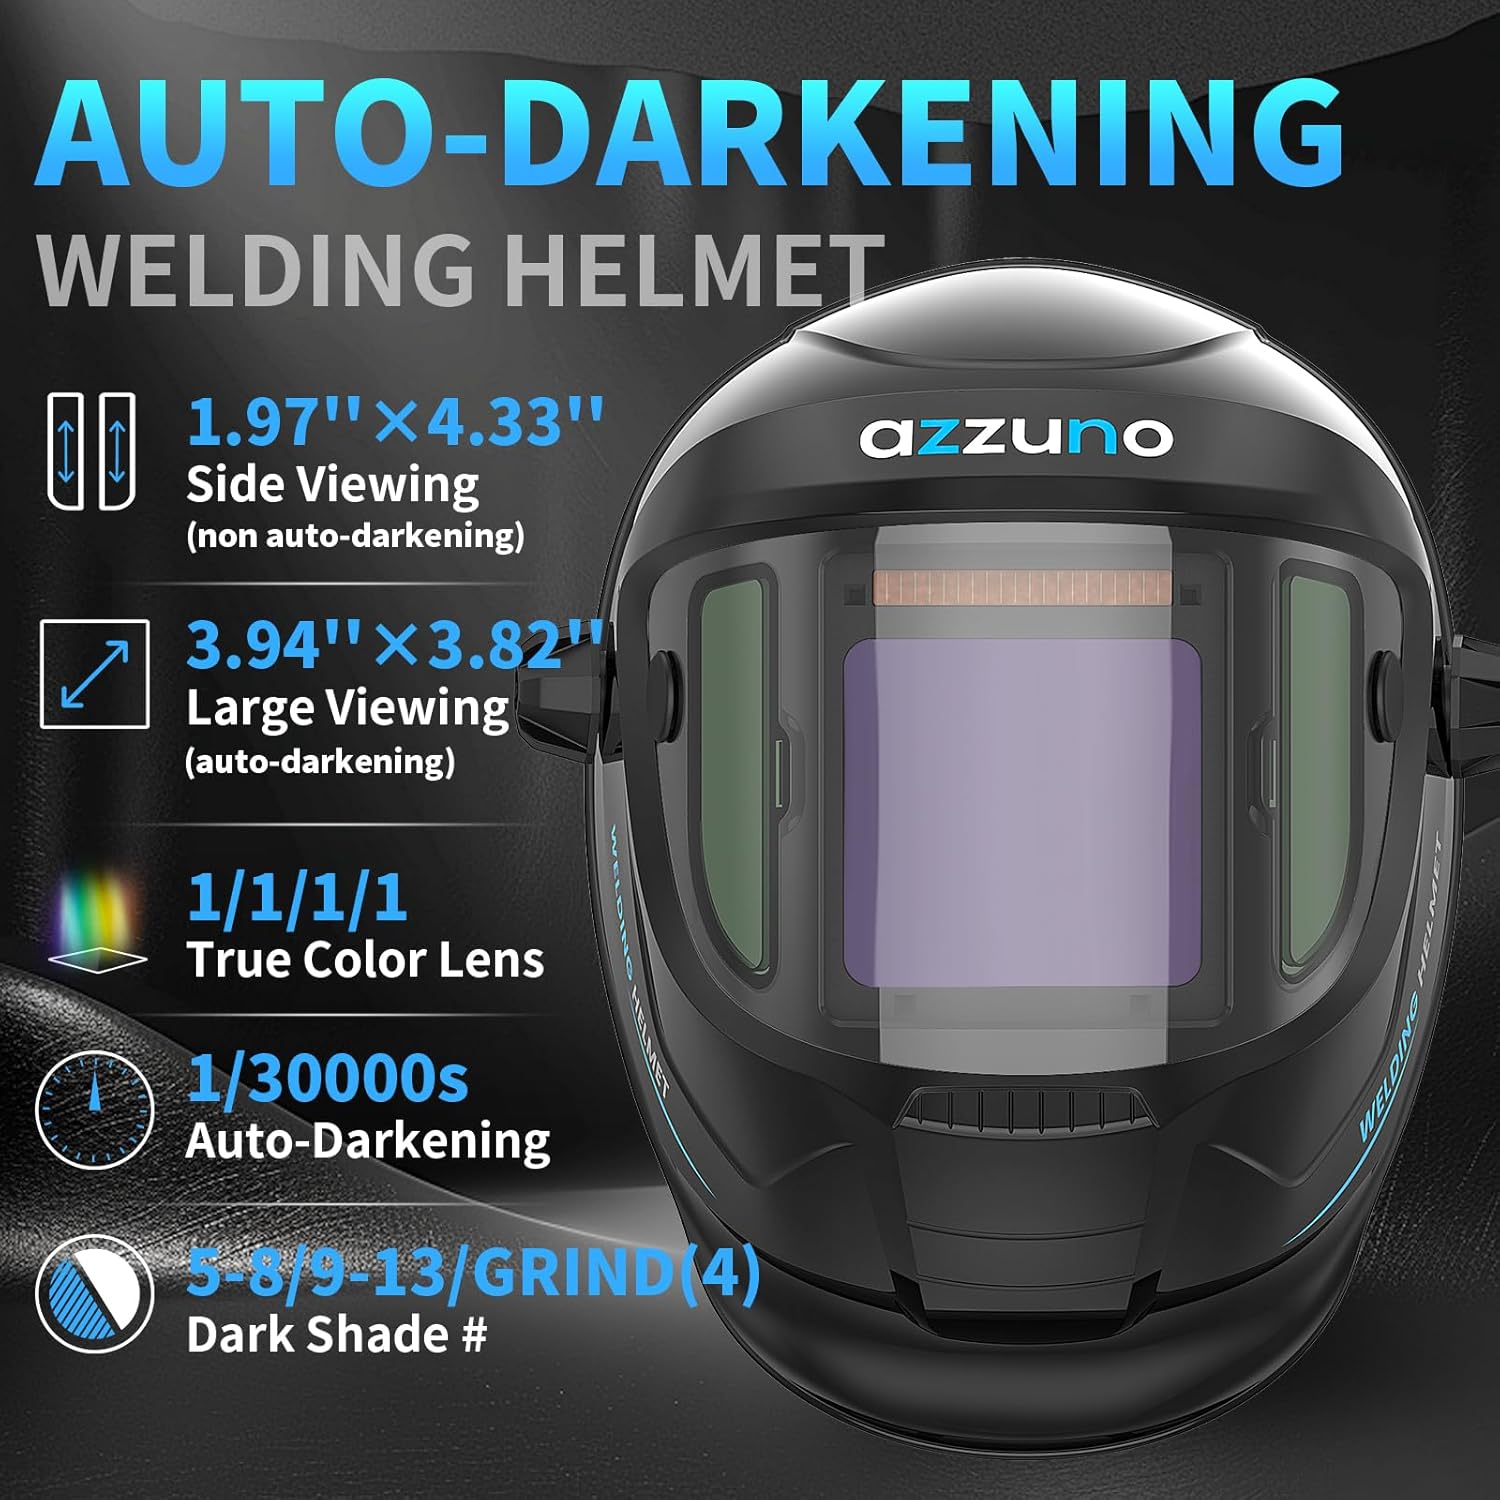
Figure 5: Auto-Darkening Welding Helmet. This image details the features of the welding helmet, including its side viewing areas, large auto-darkening main lens, true color lens technology, and rapid auto-darkening speed.
5. Configuració
5.1 Welder Unit Setup
- Connexió d'alimentació: Connect the welder to a suitable 110V or 220V power outlet using the provided adapter cord. The machine automatically detects the input voltage.
- Terra Clamp Connexió: Enganxa el terra clamp cable to the designated ground terminal on the welder. Securely attach the ground clamp a la peça de treball o a la taula de soldadura per garantir una bona connexió elèctrica.
- Instal·lació de la bobina de filferro:
- Obriu el compartiment de la bobina de filferro.
- Place the appropriate wire spool (flux core or solid wire) onto the spindle.
- Thread the wire through the drive roller mechanism. Ensure the correct drive roller groove is used for the wire size.
- Close the compartment and adjust the tension on the drive roller to prevent slipping or crushing the wire.
- Connexió de la torxa MIG: Connect the MIG torch to the front panel of the welder. Ensure it is securely fastened.
- Gas Connection (for Gas MIG): If performing Gas MIG welding, connect the gas hose from your shielding gas cylinder (e.g., CO2/MIX) to the "GAS IN" port on the welder. Ensure all connections are tight to prevent gas leaks.
- Electrode Holder / TIG Torch Connection (for Stick/Lift TIG): For Stick welding, connect the electrode holder to the positive (+) terminal and the ground clamp to the negative (-) terminal. For Lift TIG, connect the TIG torch to the negative (-) terminal and the ground clamp al terminal positiu (+).

Figure 6: Welder Setup with Wire Spools. This image shows the AZZUNO MIG-145L welder with wire spools installed, demonstrating the connections for the MIG torch and ground clamp, and highlighting the gas and gasless ports.
5.2 Configuració del casc de soldadura
- Headgear Adjustment: Adjust the headgear straps to ensure a comfortable and secure fit on your head. The helmet should sit firmly without being too tight.
- Ajust de sensibilitat: Locate the sensitivity knob on the helmet's lens cartridge. Adjust it according to the ambient light conditions and the welding process to ensure the lens darkens appropriately when an arc is struck.
- Ajust de retard: Adjust the delay knob to control how long the lens remains dark after the arc stops. A longer delay is useful for high amperage welding to prevent eye strain from residual glow.
- Ajust de l'ombra: Set the shade level according to the welding process and amperage. Refer to standard welding shade charts for guidance. The helmet offers shades 5-8/9-13.
- Botó de prova: Press the "TEST" button to verify the auto-darkening function before welding. The lens should momentarily darken and then return to clear.

Figure 7: Welding Helmet Lens Controls. This image details the internal view of the welding helmet's auto-darkening lens, showing the location of the sensitivity, shade, and delay controls, as well as the test button and arc sensors.
6. Instruccions de funcionament
6.1 Funcionament general
- Encès: Turn on the main power switch located on the welder. The LED display will illuminate.
- Selecció del mode: Use the control buttons on the front panel to select your desired welding mode: Gas MIG, Gasless Flux Core MIG, Lift TIG, or Stick.
- Mode sinèrgic: For simplified setup, press and hold button "A" for 3 seconds to activate SYNERGIC mode. In this mode, the machine automatically adjusts voltage and wire feed speed based on the selected amperage and wire type.
- Ajust manual: If not using Synergic mode, or for fine-tuning, use the main knob "B" to adjust amperage (A) or voltage (V). Press and hold knob "B" for 3 seconds to switch between ampera i voltage ajust.
- Wire Feed Button: Press and hold the dedicated wire feed button to quickly feed wire through the torch without striking an arc.
Figure 8: Welder Control Panel. This image provides a close-up view of the welder's control panel, showing the LED display, mode selection buttons, and the main adjustment knob, along with indicators for various settings.
6.2 Welding Modes and Settings
- MIG Welding (Gas/Gasless Flux Core):
- Select the appropriate MIG mode (Gas or Gasless).
- Choose wire type and size (.030"/.035"/.040" flux core, .030" solid wire).
- Ajustar amperage/voltage i velocitat d'alimentació del filferro.
- Mode 2T: Press and hold the torch trigger to weld; release to stop.
- Mode 4T: Press and release trigger to start weld; press and release again to stop. Ideal for long welds.
- SPOT Mode: For timed spot welds. Adjust the spot time setting.
- Soldadura TIG per elevació:
- Seleccioneu el mode Lift TIG.
- Connecteu la torxa TIG i la terra clamp as specified in Setup.
- Ajustar amperage.
- To start arc, touch the tungsten electrode to the workpiece and then lift slightly.
- Stick Welding:
- Seleccioneu el mode Stick.
- Connecteu el suport d'elèctrode i la terra clamp as specified in Setup.
- Choose appropriate electrode (e.g., E6013).
- Ajustar amperage based on electrode type and size.

Figure 9: 2T/4T/SPOT Settings. This image illustrates the different trigger control modes available on the welder: 2T (Hold-Release), 4T (Open-Close), and SPOT (adjustable timed weld), catering to diverse welding requirements.
7. Manteniment
Regular maintenance ensures the longevity and optimal performance of your welding equipment.
- Neteja:
- Periodically clean the welder's exterior with a dry cloth.
- Use compressed air to blow out dust and debris from the internal components, ensuring proper ventilation.
- Clean the welding helmet's lenses regularly with a soft cloth and mild cleaner. Replace scratched or damaged outer protective lenses.
- Sistema d'alimentació de filferro:
- Inspect the drive rollers for wear and cleanliness. Clean any wire residue.
- Ensure the wire liner in the MIG torch is free from kinks and blockages. Replace if necessary.
- Replace contact tips as they wear out to ensure good electrical contact and consistent arc.
- Cable i connexions: Regularly inspect all cables, connections, and torch components for damage, fraying, or loose connections. Replace damaged parts immediately.
8. Solució De Problemes
This section addresses common issues you might encounter. For problems not listed here, contact AZZUNO customer support.
| Problema | Causa possible | Solució |
|---|---|---|
| El soldador no s'encén. | No hi ha alimentació; cable d'alimentació fluix; interruptor automàtic saltat. | Comproveu la presa de corrent, assegureu-vos que el cable estigui ben connectat i reinicieu l'interruptor. |
| No arc when welding. | Poor ground connection; incorrect settings; wire feed issue; worn contact tip. | Assegureu-vos que el terra estigui netamp is secure; verify welding mode and settings; check wire feed system; replace contact tip. |
| Wire feed is inconsistent or jammed. | Incorrect drive roller tension; wrong drive roller groove; dirty wire liner; wire spool tangled. | Adjust drive roller tension; ensure correct groove; clean/replace wire liner; untangle wire spool. |
| Welding helmet does not darken. | Low battery (if applicable); sensors blocked; sensitivity too low; lens damaged. | Check battery indicator (if present); ensure sensors are clean and unobstructed; increase sensitivity; replace lens cartridge if damaged. |
| Poor weld quality (e.g., porosity, spatter). | Configuració incorrecta (volum)tage/amperage/wire speed); improper gas flow (MIG); contaminated workpiece; wrong wire/electrode. | Adjust settings according to material and thickness; check gas cylinder/flow rate; clean workpiece; use correct consumables. |
9. Especificacions
| Característica | Detall |
|---|---|
| Model | MIG-145L |
| Entrada Voltage | 110V/220V Dual Voltage |
| Processos de soldadura | Gas MIG, Gasless Flux Core MIG, Lift TIG, Stick |
| Compatible Wire Sizes | .030"/.035"/.040" flux core wire, .030" solid wire |
| Compatible Electrodes | E6013 (and others suitable for Stick welding) |
| Característiques de control | Synergic Control, 2T/4T/SPOT modes, Manual Wire Feed Button |
| Welding Helmet Main Lens Viewàrea d’inici | 3.94" × 3.82" (Auto-Darkening) |
| Welding Helmet Side Lens Viewàrea d’inici | 1.97" × 3.82" (DIN5, Non Auto-Darkening) |
| Welding Helmet Optical Clarity | 1/1/1/1 |
| Welding Helmet Arc Sensors | 4 Premium Arc Sensors |
| Welding Helmet Switching Speed | 1/30000 s |
| Welding Helmet Dark Shade Range | 5-8/9-13 (Grind mode 4) |
| Weight (Welder Unit) | Aprox. 13 lliures |
| Dimensions (Welder Unit) | Aprox. 15" x 8.8" x 5.7" |
10. Garantia i Suport
AZZUNO provides a limited warranty for this product. Please refer to the warranty card included with your purchase or visit the official AZZUNO weblloc web per obtenir informació detallada sobre els termes i condicions de la garantia.
For technical support, troubleshooting assistance, or to inquire about replacement parts, please contact AZZUNO customer service through their official channels. When contacting support, please have your product model number (MIG-145L) and purchase information ready.
AZZUNO Official Store: Visit AZZUNO Store on Amazon
Ask a question about this manual
Ask about setup, troubleshooting, compatibility, parts, safety, or missing instructions. Manuals+ will review the question and use this page’s manual context to help answer it.