
1. Introducció
Thank you for choosing the Tacens AEROSLIM500 MicroATX PC Case. This slim mini-tower is designed for efficient and compact PC builds, supporting MicroATX and Mini-ITX motherboards. It features optimized airflow, an integrated 500W TFX power supply, and modern connectivity. This manual provides essential information for safe installation, operation, and maintenance of your new PC case.
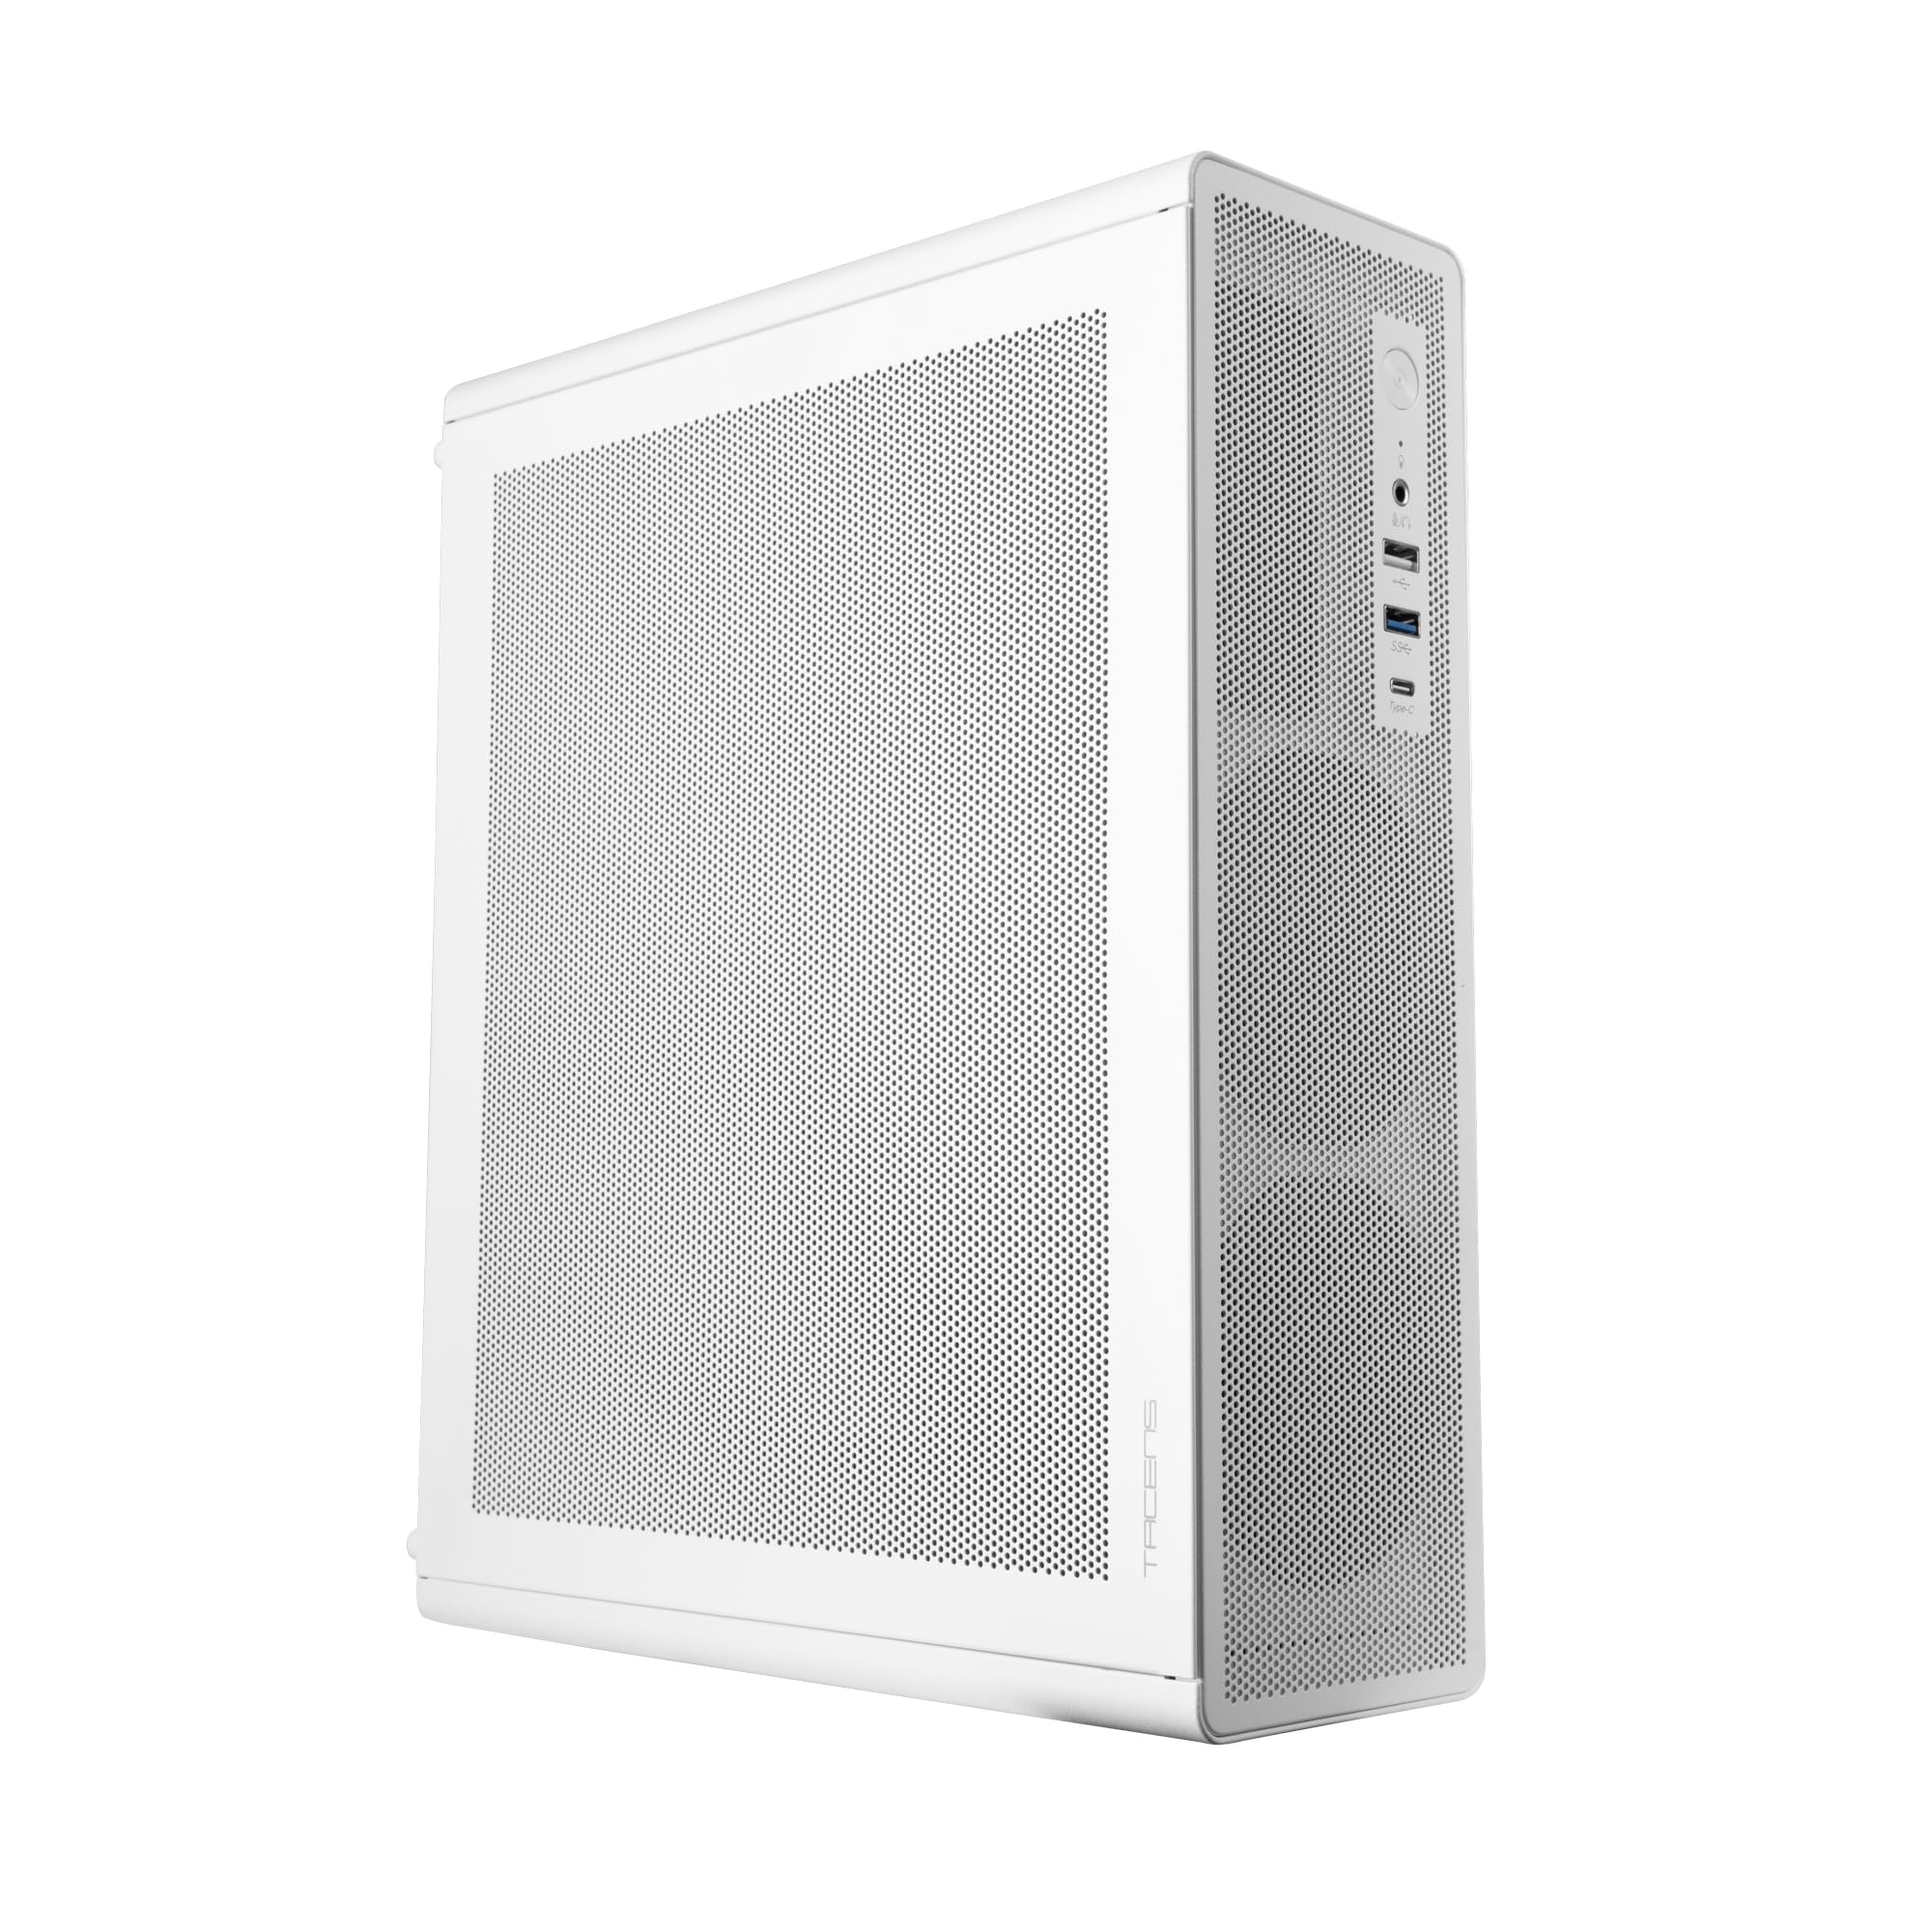
Figure 1: Tacens AEROSLIM500 MicroATX PC Case (Overall View)
2. Informació de seguretat
Please read and follow these safety guidelines to prevent damage to the product or injury to yourself.
- Desconnexió d'alimentació: Always disconnect the power cable from the wall outlet before opening the case or performing any installation/maintenance.
- Electricitat estàtica: Discharge static electricity from your body before handling internal components. Use an anti-static wrist strap if available.
- Vores esmolades: Be cautious of sharp edges inside the case during installation.
- Ventilació: Ensure proper ventilation around the case. Do not block air vents.
- Líquid i humitat: Keep the case away from liquids and excessive moisture.
- Instal·lació professional: Si no esteu segurs sobre algun dels passos d'instal·lació, demaneu ajuda a un tècnic qualificat.
3. Contingut del paquet
Verifiqueu que tots els articles siguin presents al vostre paquet. Si falta algun article o està malmès, poseu-vos en contacte amb el vostre distribuïdor.
- Tacens AEROSLIM500 MicroATX PC Case with integrated 500W TFX Power Supply
- Pre-installed 90mm FDB Front Fan
- Accessory kit (screws, standoffs, cable ties)
- Manual d'usuari (aquest document)
4. Característiques del producte
The Tacens AEROSLIM500 PC case offers a range of features for a compact and efficient build:
- Integrated TFX 500W Power Supply: Ensures stable and efficient power delivery for your components.
- Refrigeració avançada: Front and side ultra-fine mesh panels provide constant airflow and act as a dust barrier.
- Pre-installed Front Fan: Includes a 90mm FDB (Fluid Dynamic Bearing) fan for optimal cooling. Supports up to two 90mm front fans.
- Optimized Internal Space: Compatible with MicroATX (up to 210mm wide) and Mini-ITX motherboards.
- GPU Support: Accommodates low-profile GPUs up to 220mm long and 63mm wide.
- Opcions d'emmagatzematge: Features 5 x 2.5" SSD drive bays.
- Ranures d'expansió: Provides 3 expansion slots for MicroATX or 1-2 for Mini-ITX configurations.
- Connectivitat completa: Front panel includes USB-C, USB 3.0, USB 2.0 ports, and HD audio/microphone jacks.
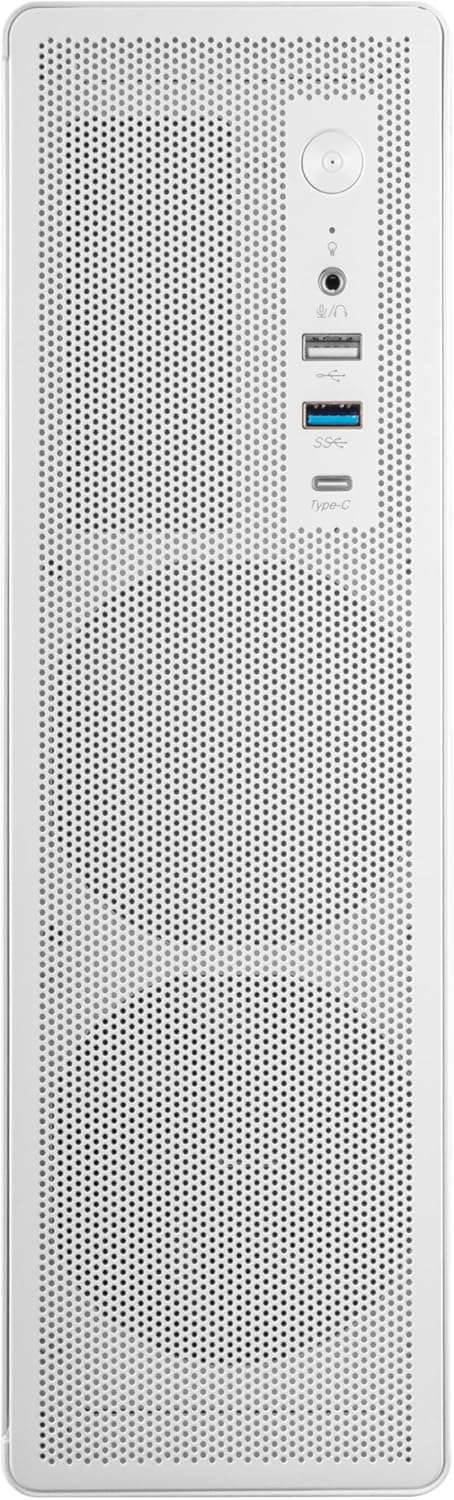
Figura 2: Connectivitat del panell frontal

Figura 3: Detallada View of Front I/O Ports
5. Configuració i instal·lació
Follow these steps to install your components into the Tacens AEROSLIM500 PC case. Ensure the system is powered off and unplugged before beginning.
5.1. Obertura de la caixa
- Col·loqueu la caixa sobre una superfície plana i estable.
- Locate the thumbscrews or standard screws on the rear panel securing the side panel(s).
- Remove the screws and carefully slide the side panel(s) backward, then lift them off.

Figure 4: Case Interior View with Pre-installed Fan
5.2. Instal·lació de la placa base
- Install the CPU, CPU cooler (ensure it fits within the 73mm height limit), and RAM onto your MicroATX or Mini-ITX motherboard before placing it in the case.
- Align the motherboard with the pre-installed standoffs inside the case.
- Fixeu la placa base amb els cargols adequats del kit d'accessoris.

Figure 5: Motherboard Mounting Area
5.3. Storage Device Installation (2.5" SSD/HDD)
- Locate the 2.5" drive bays/mounting points. The case supports up to 5 x 2.5" drives.
- Secure your 2.5" SSDs or HDDs using the provided screws.
- Connect SATA data and power cables to the drives.

Figure 6: Power Supply and Drive Bay Area
5.4. Expansion Card (GPU) Installation
- Traieu les cobertes de les ranures d'expansió necessàries de la part posterior de la carcassa.
- Carefully insert your low-profile GPU (max 220mm length, 63mm width) into the PCIe slot on the motherboard.
- Fixeu la targeta d'expansió amb un cargol.
5.5. Connexió dels cables del panell frontal
Connect the front panel cables (USB-C, USB 3.0, USB 2.0, HD Audio, Power Switch, Reset Switch, Power LED, HDD LED) to their corresponding headers on your motherboard. Refer to your motherboard manual for exact header locations.
5.6. Gestió de cables
Route cables neatly to improve airflow and aesthetics. Use the provided cable ties to secure bundles of cables.
5.7. Tancament del cas
- Once all components are installed and cables are managed, reattach the side panel(s).
- Secure the side panel(s) with the thumbscrews or standard screws.
6. Instruccions de funcionament
After successful assembly, connect your peripherals (monitor, keyboard, mouse) and the power cable to the integrated TFX 500W power supply.
- Encès: Press the power button located on the front panel to turn on your computer.
- Ports USB: Use the front USB-C, USB 3.0, and USB 2.0 ports for connecting external devices.
- Preses d'àudio: Connect headphones or a microphone to the front audio jacks.
- Apagar: Shut down your computer through the operating system. For a hard shutdown, press and hold the power button for several seconds.
7. Manteniment
Un manteniment regular ajuda a garantir un rendiment òptim i una llarga vida útil dels components del teu PC.
- Neteja de pols: The mesh panels act as dust filters. Periodically clean the front and side mesh panels using compressed air or a soft brush to remove accumulated dust.
- Neteja interior: Every 6-12 months, open the case (after disconnecting power) and use compressed air to clean dust from internal components, especially CPU coolers and GPU fans.
- Comprovació de la gestió de cables: Ensure cables remain neatly routed and do not obstruct airflow.
8. Solució De Problemes
Si teniu problemes, consulteu els passos habituals de resolució de problemes següents.
- Sense energia:
- Ensure the power cable is securely connected to both the wall outlet and the PC's power supply.
- Verify that the power supply switch (if present) is in the 'ON' position.
- Check all internal power connections (24-pin ATX, 8-pin CPU, GPU power) to the motherboard and components.
- Assegureu-vos que el cable del botó d'engegada del panell frontal estigui connectat correctament a la placa base.
- Sense pantalla:
- Confirm your monitor is powered on and connected to the correct video output on your GPU or motherboard.
- Reseat your GPU and RAM modules.
- Soroll excessiu:
- Check if any cables are obstructing fan blades.
- Clean dust from fans (CPU, GPU, case fans, PSU fan).
- Ensure all screws are tightened to prevent vibrations.
- Ports del panell frontal que no funcionen:
- Verify that the USB and audio cables from the front panel are correctly connected to the motherboard headers.
9. Especificacions
| Marca | Tacens |
| Nom del model | AEROSLIM500 |
| Compatibilitat amb la placa base | Micro ATX, Mini ITX |
| Tipus de cas | Compact Desktop / Mini-Tower |
| Color | Blanc |
| Material | Metall |
| Font d'alimentació | Integrated TFX 500W |
| Mètode de refrigeració | Air (Pre-installed 90mm FDB front fan) |
| Límit d'alçada del refrigerador de la CPU | Fins a 73 mm |
| Límit de longitud de la GPU | Up to 220mm (low-profile només) |
| GPU Width Limit | Fins a 63 mm |
| Drive Bays | 5 x 2.5" SSD/HDD |
| Ranures d'expansió | 3 (MicroATX), 1-2 (Mini-ITX) |
| Ports d'E / S frontals | 1x USB-C, 1x USB 3.0, 2x USB 2.0, HD Audio (Headphone/Microphone) |
| Pes de l'article | 2.25 quilos |
10. Garantia i Suport
Tacens products are manufactured to the highest quality standards. For information regarding warranty coverage, terms, and conditions, please refer to the warranty card included with your product or visit the official Tacens weblloc.
For technical support, troubleshooting assistance beyond this manual, or to inquire about replacement parts, please contact Tacens customer service through their official weblloc web o la informació de contacte que es proporciona a la documentació del producte.
Official Tacens Weblloc: www.tacens.com (Nota: Això és un marcador de posició URL. Please refer to your product packaging for the correct official weblloc.)