
1. Introducció
This manual provides essential information for the safe and effective use of your diymore Wireless USB-C Soldering Iron Kit. This portable soldering iron features a built-in 1100 mAh battery, rechargeable via USB-C, offering cordless operation. It includes an LCD display for precise temperature control, adjustable from 180℃ to 450℃ (356°F to 842°F), and boasts rapid heating in approximately 8 seconds. It is designed for various applications such as circuit board repair, jewelry soldering, guitar maintenance, watch repair, and other small electronic DIY projects. Please read this manual thoroughly before first use.
2. Instruccions de seguretat
Observeu sempre les següents precaucions de seguretat per evitar lesions o danys al dispositiu:
- Risc de calor: The soldering iron tip reaches high temperatures. Avoid direct contact with skin or flammable materials.
- Ventilació: Use in a well-ventilated area to avoid inhaling soldering fumes.
- Protecció ocular: Always wear safety glasses to protect against solder splashes.
- Ús adequat: Only use the device for its intended soldering purpose. Do not use for high-power projects.
- Emmagatzematge: Allow the soldering iron to cool completely before storing. Store in a safe place, out of reach of children.
- Font d'alimentació: Use only a 5V/2A USB-C power source for charging.
- Danys: Do not operate if the device or cable is damaged.
3. Contingut del paquet
Verifiqueu que tots els elements siguin presents al vostre paquet:
- 1 x USB Soldering Iron
- 1 x cable de càrrega USB-C
- 1 x Suport de soldador amb esponja
- 3 x Soldering Tips (Round, Horseshoe, Knife Head)
- 1 x Rosin

Figure 3.1: Included components of the diymore Wireless USB-C Soldering Iron Kit.
4. Producte acabatview
Familiarize yourself with the main parts of your soldering iron:
- Consell de soldadura: The interchangeable heating element and tip.
- Tip Connector: Where the soldering tip is inserted.
- Pantalla LCD: Shows current temperature, battery status, and error codes.
- Botó d'encesa: S'utilitza per encendre/apagar el dispositiu.
- Botons d'ajust de temperatura (+/-): Used to increase or decrease the temperature.
- Port de càrrega USB-C: Per connectar el cable de càrrega.
- Mànec: Ergonomically designed, heat-resistant TPE material.

Figura 4.1: Mésview of the soldering iron's controls and display.

Figure 4.2: Physical dimensions and summarized features of the soldering iron.
5. Configuració
5.1. Charging the Soldering Iron
Before first use, fully charge the soldering iron. Connect the provided USB-C charging cable to the soldering iron's USB-C port and to a 5V/2A USB power adapter (not included). The LCD display will show the battery percentage during charging. A full charge takes approximately 90 minutes and provides 20-30 minutes of continuous operation.

Figure 5.1: USB-C charging and battery specifications.
5.2. Installing/Replacing Soldering Tips
The soldering iron comes with three interchangeable tips: Round, Horseshoe, and Knife Head. To install or replace a tip:
- Ensure the soldering iron is off and cool.
- Gently pull out the current tip from the tip connector.
- Insert the desired tip firmly into the tip connector until it is securely seated.

Figure 5.2: Replacing soldering iron tips.
6. Instruccions de funcionament
6.1. Encendre/apagar
To turn the soldering iron ON or OFF, press and hold the Power button for 3 seconds.
6.2. Ajust de temperatura
Once powered on, the LCD will display the current temperature. The soldering iron heats up rapidly, reaching the set temperature in approximately 8 seconds.
- Increase/Decrease Temperature: Click the "+" or "-" button to adjust the temperature by 5℃ (or 9°F) increments. Press and hold the "+" or "-" button for rapid temperature adjustment.
- Switch ℃/°F: Press the "+" and "-" buttons simultaneously to switch between Celsius and Fahrenheit display modes.

Figure 6.1: Intelligent temperature control display.

Figure 6.2: Fast heating performance.
6.3. Sleep Mode and Automatic Shutdown
The soldering iron is equipped with intelligent power management features:
- During Battery Discharge:
- After 1 minute of inactivity, the device enters sleep mode (display turns OFF).
- After 5 minutes of inactivity, the device performs an automatic shutdown.
- During Charging and Use:
- After 3 minutes of inactivity, the device enters sleep mode (display shows OFF + % flicker).
- After 5 minutes of inactivity, the device performs an automatic shutdown. The battery percentage will flash during charging.
- Wake-up Method: To wake the device from sleep mode, click any temperature adjustment button or gently vibrate the device.
7. Manteniment
Regular maintenance ensures optimal performance and longevity of your soldering iron.
- Neteja de consells: Regularly clean the soldering tip using the provided sponge (dampened with water) to remove excess solder and oxidation. This helps maintain efficient heat transfer.
- Substitució de la punta: Replace soldering tips when they become worn or damaged to ensure proper soldering results. Refer to Section 5.2 for replacement instructions.
- Emmagatzematge: Always allow the soldering iron to cool down completely before storing it in its case or a safe place.
- Neteja general: Wipe the body of the soldering iron with a dry, soft cloth. Do not use abrasive cleaners or solvents.
8. Solució De Problemes
Aquesta secció tracta els problemes habituals que podeu trobar:
| Issue/Display Code | Descripció | Solució |
|---|---|---|
| "NO" flashing on LCD | Short circuit detected. The device will automatically shut down if not resolved within 30 seconds. | Check for any short circuits in the soldering tip or connection area. Ensure the tip is correctly installed. Power cycle the device. |
| Battery ≤15% (flashing) | Low battery reminder. Display flashes for 10 seconds. | Recharge the soldering iron using the USB-C cable. |
| "LO" flashing on LCD | Very low battery. Display flashes for 5 seconds, then device shuts down. | Immediately recharge the soldering iron. |
| "ON" on LCD (with heating core failure reminder) | Indicates a potential heating core failure. | Ensure the soldering tip is correctly and firmly inserted. If the issue persists, the heating element or tip may be faulty and require replacement. |
| El dispositiu no s'encén | No power or battery completely drained. | Charge the device for at least 15 minutes. Ensure the power button is pressed and held for 3 seconds. |
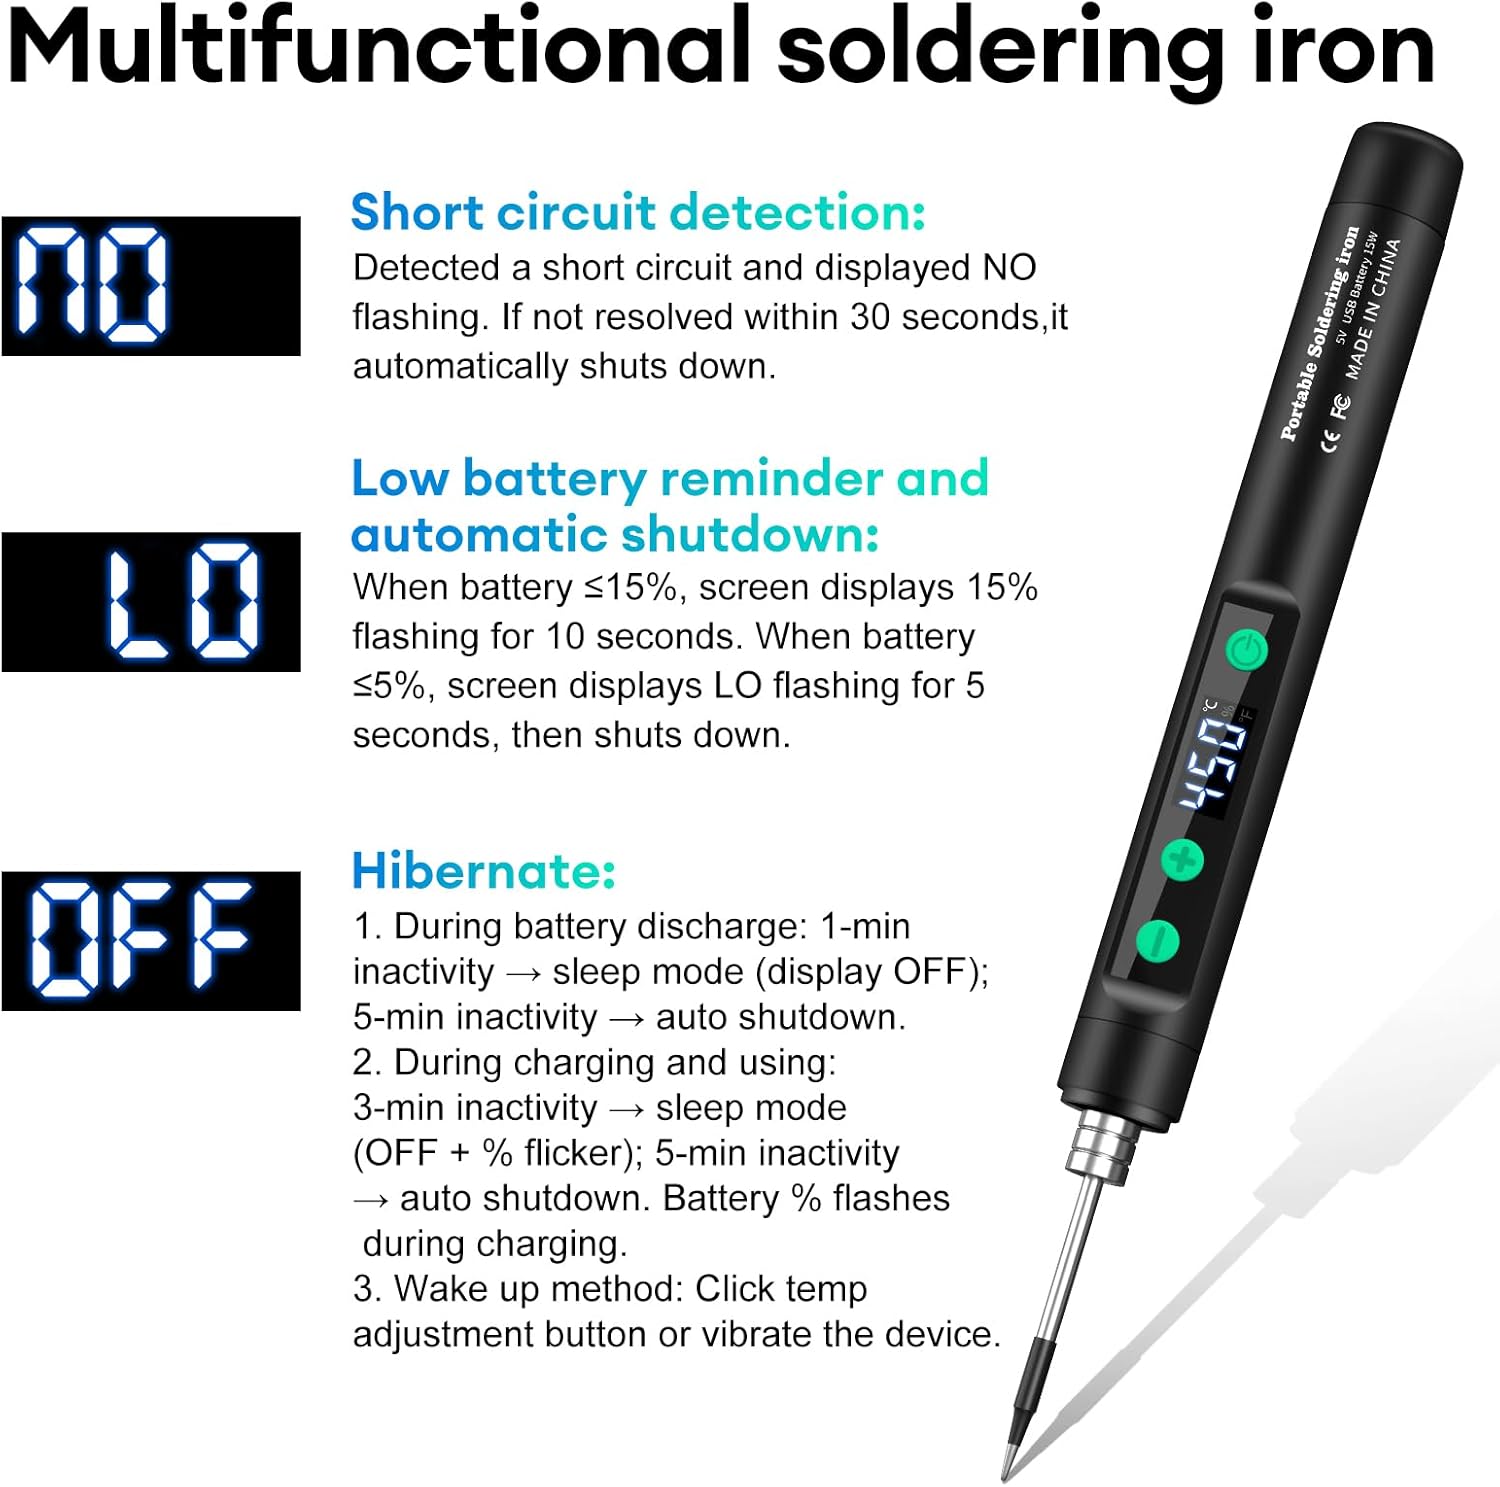
Figure 8.1: Display codes for troubleshooting.
9. Especificacions
| Característica | Especificació |
|---|---|
| Marca | diymore |
| Número de model | AM03-IDCE0138-AAC |
| Font d'alimentació | Bateria (recarregable) |
| Wattage | 15 watts |
| Entrada Voltage | 5 Volts |
| Capacitat de la bateria | 1100 mAh |
| Interfície de càrrega | USB-C |
| Temps de càrrega | Aprox. 90 minuts |
| Temps de resistència | 20-30 minutes (continuous use) |
| Interval de temperatura ajustable | 180 ℃ - 450 ℃ (356 °F - 842 °F) |
| Temps de calefacció | Aprox. 8 segons |
| Material del mànec | Plastic (TPE) |
| Longitud del producte | 19.2 cm (7.56 polzades) |
| Característiques especials | Portable, Wireless, USB Charging, LCD Display, Adjustable Temperature |
10. Garantia i Suport
For warranty information or technical support, please refer to the retailer's return policy or contact diymore customer service directly. Contact details can typically be found on the product packaging or the official diymore weblloc.