1. Introducció
This manual provides detailed instructions for the setup, operation, and maintenance of your LIORQUE BJ8555 Indoor Outdoor Weather Station. This device is designed to monitor temperature and humidity both indoors and in up to three remote outdoor locations, providing real-time data and environmental insights.
2. Contingut del paquet
Si us plau, comproveu el paquet per veure si hi ha els elements següents:
- Unitat de visualització principal (1)
- Remote Outdoor Sensors (3)
- USB Power Cable (1)
- Manual d'usuari (1)
Note: Batteries are not included. The main unit requires 3x AAA batteries, and each remote sensor requires 2x AA batteries.

Image: Contents of the LIORQUE BJ8555 Weather Station package.
3. Producte acabatview
The LIORQUE BJ8555 Weather Station consists of a main display unit and three wireless remote sensors. The main unit displays indoor temperature and humidity, along with data from the three remote sensors. It features a large LCD screen with adjustable backlight.
3.1 Unitat de visualització principal

Image: Main Display Unit features and button descriptions.
The main unit includes:
- Pantalla LCD: Shows indoor and outdoor temperature/humidity, comfort level, trend indicators, MAX/MIN records, and low battery warnings.
- Botó de retroil·luminació: Activates or adjusts the display backlight.
- Botons de selecció de canals (1, 2, 3): Manually select which remote sensor's data to view, or cycle through them.
- Botó MEM: Accesses MAX/MIN temperature and humidity records.
- Botó CH: Cycles through remote sensor channels or initiates pairing.
- C/F Switch: Alterna entre les unitats de temperatura Celsius i Fahrenheit.
- Compartiment de la bateria: For 3x AAA batteries.
- Entrada USB-C: For continuous power and backlight.
- Wall Mount Hole & Kickstand: For flexible placement.
3.2 Remote Outdoor Sensors
Image: Remote Outdoor Sensor features and button descriptions.
Each remote sensor includes:
- Sensor de temperatura i humitat: Measures environmental conditions.
- Channel Switch (1, 2, 3): Allows you to assign a unique channel to each sensor.
- Llum indicador de senyal: Flashes when transmitting data.
- Compartiment de la bateria: For 2x AA batteries.
- Wall Mount Hole: For easy installation.

Image: LIORQUE Weather Station main unit and three remote sensors.
4. Configuració
4.1 Instal·lació de la bateria
- Sensors remots: Open the battery compartment cover on each remote sensor. Insert 2x AA batteries into each sensor, observing the correct polarity (+/-). Select a unique channel (1, 2, or 3) for each sensor using the internal switch. Close the battery compartment.
- Unitat de visualització principal: Open the battery compartment cover on the back of the main unit. Insert 3x AAA batteries, observing the correct polarity (+/-). Close the battery compartment. Alternatively, connect the provided USB cable to the USB-C input on the main unit and plug the other end into a 5V USB power adapter (not included) for continuous power.
4.2 Emparellament inicial
Once batteries are installed in both the sensors and the main unit, the main unit will automatically begin searching for signals from the remote sensors. This process may take a few minutes. Ensure the sensors are within range of the main unit during initial setup.
- If a sensor does not connect, press and hold the 'CH' button on the main unit for 3 seconds to initiate a manual search.
- Ensure each remote sensor is set to a different channel (1, 2, or 3) to avoid interference.
5. Instruccions de funcionament
5.1 Característiques de visualització

Imatge: Detallada view de la pantalla LCD i els seus indicadors.
The 4.4-inch LCD display provides the following information:
- Temperatura i humitat interiors: Displayed at the top.
- Temperatura i humitat exteriors: Displayed for each connected remote sensor (Channels 1, 2, 3).
- Indicador de nivell de confort: An icon indicating the current comfort level (Humid, Comfortable, Dry).
- Temperature & Humidity Trend Indicators: Arrows showing if values are rising, falling, or stable.
- Frost Point Warning: An icon may appear if outdoor temperature approaches freezing.
- Indicador de bateria baixa: Apareix quan cal substituir les piles.
5.2 Temperature Unit Selection (℃/℉)

Image: Switching between Celsius and Fahrenheit temperature units.
To switch between Celsius (℃) and Fahrenheit (℉), press the 'C/F' button located on the side of the main unit.
5.3 Registres MÀX/MÍN

Image: MAX/MIN memory function display.
The device records the maximum and minimum temperature and humidity values over a 24-hour period. To view these records:
- Press the 'MEM' button once to display the maximum (MAX) values.
- Press the 'MEM' button a second time to display the minimum (MIN) values.
- Press the 'MEM' button a third time to return to current readings.
5.4 Indicador del nivell de confort
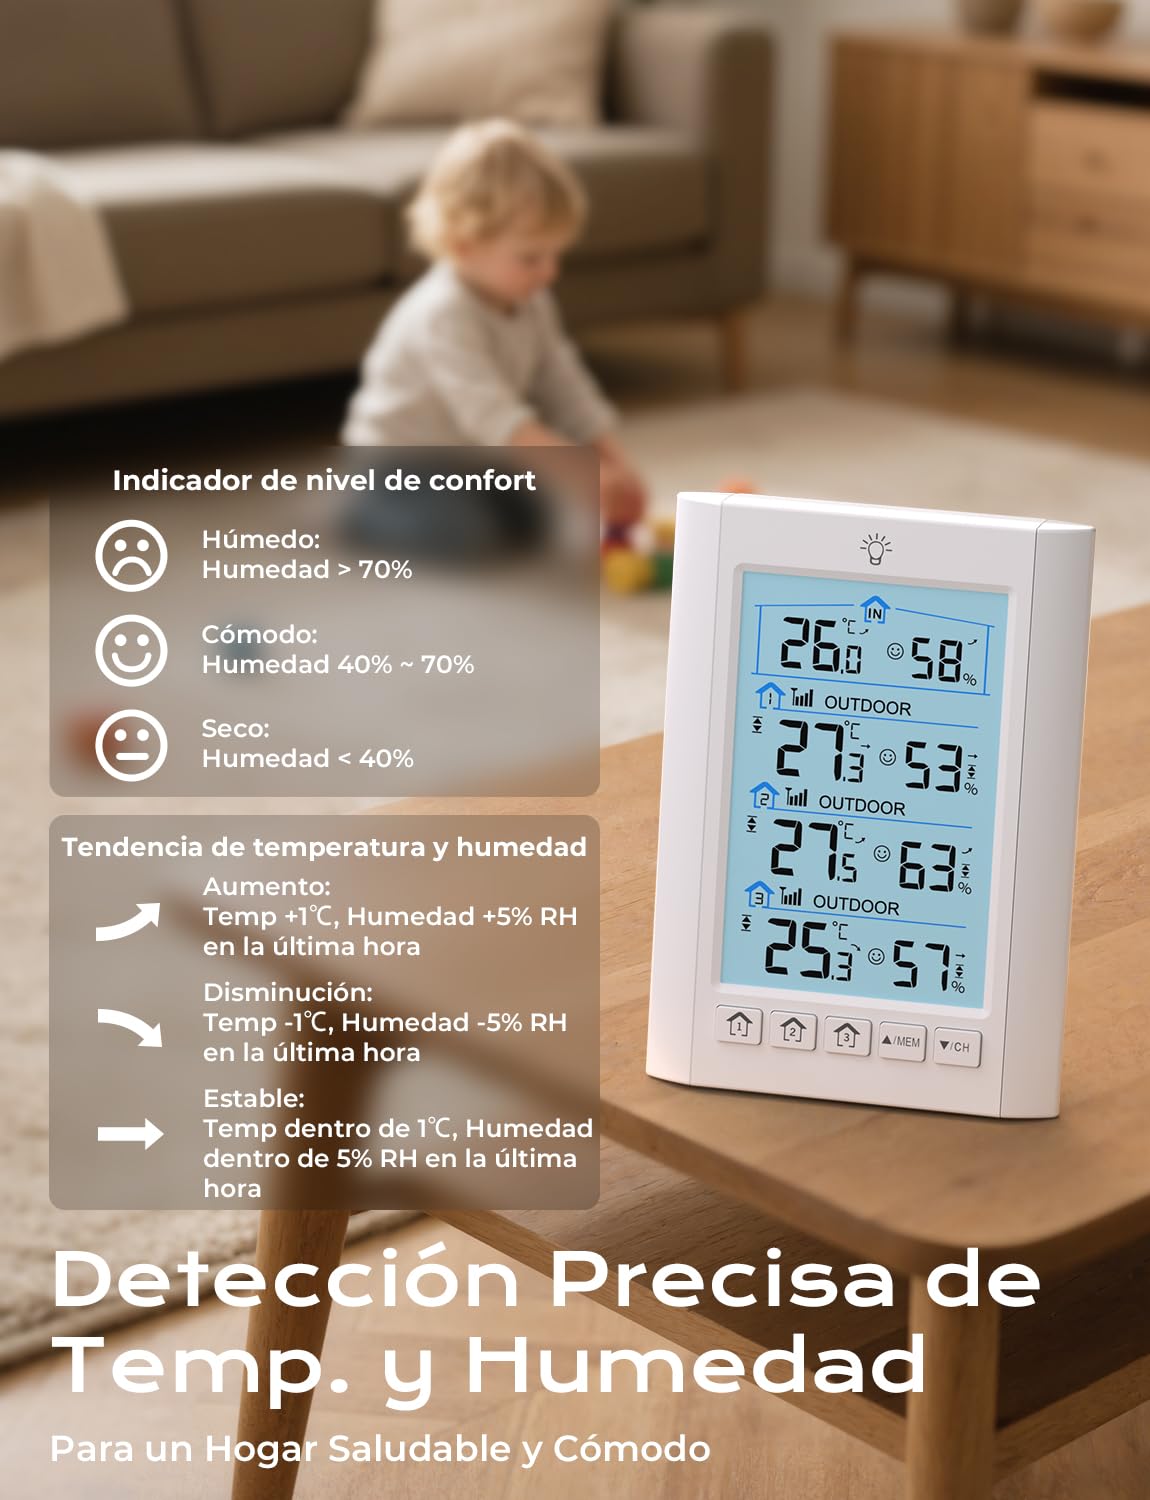
Image: Comfort level indicator icons and their corresponding humidity ranges.
The comfort level indicator provides a quick assessment of the environment based on humidity:
- Humit: Humitat > 70%
- Còmode: Humidity 40% - 70%
- Seca: Humitat < 40%
5.5 Trend Indicators

Image: Temperature and humidity trend indicators.
Arrows next to the temperature and humidity readings indicate the trend over the last hour:
- Up Arrow (↑): Incrementasing (Temp +1℃, Humidity +5% RH)
- Down Arrow (↓): Decretasing (Temp -1℃, Humidity -5% RH)
- Horizontal Arrow (→): Stable (Temp within 1℃, Humidity within 5% RH)
5.6 Configuració d'alarma
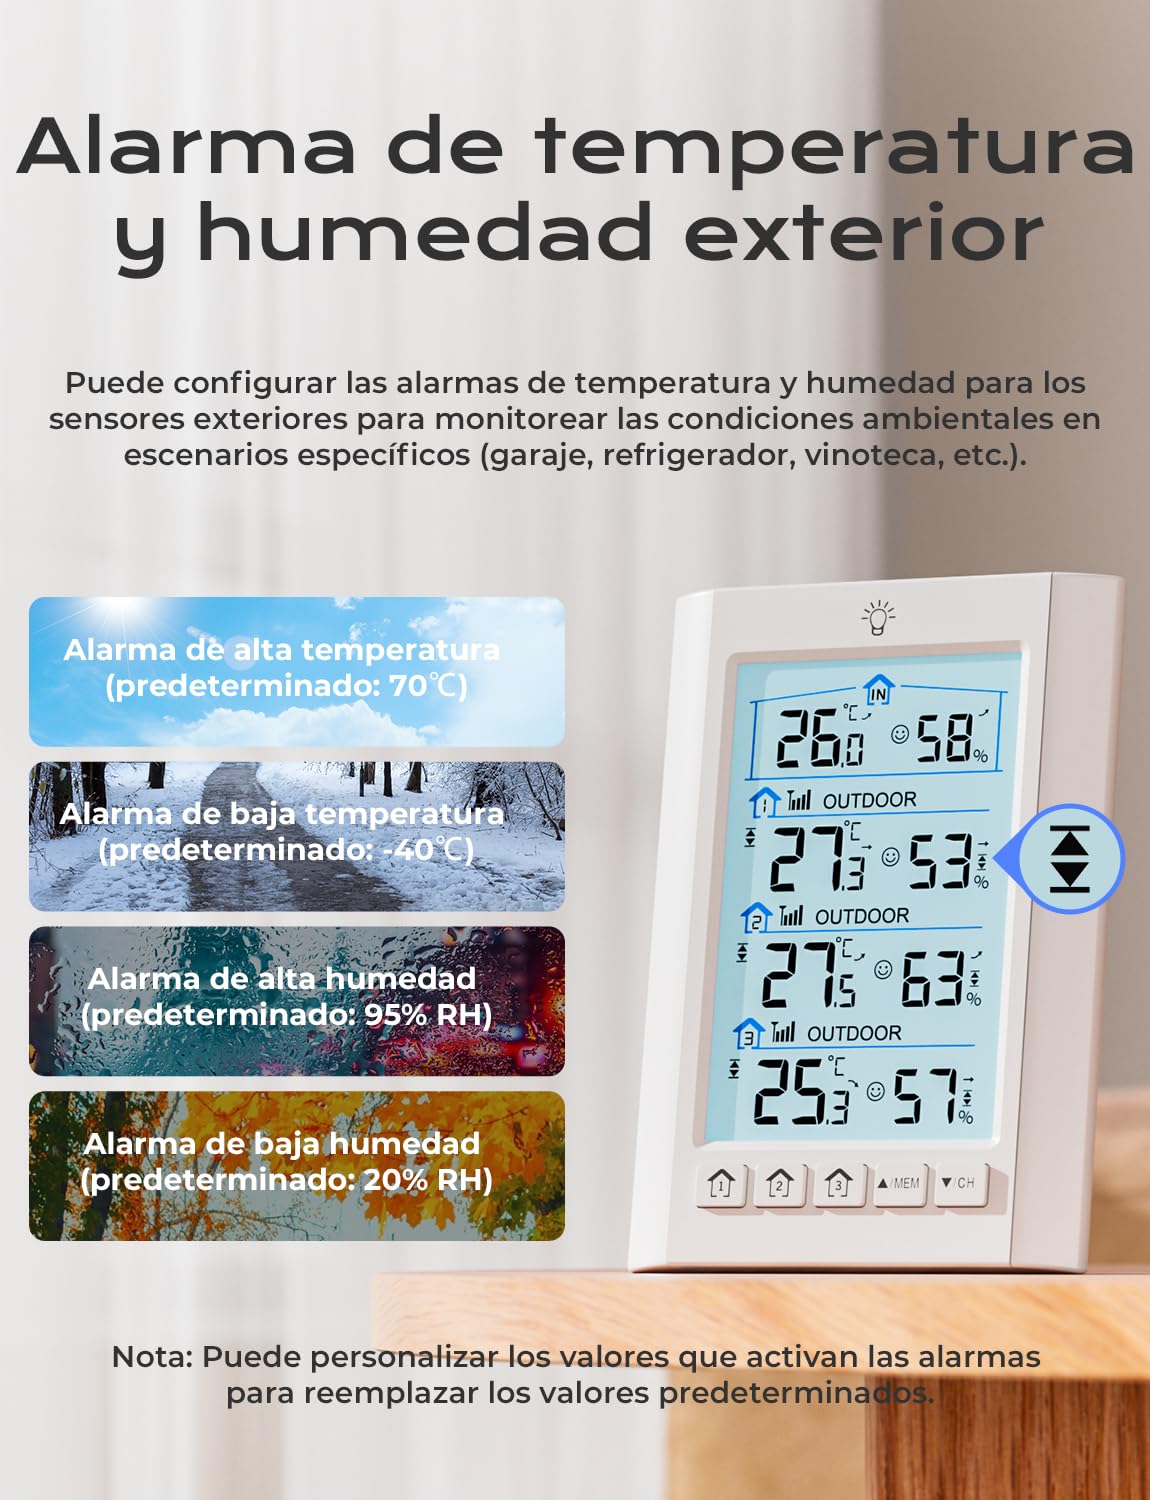
Image: Outdoor temperature and humidity alarm settings.
You can set customizable high and low temperature and humidity alarms for the outdoor sensors. When the measured values exceed these thresholds, an audible alarm will sound.
- Refer to the specific instructions in the included user manual for detailed steps on setting and adjusting alarm thresholds.
- Default alarm thresholds are: High Temp 70℃, Low Temp -40℃, High Humidity 95% RH, Low Humidity 20% RH. These can be customized.
5.7 Ajust de la llum de fons

Image: Adjustable screen brightness and power modes.
The display backlight can be adjusted:
- USB Power Mode: When powered by the USB cable, press the backlight button (light bulb icon) to cycle through three brightness levels: High, Low, and Off. The backlight will remain on continuously.
- Battery Power Mode: When powered by batteries only, pressing the backlight button will illuminate the screen for 10 seconds before automatically turning off to conserve power.
6. Sensor Placement and Installation
Proper placement of the remote sensors is crucial for accurate readings and optimal wireless transmission.

Imatge: Example of multi-sensor placement around a home.
- Interval: The sensors have a transmission range of up to 100 meters (328 feet) in open areas. Walls, metal structures, and other electronic devices can reduce this range.
- Protecció: To ensure accuracy and durability, protect the remote sensors from direct sunlight and rain.

Image: Guidelines for correct outdoor sensor installation.
- Ubicacions ideals: Place sensors under an overhang, porch, or in a shaded, well-ventilated area.
- Muntatge: Use the integrated wall mount hole to secure the sensors to a vertical surface.
7. Manteniment
- Substitució de la bateria: Replace batteries in the main unit and remote sensors when the low battery indicator appears on the display. Always replace all batteries in a unit at the same time.
- Neteja: Clean the display unit and sensors with a soft, damp tela. No utilitzeu netejadors abrasius ni dissolvents.
- Emmagatzematge: Si guardeu el dispositiu durant un període prolongat, traieu totes les piles per evitar fuites.
8. Solució De Problemes
| Problema | Causa possible | Solució |
|---|---|---|
| No hi ha cap pantalla a la unitat principal | Batteries are dead or incorrectly inserted; USB power not connected. | Comproveu la polaritat de la bateria i substituïu-la si cal. Assegureu-vos que el cable USB estigui connectat correctament a una font d'alimentació que funcioni. |
| Outdoor sensor data not displayed | Sensor out of range; low sensor battery; incorrect channel setting; interference. | Move sensor closer to the main unit. Replace sensor batteries. Ensure sensor channel matches the selected channel on the main unit. Press and hold 'CH' button on main unit to re-scan. Avoid placing near large metal objects or other electronics. |
| Lectures inexactes | Sensor exposed to direct sunlight or rain; sensor placed near heat/cold sources. | Relocate sensor to a shaded, protected, and well-ventilated area away from extreme temperature sources. |
| Backlight not staying on | Main unit is running on battery power. | Connect the main unit to a USB power source for continuous backlight. |
9. Especificacions
- Número de model: BJ8555
- Marca: LIORQUE
- Potència de la unitat principal: 3x AAA batteries (not included) or DC 5V via USB-C cable
- Potència del sensor remot: 2x AA batteries per sensor (not included)
- Precisió de la temperatura: ± 1 ℃
- Precisió de la humitat: ±5% HR
- Freqüència d'actualització de dades: Cada 30 segons
- Interval de transmissió sense fil: Up to 100m (328ft) in open areas
- Mida de la pantalla: LCD de 4.4 polzades
- Característiques especials: 3 remote sensors, switchable ℃/℉, comfort level indicator, backlit LCD, MAX/MIN records, trend indicators, customizable alarms.
10. Garantia i Suport
Per obtenir informació sobre la garantia o assistència tècnica, consulteu les dades de contacte proporcionades amb la vostra compra o visiteu el lloc web oficial de LIORQUE. weblloc web. Conserveu el rebut de compra com a comprovant de compra.