
1. Introducció
This manual provides detailed instructions for the installation, operation, and maintenance of your plplaaoo 100A MPPT Solar Charge Controller. This advanced controller is designed to optimize energy harvest from your solar panels and manage battery charging efficiently for 12V, 24V, 36V, and 48V solar power systems. Please read this manual thoroughly before installation and use to ensure proper function and safety.
2. Instruccions de seguretat
Si us plau, observeu les següents precaucions de seguretat durant la instal·lació i el funcionament:
- Ensure all wiring is correctly connected and securely fastened to prevent loose connections and overheating.
- Always disconnect the solar panel and battery power before installing or adjusting the controller.
- Use appropriate tools and wear protective gear, including eye protection, during installation.
- Install the controller in a well-ventilated area, away from flammable gases and liquids.
- Do not disassemble or attempt to repair the controller yourself. Contact qualified personnel for service.
- Ensure the battery bank is properly sized and compatible with the controller's voltage i qualificacions actuals.
- Avoid short-circuiting the solar panel, battery, or load terminals.
3. Característiques del producte
- Maximum Power Point Tracking (MPPT): Achieves up to 98% conversion efficiency by intelligently tracking the maximum power point of solar panels under varying conditions.
- Volum automàtictage Adaptation: Automatically detects and adapts to 12V, 24V, 36V, or 48V battery systems.
- Multifunctional Control: Supports various operating modes including PWM charging, constant current output, and voltagregulació.
- Integrated USB and DC Outputs: Features dual 5V 1A USB ports and a 2A DC output for charging external devices.
- Protecció integral: Includes safeguards against overvoltage, overcurrent, overtemperature, overload, short circuits, and reverse polarity.
- Interfície fàcil d'utilitzar: Equipped with a backlit LCD display for real-time monitoring and intuitive buttons for configuration.
- Construcció duradora: Features an aluminum heatsink for efficient cooling and robust design for harsh environments (0°C to 60°C).
- Compatibilitat de la bateria: Compatible with gel, sealed lead-acid, and lithium batteries.
4. Contingut del paquet
- 1 x plplaaoo 100A MPPT Solar Charge Controller
- 1 x Manual d'usuari
5. Producte acabatview i Components
Familiarize yourself with the main components and interface of the solar charge controller.

Figura 5.1: Davant view of the solar charge controller, highlighting the LCD screen and various connection terminals.
The controller features an intuitive LCD display and clearly labeled ports for easy connection. The display provides real-time information about the system's status.
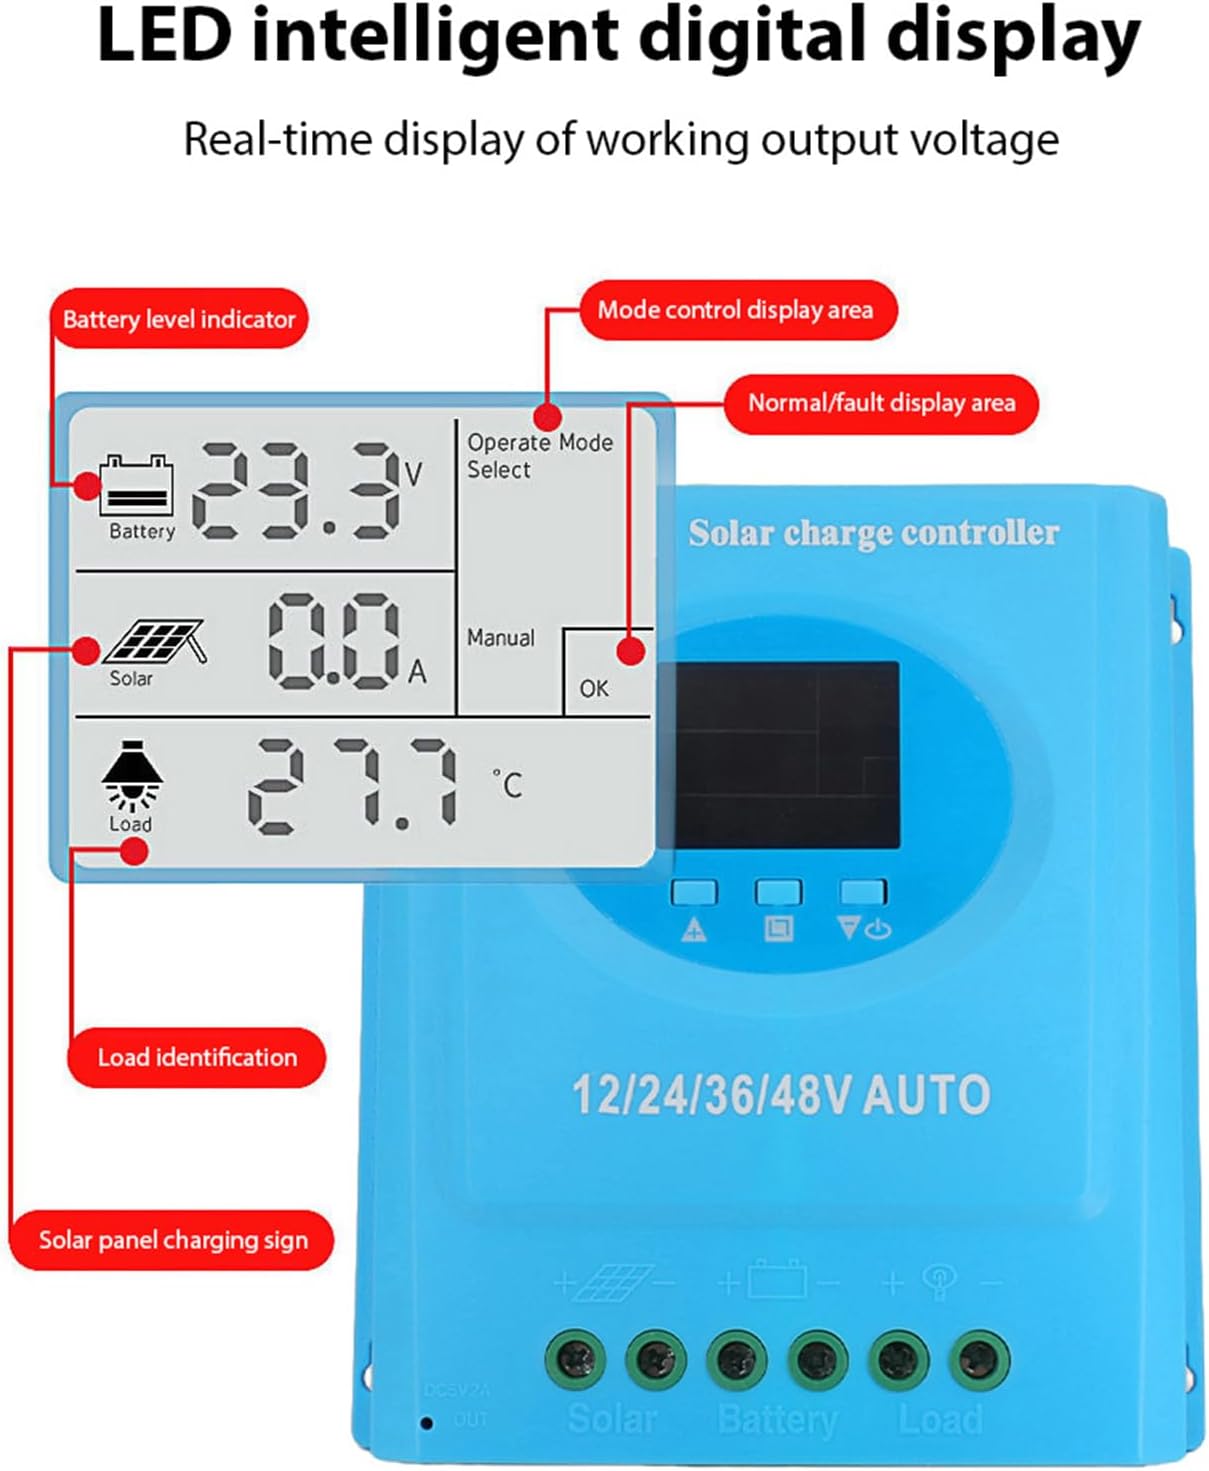
Figura 5.2: Detallada view of the controller's connection ports.

Figura 5.3: Detallada view of the LCD display, indicating battery level, solar panel charging sign, load identification, operating mode, and real-time voltage.
5.1. Ports de connexió
- Dual USB Interface: Two 5V 1A USB ports for charging mobile devices.
- Solar Panel Port: Connects to your solar panels (positive and negative).
- Port de la bateria: Connects to your battery bank (positive and negative).
- DC Load Port: Connects to your DC loads (positive and negative).
- Port de sortida de CC: Additional DC output.
6. Configuració i instal·lació
Follow these steps for proper installation of the solar charge controller. Ensure all power sources are disconnected before beginning.
6.1. Mètode de cablejat
Connect the components in the following order to prevent damage:
- Connecteu la bateria: Connect the battery to the controller's battery terminals (positive to positive, negative to negative). The controller will automatically detect the battery voltage.
- Connecteu el panell solar: Connect the solar panel to the controller's solar panel terminals (positive to positive, negative to negative).
- Connect the DC Load: Connect the DC load to the controller's load terminals (positive to positive, negative to negative).
Important: Connecteu sempre primer la bateria, després el panell solar i finalment la càrrega. Desconnecteu-ho en ordre invers.

Figura 6.1: Solar energy system wiring diagram. Note the correct polarity for all connections.
6.2. Muntatge
Mount the controller vertically on a flat surface in a well-ventilated area, ensuring adequate clearance for air circulation around the heatsink. Avoid direct sunlight, high temperatures, and humid environments.
7. Instruccions de funcionament
Once installed, the controller will automatically begin operating. The LCD display provides real-time system status.
7.1. Informació de la pantalla LCD
The LCD screen displays various parameters:
- Indicador de nivell de bateria: Shows the current charge status of the battery.
- Solar Panel Charging Sign: Indicates when the solar panels are actively charging the battery.
- Load Identification: Shows the status of the connected DC load.
- Operating Mode Display Area: Displays the current operating mode (e.g., manual, automatic).
- Normal/Fault Display Area: Indicates normal operation or displays error codes if a fault occurs.
- Real-time Working Output Voltage: Mostra el volum actualtage del sistema.
7.2. Funcions del botó
The controller typically features multiple buttons for navigation and setting adjustments:
- Botó de menú: Used to enter and exit the menu settings.
- Botons amunt / avall: Used to navigate through menu options and adjust parameter values.
- Botó D'acord: Used to confirm selections and save settings.
Refer to the on-screen menu for specific parameter adjustments such as battery type, load control mode, and charging thresholds.
8. Manteniment
Un manteniment regular garanteix un rendiment òptim i una llarga vida útil del controlador de càrrega solar.
- Neteja: Netegeu periòdicament l'exterior del controlador amb un drap sec per eliminar la pols i les restes. Assegureu-vos que les obertures de ventilació estiguin lliures.
- Comprovació de la connexió: Annually inspect all wiring connections for tightness and corrosion. Re-tighten if necessary.
- Control ambiental: Ensure the installation environment remains within the specified operating temperature range and is free from excessive moisture or dust.
- Inspecció de la bateria: Regularly check the battery terminals for corrosion and ensure the battery is in good condition.
9. Solució De Problemes
Si teniu problemes amb el controlador de càrrega solar, consulteu els següents problemes i solucions habituals:
| Problema | Causa possible | Solució |
|---|---|---|
| El controlador no s'encén / LCD en blanc |
|
|
| La bateria no es carrega |
|
|
| La càrrega no funciona |
|
|
| Es mostra el codi d'error | Error específic del sistema. | Refer to the controller's display for the specific error code and consult the full product documentation or contact support for detailed interpretation and resolution. |
10. Especificacions
| Paràmetre | Valor |
|---|---|
| Model | plplaaoozi6egog4wm-0A |
| Marca | plplaaoo |
| Corrent nominal | 100A |
| Volum del sistematage | 12V / 24V / 36V / 48V Automatic Adaptation |
| Tipus de càrrega | MPPT (seguiment del punt de màxima potència) |
| Eficiència de conversió | Fins al 98% |
| Sortida USB | Dual 5V 1A ports |
| Sortida de corrent continu | 2A |
| Temperatura de funcionament | 0 °C a 60 °C |
| Dimensions (aprox.) | 19.5 cm x 18.3 cm x 6.8 cm (7.7 polzades x 7.2 polzades x 2.7 polzades) |

Figura 10.1: Approximate dimensions of the solar charge controller.
11. Garantia i Suport
Per obtenir informació sobre la garantia, assistència tècnica o consultes sobre el servei, poseu-vos en contacte amb el vostre distribuïdor o directament amb el fabricant. Conserveu el rebut de compra com a comprovant de compra.