1. Introducció
This manual provides essential information for the safe and efficient operation, assembly, and maintenance of your Geemax Electric Tricycle, model DDSLC002. Please read this manual thoroughly before using the tricycle to ensure proper function and to prevent injury or damage.
The Geemax Electric Tricycle is designed for adult use, featuring 20-inch by 4.0-inch fat tires, a 36V 350W motor, and a 13Ah lithium battery. It is suitable for various terrains including urban roads, beaches, and light snow.

Figure 1.1: Geemax Electric Tricycle DDSLC002
This image shows the Geemax Electric Tricycle, model DDSLC002, in white. It features large 20-inch fat tires, a comfortable seat with a backrest, and a spacious rear cargo basket. The design highlights its robust construction suitable for various terrains.

Figure 1.2: Versatile Terrain Capability
This image demonstrates the tricycle's adaptability to various environments, showcasing it on a paved road, a sandy beach, a snowy path, and a grassy field, emphasizing its fat tire design for multi-terrain use.
2. Informació de seguretat
Your safety is paramount. Adhere to all warnings and instructions in this manual.
- Porteu sempre casc i equip de seguretat adequat quan conduïu.
- Assegureu-vos que tots els components estiguin ben fixats abans de cada viatge.
- No conduïu el tricicle sota els efectes de l'alcohol o les drogues.
- Respecteu totes les lleis i regulacions locals de trànsit.
- Avoid riding in adverse weather conditions, such as heavy rain or ice, unless the tricycle is specifically designed and equipped for such conditions.
- The maximum load capacity for this tricycle is 350 lbs (158 kg). Do not exceed this limit.
- Keep hands and feet away from moving parts during operation.
- Regularly inspect brakes, tires, and battery for wear and damage.
3. Contingut del paquet
Upon unpacking, verify that all components are present and undamaged. If any parts are missing or damaged, contact customer support immediately.
- Geemax Electric Tricycle (partially assembled)
- Bateria de liti de 36 V 13 Ah
- Carregador de bateria
- Cistella d'emmagatzematge posterior
- Eines de muntatge
- Manual d'usuari
4. Identificació de components
Familiarize yourself with the various parts of your Geemax Electric Tricycle using the diagram below.
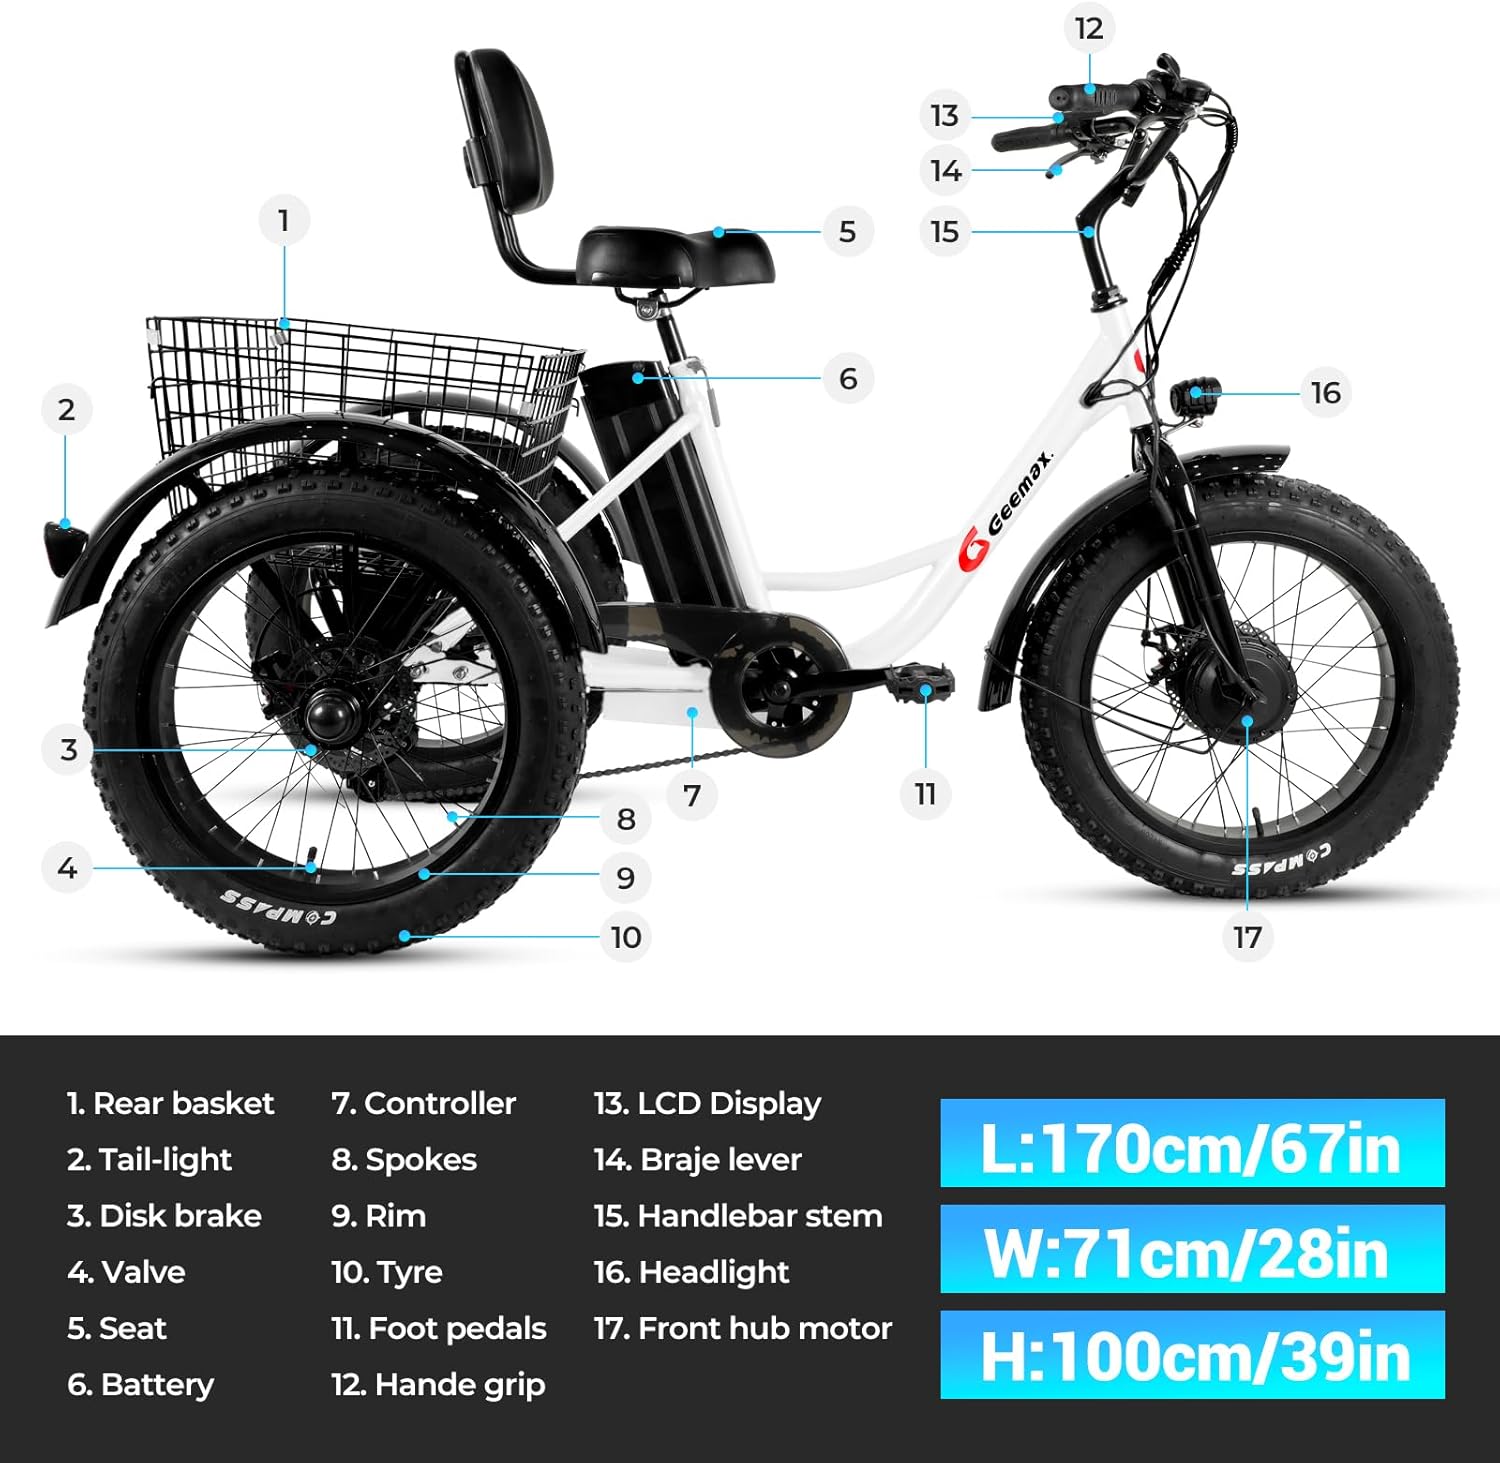
Figure 4.1: Tricycle Component Diagram
This image displays a detailed diagram of the Geemax Electric Tricycle, highlighting its key components with numbered labels for easy identification. The diagram includes the rear basket, tail-light, disk brake, valve, seat, battery, controller, spokes, rim, tire, foot pedals, handle grip, LCD display, brake lever, handlebar stem, headlight, and front hub motor. Dimensions are also provided: Length 170cm/67in, Width 71cm/28in, Height 100cm/39in.
- Cistella posterior
- Llum de la cua
- Fre de disc
- Vàlvula
- Seient
- Bateria
- Controlador
- Ràdios
- Rim
- Pneumàtic
- Pedals de peu
- Empunyadura del mànec
- Pantalla LCD
- Palanca de fre
- Tija del manillar
- Far
- Motor de cub davanter
5. Muntatge i muntatge
The Geemax Electric Tricycle arrives approximately 50% assembled. Follow these steps for final assembly.
5.1 Desembalatge
- Traieu amb cura tots els components de l'embalatge.
- Place all parts on a clean, flat surface.
- Verify all parts are present against the package contents list.
5.2 Instal·lació del manillar
- Loosen the bolts on the handlebar stem.
- Insert the handlebar into the stem, ensuring it is centered and aligned.
- Premeu els cargols amb seguretat.
5.3 Seat and Backrest Adjustment
Adjust the seat height and backrest for optimal comfort and riding posture.

Figure 5.1: Adjustable Seat and Backrest
This image illustrates the adjustable mechanism for the tricycle's seat and backrest, allowing riders to customize their seating position for comfort and ergonomics.
- Loosen the quick-release lever or bolt for the seat post.
- Adjust the seat to a comfortable height where your feet can touch the ground.
- Securely tighten the quick-release lever or bolt.
- Adjust the backrest angle for lumbar support.
5.4 Rear Basket Attachment
Attach the rear basket to the designated mounting points on the tricycle frame.

Figure 5.2: Rear Storage Basket
This image shows the spacious rear basket of the tricycle, demonstrating its capacity by being filled with various groceries, highlighting its utility for carrying items.
- Align the basket with the mounting holes on the rear frame.
- Use the provided bolts and nuts to secure the basket firmly.
- Ensure the basket is stable and does not wobble.
5.5 Headlight and Taillight Installation
Install the headlight and taillight for improved visibility and safety.

Figura 5.3: Far davanter
This image focuses on the tricycle's bright LED headlight, demonstrating its illumination capability for nighttime riding or low-light conditions.
- Mount the headlight to the front of the tricycle, typically on the handlebars or front fork.
- Mount the taillight to the rear of the tricycle, usually on the rear fender or basket.
- Connect the lights to the tricycle's electrical system as per the wiring instructions (refer to detailed wiring diagram if provided separately).
5.6 Comprovacions finals
- Ensure all bolts and fasteners are tightened.
- Comproveu la pressió dels pneumàtics.
- Test brake functionality.
- Verify the battery is fully charged and properly installed.
6. Informació de la bateria
The Geemax Electric Tricycle is powered by a 36V 13Ah Lithium Battery, UL Certified for safety.

Figure 6.1: 36V 13Ah Lithium Battery
This image displays the 36V 13Ah lithium battery pack, highlighting its internal cell structure and UL certification, indicating its safety and quality standards. The battery provides an electric range of 28-35 miles and an assist range of 35-45 miles.
6.1 Càrrega de la bateria
- Connecteu el carregador a una presa de corrent estàndard.
- Connect the charger output to the battery charging port.
- El llum indicador del carregador mostrarà l'estat de càrrega (per exemple, vermell per a la càrrega, verd per a la càrrega completa).
- No sobrecarregueu la bateria. Desconnecteu el carregador un cop finalitzada la càrrega.
- Charging time typically ranges from 4-6 hours for a full charge.
6.2 Instal·lació i extracció de la bateria
- To install: Slide the battery into its designated slot on the tricycle frame until it clicks securely into place. Ensure the battery is locked to prevent theft.
- To remove: Unlock the battery with the provided key, then slide it out of the frame.
7. Instruccions de funcionament
7.1 Engegada/apagada
- To power on: Press and hold the power button on the LCD display.
- Per apagar: premeu i manteniu premut el botó d'engegada de nou.
7.2 Funcions de la pantalla LCD
The LCD display provides real-time information about your ride.

Figure 7.1: LCD Display Interface
This image shows the multi-function LCD display (S866 model) mounted on the handlebars. It clearly indicates current speed, battery level, distance covered, and the selected pedal assist level (0-5). The display also features power and mode buttons.
- Velocitat: Mostra la velocitat de conducció actual.
- Nivell de bateria: Indica la càrrega restant de la bateria.
- Distància: Shows trip distance or total odometer reading.
- Nivell d'assistència al pedal: Displays the current assist level (0-5).
7.3 Riding Modes and Speed Assist
Your tricycle offers three riding modes and five levels of pedal assist.

Figure 7.2: Speed Assist Controls
This close-up image shows the LCD display and the control buttons (+, -, power) on the handlebar, used to adjust the pedal assist level from 1 to 5, and to power the system on or off.
- Electric Tricycle Mode (e-trike): Provides full motor power without pedaling.
- Assisted Tricycle Mode: The motor provides assistance as you pedal. Use the '+' and '-' buttons on the display to adjust the assist level from 1 (minimal assistance) to 5 (maximum assistance).
- Normal Tricycle Mode: The motor is off, and you pedal manually like a traditional tricycle.
7.4 Sistema de frenada
The tricycle is equipped with disc brakes for reliable stopping power.

Figure 7.3: Disc Brake System
Aquesta imatge ofereix un primer pla view of the disc brake system on the tricycle's wheel, showing the rotor and caliper mechanism, which ensures effective and responsive braking.
- Squeeze the brake levers on the handlebars to engage the brakes.
- Apply both front and rear brakes simultaneously for balanced stopping.
- Avoid sudden, hard braking, especially at high speeds or on slippery surfaces.
8. Manteniment
Un manteniment regular garanteix la longevitat i el funcionament segur del vostre tricicle.
8.1 Neteja
- Netegeu el marc amb anunciamp drap. Eviteu utilitzar rentadores d'alta pressió directament sobre els components elèctrics.
- Clean the chain and lubricate it regularly.
8.2 Cura dels pneumàtics
- Maintain recommended tire pressure (refer to tire sidewall for specifications).
- Inspeccioneu els pneumàtics per detectar desgast, punxades o danys abans de cada viatge.
- The 4-inch wide fat tires provide excellent traction across various terrains.
8.3 Inspecció de frens
- Check brake pads for wear and replace them if necessary.
- Ensure brake levers are responsive and cables are not frayed.
8.4 Cura de la bateria
- Guardeu la bateria en un lloc fresc i sec quan no la feu servir.
- Charge the battery at least once every two months, even if not used, to maintain its health.
- Eviteu descarregar completament la bateria amb freqüència.
9. Solució De Problemes
| Problema | Causa possible | Solució |
|---|---|---|
| El tricicle no s'encén | Battery not charged or improperly installed; loose electrical connection. | Ensure battery is fully charged and securely seated. Check all visible connections. |
| El motor no ajuda | Pedal assist level set to 0; brake levers engaged; motor or controller issue. | Increase pedal assist level on LCD. Release brake levers. If problem persists, contact support. |
| Els frens es senten febles | Pastilles de fre desgastades; cables de fre solts; aire al sistema hidràulic (si escau). | Inspeccioneu i substituïu les pastilles de fre. Ajusteu la tensió del cable de fre. Consulteu un professional per a problemes amb els frens hidràulics. |
| Sorolls inusuals durant la conducció | Loose components; dry chain; tire rubbing. | Check all fasteners. Lubricate chain. Inspect for tire rubbing against frame or fenders. |
10. Especificacions
Detailed technical specifications for the Geemax Electric Tricycle DDSLC002.

Figure 10.1: Rider Height and Load Capacity
This image illustrates the recommended rider height range of 5'2" to 6'4" and the maximum load capacity of 350 lbs for the Geemax Electric Tricycle. It also shows the adjustable seat height from 30.5 inches to 38.5 inches.

Figure 10.2: Tricycle Dimensions
This image provides the overall dimensions of the tricycle: Length 170cm (67in), Height 100cm (39in), and Width 71cm (28in). It also reiterates the recommended rider height and maximum load capacity.
| Característica | Especificació |
|---|---|
| Nom del model | DDSLC002 |
| Tipus de bicicleta | Tricicle elèctric |
| Franja d'edat | Adult |
| Motor | 36V 350W Brushless High-Speed Motor |
| Bateria | 36V 13Ah Lithium Battery (UL Certified) |
| Velocitat màxima | Fins a 20 mph (32 km/h) |
| Range (Assist Mode) | Fins a 40 milles (64 km) |
| Range (Electric Mode) | Fins a 28 milles (45 km) |
| Pneumàtics | 20" x 4.0" Puncture-Resistant Fat Tires |
| Material del marc | Carbon Steel / Alloy Steel |
| Estil de fre | Frens de disc |
| Tipus de suspensió | Rígida |
| Nombre de velocitats | 20 (implied by product data, likely referring to gear combinations or assist levels) |
| Característica especial | Pantalla LCD |
| Components inclosos | Cistella |
| Capacitat de càrrega màxima | 350 lliures (158 kg) |
| Alçada recomanada del genet | 1,62 m - 1,93 m |
| UPC | 760762256946 |
11. Garantia i Suport
11.1 Informació de la garantia
The Geemax Electric Tricycle DDSLC002 comes with a One Year Warranty from the date of purchase. This warranty covers manufacturing defects in materials and workmanship. It does not cover damage due to misuse, accidents, normal wear and tear, or unauthorized modifications.
11.2 Atenció al client
For technical assistance, warranty claims, or replacement parts, please contact Geemax customer support. Refer to your purchase documentation for specific contact details or visit the official Geemax weblloc.