
1. Introducció
This manual provides detailed instructions for the safe and effective operation, setup, and maintenance of your AZZUNO MIG-155L 5-in-1 Multiprocess Welder. This versatile machine supports Gas MIG, Aluminum MIG, Gasless Flux Core MIG, Lift TIG, and Stick welding processes, operating on both 110V and 220V power inputs. Please read this manual thoroughly before using the welder.
2. Informació de seguretat
ADVERTIMENT: Welding can be dangerous. Always wear appropriate personal protective equipment (PPE) including a welding helmet with proper shade, flame-resistant clothing, welding gloves, and safety shoes. Ensure adequate ventilation to avoid inhaling fumes. Always work in a dry environment and keep a fire extinguisher nearby. Disconnect power before performing any maintenance or adjustments.
- Descàrrega elèctrica: Can kill. Do not touch live electrical parts.
- Fums i gasos: Pot ser perillós per a la salut. Mantingueu el cap allunyat dels fums. Utilitzeu la ventilació o l'extracció per eliminar els fums de la zona de respiració.
- Raigs d'arc: Can burn eyes and skin. Wear a welding helmet and protective clothing.
- Incendi i explosió: Welding can cause fire or explosion. Keep flammables away from the welding area.
- Parts calentes: Can cause severe burns. Do not touch hot parts with bare hands.
3. Característiques del producte
- Capacitat de soldadura 5 en 1: Supports Gas MIG, Aluminum MIG, Gasless Flux Core MIG, Lift TIG, and Stick welding.
- Dual Voltage Entrada: Compatible with both 110V and 220V power supplies.
- Simplified Aluminum MIG Welding: Designed for efficient aluminum welding without requiring a Teflon liner or Spool Gun.
- Large Clear LED Display: Provides crystal-clear visibility for settings and intuitive operation.
- SYNERGIC Mode: Automatically adjusts welding parameters for optimal performance.
- 2T, 4T, and SPOT Modes: Offers flexibility for manual, continuous, or timed welds.
- Manual Wire Feed Button: Allows for quick and easy wire feeding.
4. Components mésview
The AZZUNO MIG-155L welder is a compact and powerful unit designed for various welding tasks. Below is an overview of its main functions and connections.
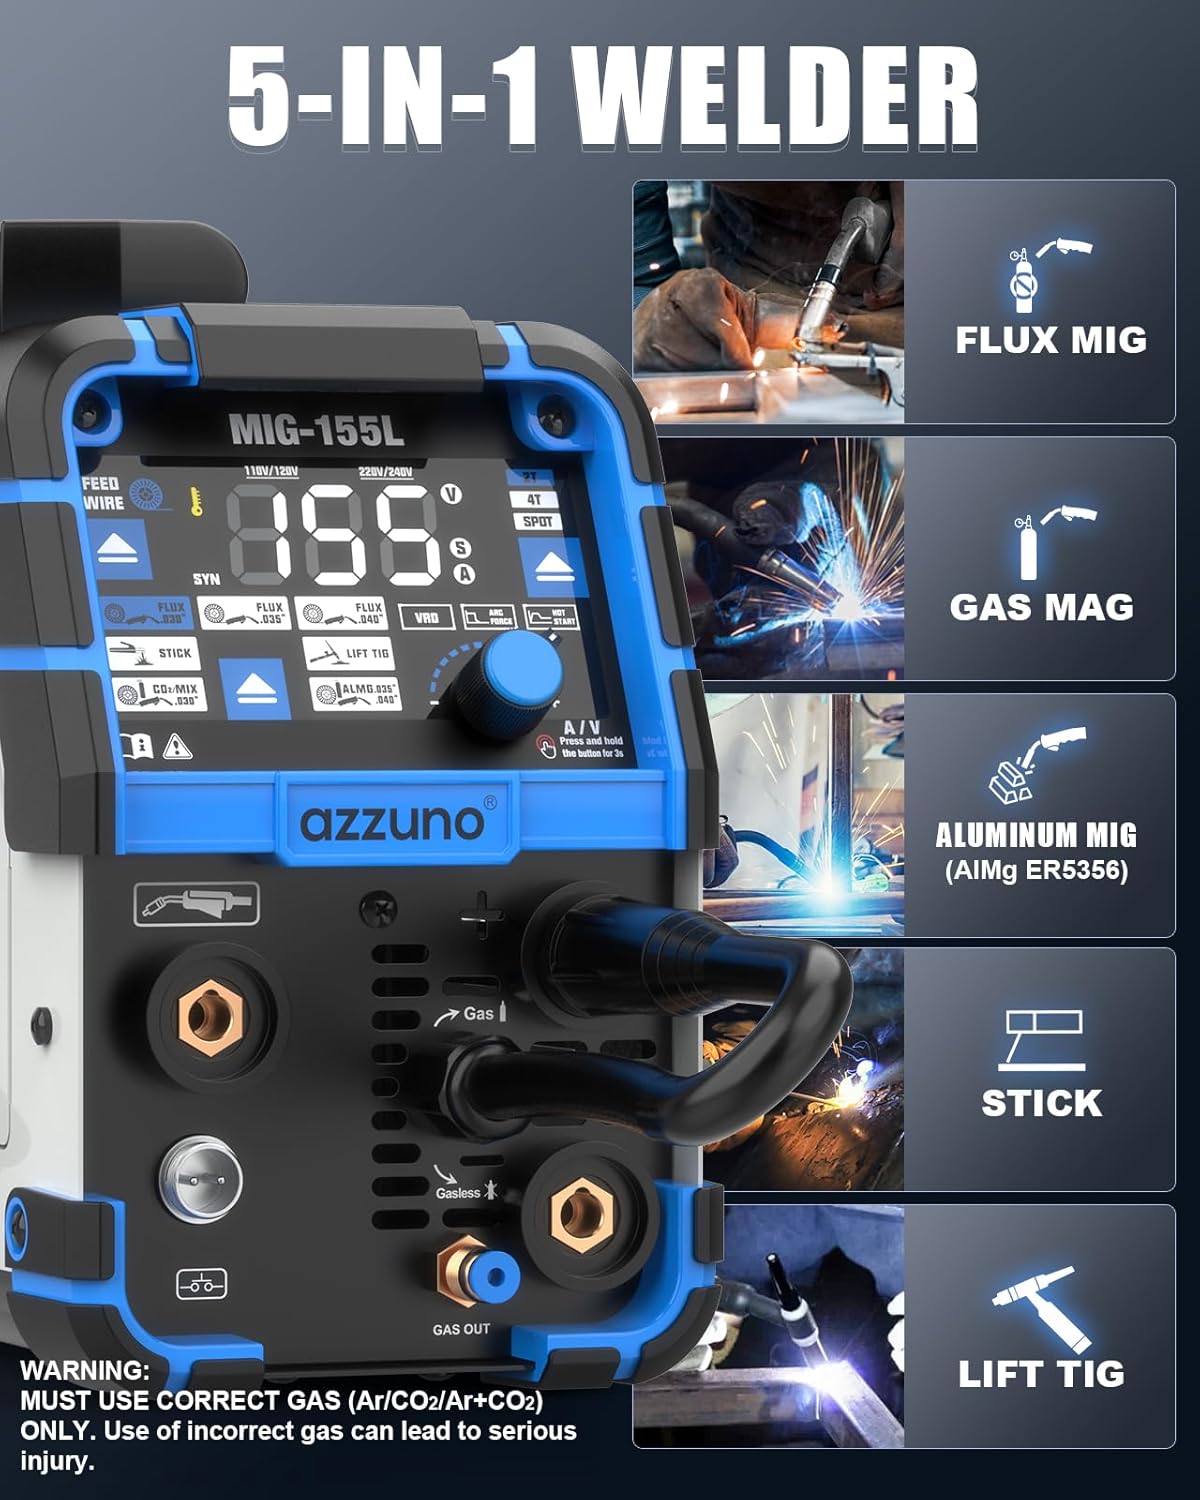
Figura 4.1: Acabatview of the AZZUNO MIG-155L welder, illustrating its 5-in-1 capabilities including Flux MIG, Gas MAG, Aluminum MIG, Stick, and Lift TIG welding modes. The image highlights the control panel, wire feed mechanism, and various connection points for gas and welding cables.
5. Instruccions de configuració
5.1 Connexió d'alimentació
Connect the welder to a suitable power source. The machine automatically detects and adapts to both 110V and 220V inputs. Use the provided adapter cord if necessary for 110V operation. Ensure the power outlet is properly grounded and capable of supplying the required amperage.
Instal·lació de 5.2 cables
Open the wire feed compartment. Place the wire spool onto the spindle and secure it. Thread the welding wire through the appropriate drive roller groove and into the torch liner. Ensure the drive roller matches the wire type:
- K-groove: For Flux welding wire.
- V-groove: For Solid welding wire.
- U-groove: For Aluminum welding wire (AlMg5356).

Figura 5.2: Illustration of the wire feeding system, showing the placement of the wire spool and the three types of drive rollers: K-groove for flux wire, V-groove for solid wire, and U-groove for aluminum wire. Proper selection of the drive roller is crucial for consistent wire feeding.
5.3 Connexió de gas (per a gas MIG/MAG)
For Gas MIG/MAG welding, connect your shielding gas cylinder (e.g., Argon/CO2 mix for MAG, pure Argon for Aluminum MIG) to the gas inlet on the rear of the machine using the provided gas hose. Ensure all connections are tight to prevent leaks. ADVERTIMENT: Use correct gas (Ar/CO2/Ar+CO2) ONLY. Use of incorrect gas can lead to serious injury.
5.4 TIG Torch Connection
Connect the WP-17V TIG welding torch to the designated quick connector (10-25mm²) on the front panel. Ensure the gas hose from the TIG torch is also connected to the gas output on the machine if using shielding gas for TIG welding.
5.5 Cl mòltamp and Electrode Holder Connection
Connecteu la terra clamp cable to the negative (-) terminal and the electrode holder cable (for Stick welding) or MIG torch cable to the positive (+) terminal on the front panel. Always ensure a good electrical connection for the ground clamp a la peça de treball.
6. Instruccions de funcionament
6.1 Tauler de control i pantalla LED
The welder features a large LED display for clear visibility of settings. The main knob allows for adjustment of welding parameters. Press and hold button "A" for 3 seconds to activate SYNERGIC mode. The knob "B" can also function as a button. To switch between Amp i Voltage adjustment, select VRD/Arc Force/Hot Start and then press and hold the knob for 3 seconds.
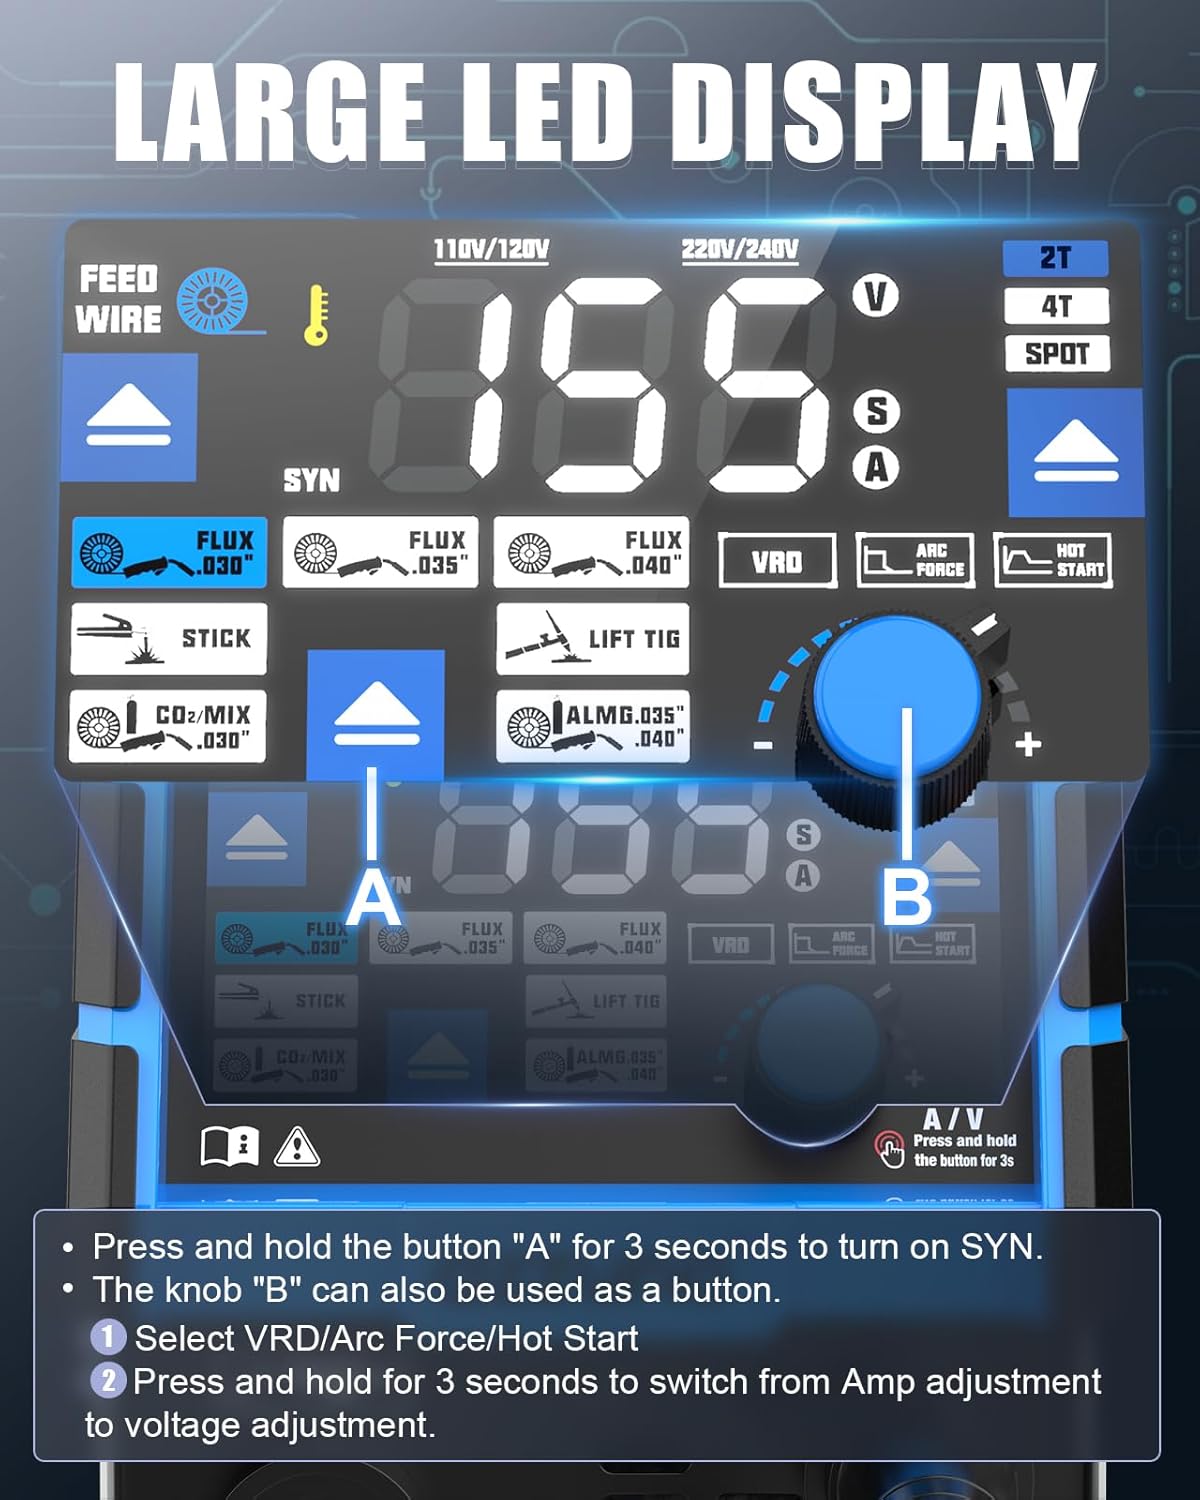
Figura 6.1: Detallada view of the welder's large LED display and control panel. It shows the digital readouts for voltage i amperage, indicators for different welding modes (Flux, Stick, Lift TIG, CO2/MIX, ALMG), and the main adjustment knob with its integrated button functionality for switching between ampera i voltage ajustos.
6.2 Selecció del mode
Use the mode selection buttons on the control panel to choose your desired welding process: Gas MIG, Aluminum MIG, Gasless Flux Core MIG, Lift TIG, or Stick welding. The selected mode will be indicated on the LED display.
6.3 SYNERGIC Mode
In SYNERGIC mode, the welder automatically sets optimal voltage and wire feed speed based on the selected amperage and material. This simplifies setup and provides consistent weld quality. To activate, press and hold button "A" for 3 seconds.
6.4 2T/4T/SPOT Settings
These settings provide control over the torch trigger operation:
- 2T (Dos tocs): Press and hold the trigger to weld, release to stop. Ideal for short welds.
- 4T (Quatre tocs): Press and release to start welding, press and release again to stop. Suitable for long welds, reducing hand fatigue.
- TACA: Allows for timed spot welds. The spot time can be adjusted.

Figura 6.4: Visual representation of the 2T, 4T, and SPOT welding settings. 2T involves holding the trigger, 4T allows for continuous welding with two presses, and SPOT enables timed spot welds, catering to diverse welding requirements.
6.5 Aluminum MIG Welding
The AZZUNO MIG-155L simplifies aluminum MIG welding. For best results, use ER5356 AlMg welding wire with a recommended diameter of .040". No Teflon liner or Spool Gun is required. Position the welding torch facing left and weld from right to left for optimal bead formation.
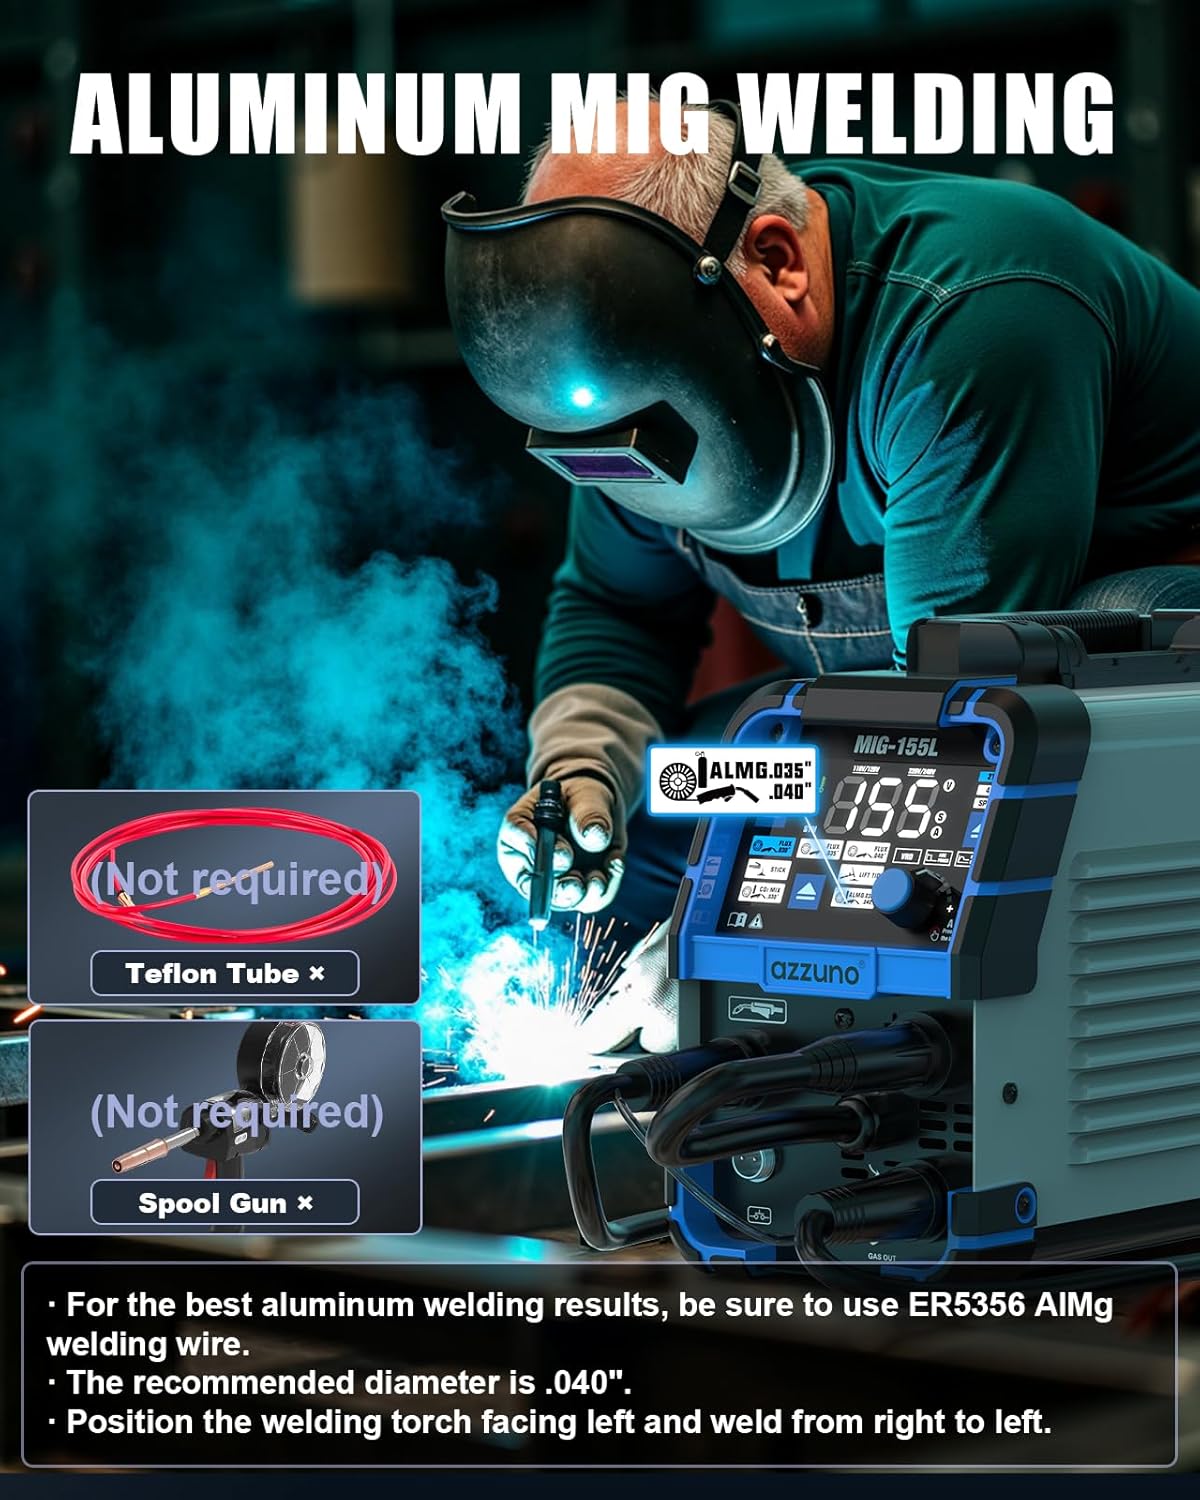
Figura 6.5: Demonstration of aluminum MIG welding with the AZZUNO MIG-155L. The image highlights that a Teflon tube and Spool Gun are not required, simplifying the process. It also recommends using ER5356 AlMg welding wire with a .040" diameter and specific torch positioning.
6.6 Manual Wire Feed Button
The manual WIRE FEED BUTTON allows you to quickly feed the welding wire without initiating an arc. Press and hold this button to advance the wire, useful for loading new spools or clearing blockages.
7. Accessoris
The AZZUNO MIG-155L comes with a comprehensive set of accessories to support its various welding functions.
7.1 WP-17V TIG Welding Torch and Components
The included air-cooled WP-17V TIG welding torch features an extra-long 13-ft (4m) cable and gas hose with a 10-25mm² quick connector and 5/8" external thread gas hose connector.

Figura 7.1a: The WP-17V TIG welding torch with its 13-ft (4m) cable, highlighting the 10-25mm² quick connector and the 5/8" external thread gas hose connector.
The TIG torch kit includes:
- TIG Torch (WP-17V) x1
- Ceramic Cups (#4, #5, #6) x3
- Collets (.063"/1.6mm, .078"/2.0mm, .094"/2.4mm) x3
- Collet Body x1
- Long Back Cap x1
- Short Back Cap x1

Figura 7.1b: A visual breakdown of the WP-17V TIG torch accessories, including ceramic cups (#4, #5, #6), collets of various sizes, a collet body, and both long and short back caps.
7.2 Accessoris generals
Additional accessories included with the welder:
- Portaelèctrodes
- Terra Clamp
- Torxa MIG (14AK)
- Contact Tips x2
- Hose Bands x2
- Flux Wire x1
- Martell
- Mànega de gas
- U/V Drive Roller
- Cable adaptador de 110V~220V
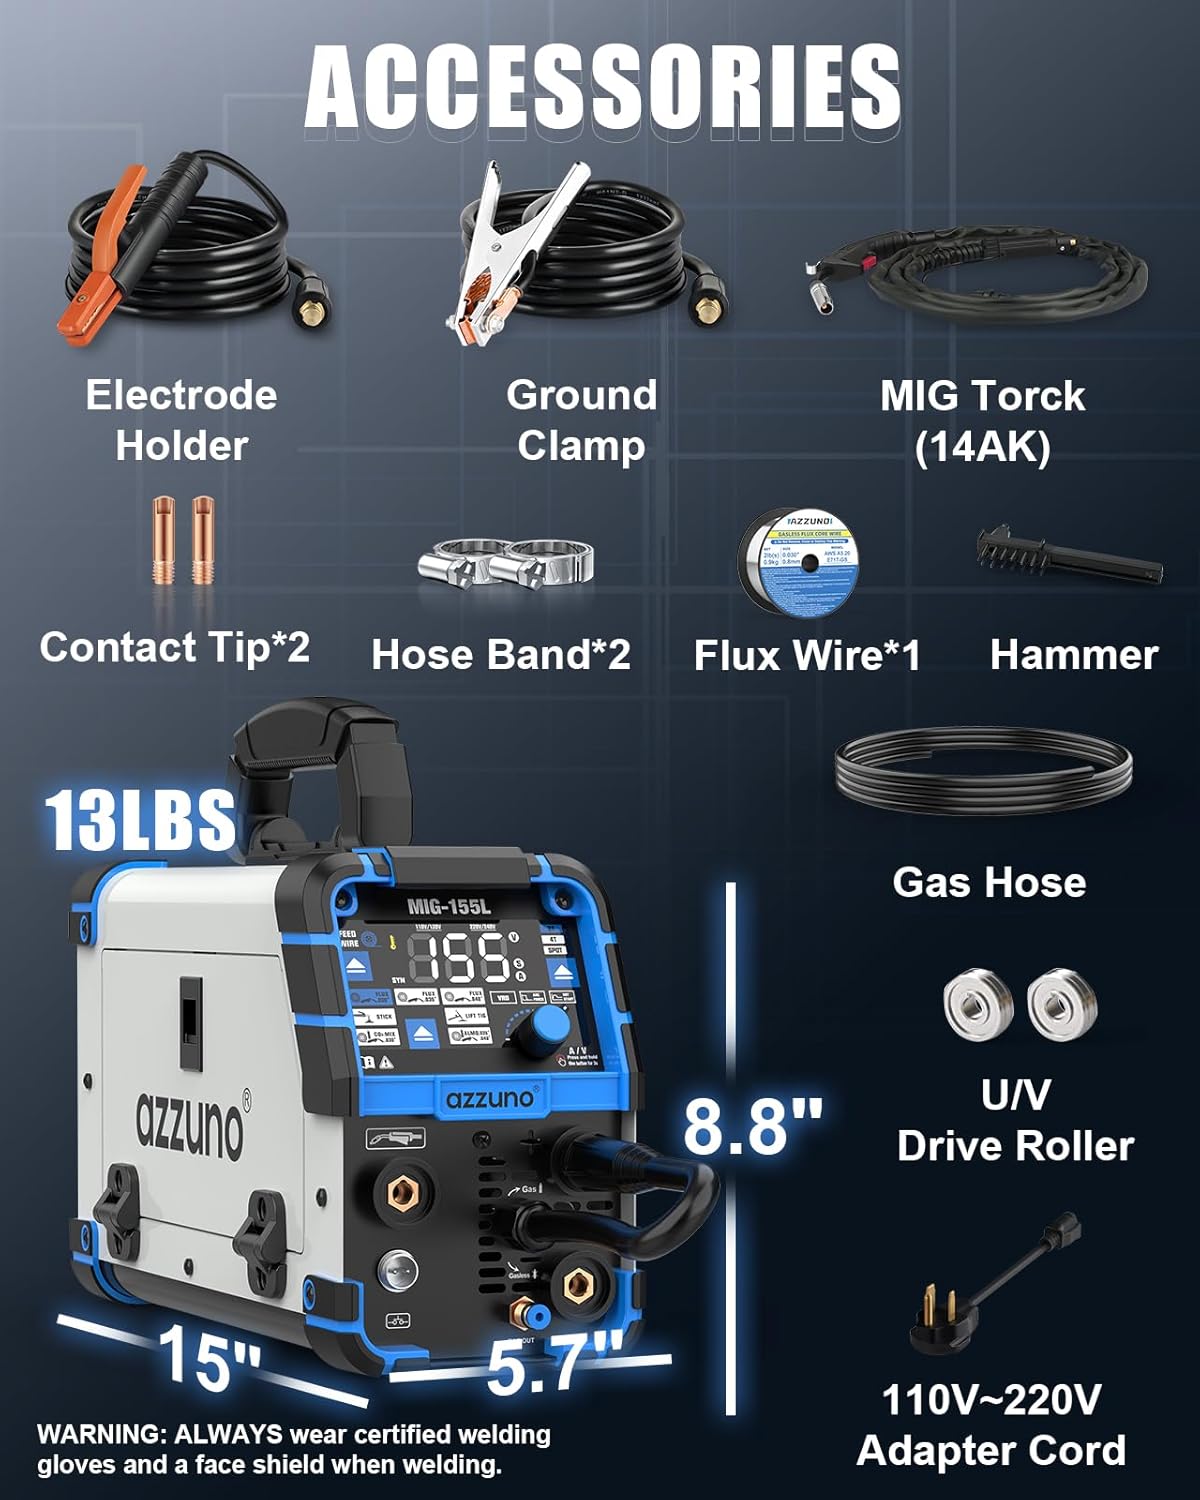
Figura 7.2: Un acabatview of all included accessories such as the electrode holder, ground clamp, MIG torch, contact tips, hose bands, flux wire, hammer, gas hose, U/V drive roller, and 110V~220V adapter cord. The image also displays the compact dimensions of the MIG-155L welder (approximately 15" x 8.8" x 5.7") and its weight (13 lbs).
8. Manteniment
Un manteniment regular garanteix la longevitat i el rendiment òptim del vostre soldador.
- Neteja: Periodically clean the internal components with compressed air to remove dust and debris. Keep the exterior clean.
- Inspecció del cable: Regularly inspect all welding cables, torches, and connections for wear, damage, or loose fittings. Replace damaged parts immediately.
- Rodets d'accionament: Ensure drive rollers are clean and free of wire residue for consistent wire feeding.
- Emmagatzematge: Guardeu el soldador en un entorn sec i net, allunyat de la pols i la humitat excessives.
9. Solució De Problemes
If you encounter issues with your welder, refer to the following common troubleshooting steps:
- Sense energia: Check power cord connection, circuit breaker, and ensure the power switch is on.
- Sense arc: Verify ground clamp connection, ensure correct welding mode is selected, check for proper wire feed, and inspect torch consumables.
- Mala qualitat de la soldadura: Ajustar amperage/voltage settings, check wire feed speed, ensure proper gas flow (if applicable), and clean workpiece.
- Problemes d'alimentació de cable: Check wire spool installation, ensure drive roller groove matches wire type, clean drive rollers, and inspect torch liner for blockages.
- Sobreescalfament: Allow the machine to cool down. Ensure proper ventilation and do not exceed the duty cycle.
For persistent issues, contact AZZUNO customer support.
10. Especificacions tècniques
| Característica | Especificació |
|---|---|
| Model | MIG-155L |
| Processos de soldadura | Gas MIG, Aluminum MIG, Gasless Flux Core MIG, Lift TIG, Stick |
| Entrada Voltage | 110V/220V Dual Voltage |
| Màx Ampedat | 155A |
| Compatible Flux Core Wire | .030"/.035"/.040" |
| Compatible Solid Wire | .030" |
| Compatible Aluminum Wire | .035"/.040" ER5356 AlMg |
| Compatible Electrodes | E6013 |
| Torxa TIG | WP-17V (13-ft cable, 10-25mm² connector) |
| Dimensions (aprox.) | 15" x 8.8" x 5.7" |
| Pes (aprox.) | 13 lliures |
11. Garantia i Suport
For warranty information, technical support, or service inquiries, please refer to the warranty card included with your product or visit the official AZZUNO weblloc web. Conserveu el rebut de compra com a comprovant de compra.