
Introducció
The REPTITRIP PT02T 2-in-1 Reptile Dimming Thermostat is designed to provide precise and reliable temperature and lighting control for reptile enclosures. This device features two independent sockets: one for timer-controlled devices and another for PID (Proportional-Integral-Derivative) dimming temperature control. It helps maintain a stable and appropriate environment for your reptiles, promoting their health and well-being.

Image: The REPTITRIP PT02T thermostat connected to two heat lamps in a reptile terrarium, demonstrating its dual control capability.
Producte acabatview
The PT02T thermostat integrates two distinct control functions into a single unit:
- Timer Socket: This socket provides on/off control for connected devices based on a user-defined timer (1 to 24 hours). It is suitable for devices that require scheduled operation, such as daytime heat lamps, UVA/UVB lights, or LED lights.
- PID Temperature Socket: This socket offers precise temperature regulation using PID dimming technology. It continuously adjusts the power output to the connected heating device to maintain a stable target temperature within the enclosure. This is ideal for heat mats, ceramic heat emitters, and infrared heat lamps.
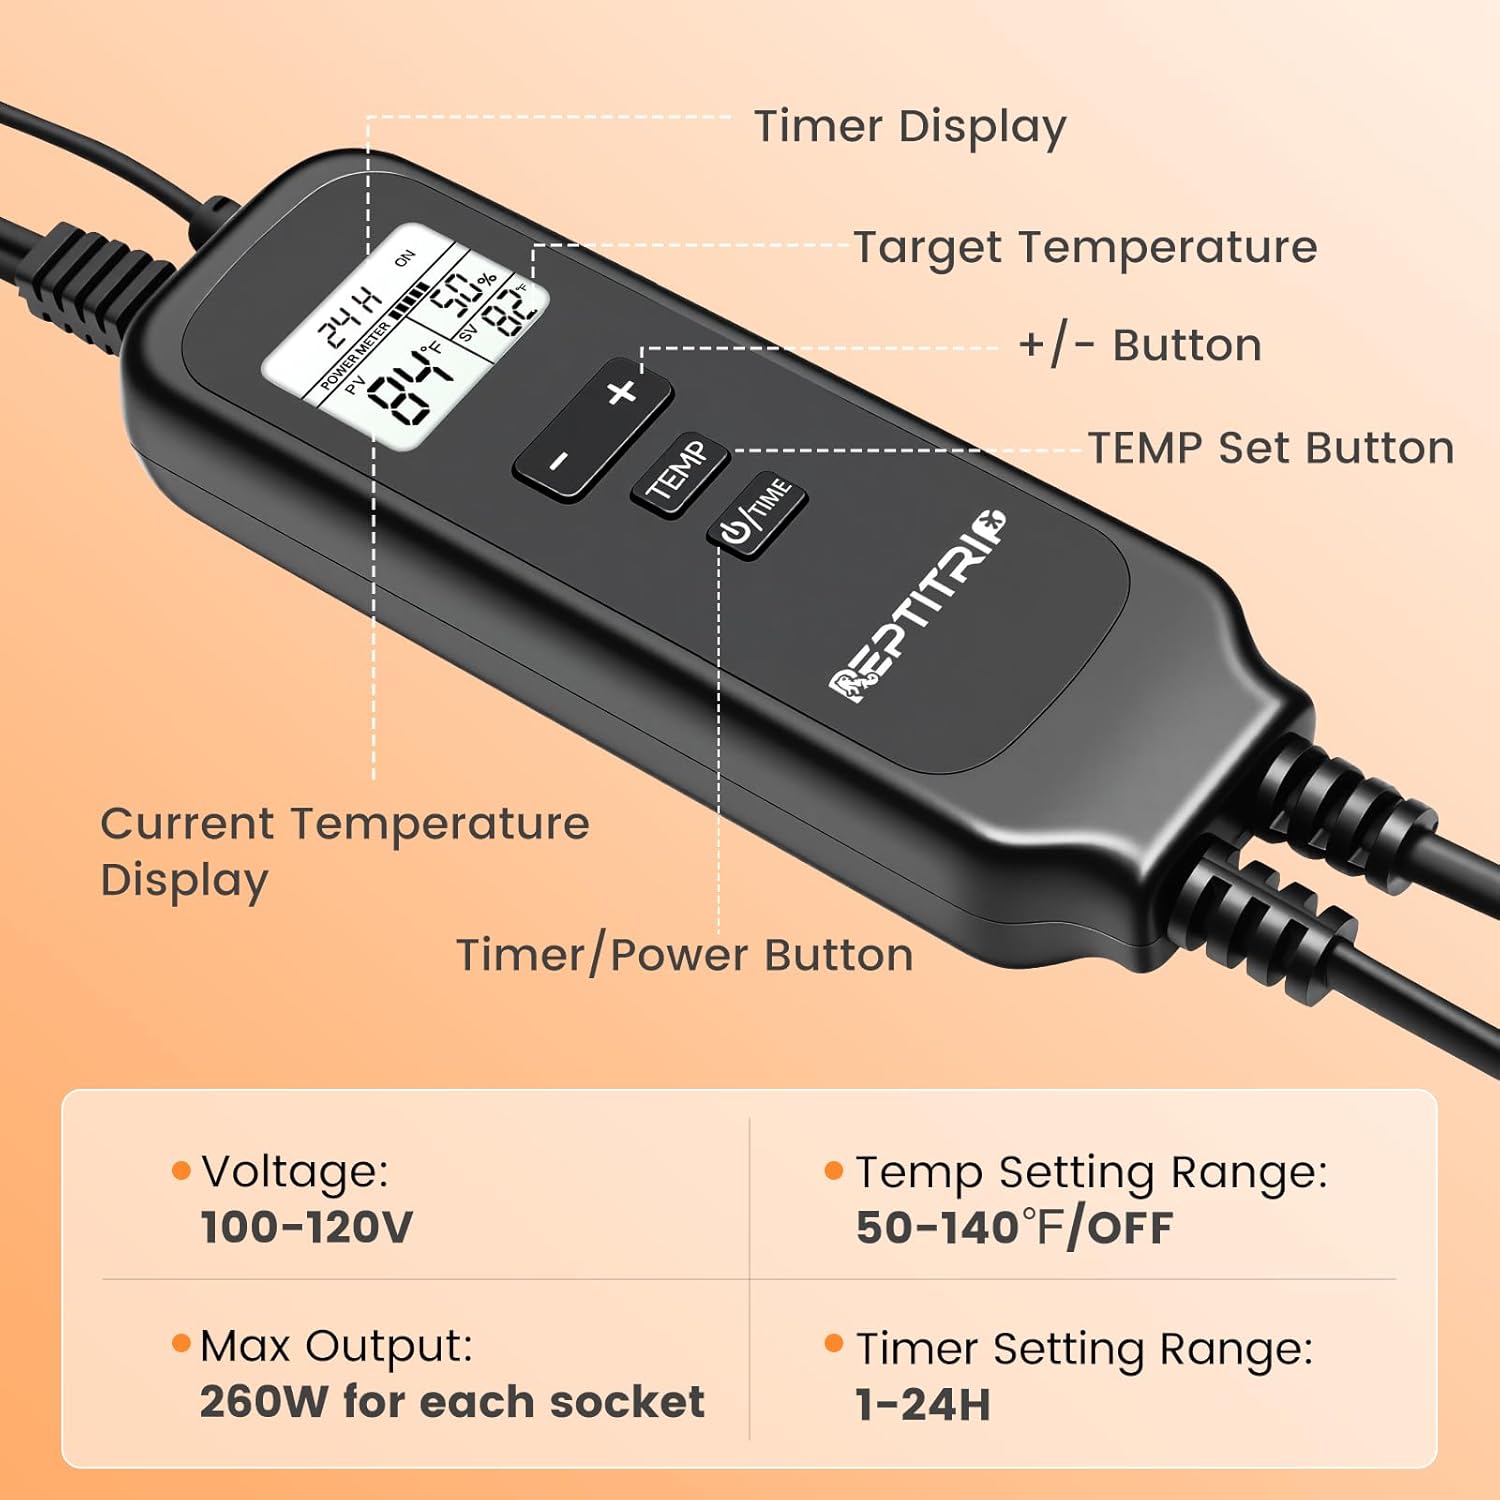
Imatge: Detallada view of the PT02T controller, highlighting the timer display, target temperature, current temperature, and control buttons.
Instruccions de seguretat
- Assegureu-vos el wat totaltage of devices connected to each socket does not exceed 260W.
- Always place the temperature sensor in the reptile's basking area or the desired temperature zone, away from direct heat sources that could provide inaccurate readings.
- Do not immerse the controller or any part of the wiring in water. This product is designed for indoor use only.
- Regularly inspect all cables and connections for damage. Discontinue use if any damage is observed.
- Keep the device out of reach of pets to prevent chewing or tamperrant.
- The power cord features a flame-retardant jacket and sturdy strain relief for enhanced safety and durability.

Image: A power plug with a flame-retardant jacket, emphasizing the product's safety features.

Image: A comparison showing the sturdy strain relief on the product's cable versus a damaged, frayed cable from another product, highlighting durability.
Configuració
- Desembalar: Carefully remove the thermostat and all components from the packaging.
- Connexió de dispositius:
- Connect your timer-controlled device (e.g., daytime heat lamp, UVB light) to the socket labeled with a clock icon.
- Connect your temperature-controlled heating device (e.g., heat mat, ceramic heat emitter) to the socket labeled with a thermometer icon.
- Sensor de posició: Place the temperature sensor inside the reptile enclosure in the area where you want to monitor and maintain the temperature. Use the included suction cup to secure the sensor. Ensure the sensor is not directly under a heat lamp or in a water dish, which could lead to inaccurate readings.
- Controlador de muntatge: Position the controller in a visible and accessible location outside the enclosure.
- Encès: Plug the thermostat's power cord into a standard 100-120V electrical outlet. The display will illuminate.

Image: A temperature sensor positioned on a rock within a reptile habitat, illustrating proper placement.
Instruccions de funcionament
Setting the Timer Socket
The timer socket controls devices for a set duration each day. This is ideal for simulating day/night cycles.
- Premeu el botó U/TIME button once. The timer display will flash.
- Utilitza el + or - buttons to adjust the desired ON duration (1 to 24 hours).
- Premeu el botó U/TIME button again to confirm the setting. The timer will now operate daily based on this duration.
ExampLI: To set an 8-hour daytime cycle, set the timer to "8H". The device will turn on for 8 hours and then off for 16 hours, repeating daily from the time it was initially activated.

Image: Visual guide on setting the timer duration using the thermostat's buttons.
Compatible Devices for Timer Socket (up to 260W): Heat Mats, Ceramic Emitters, Infrared Lamps, Night Lamps, Daylight Bulbs, Sun Lamps, UVA/UVB Bulbs, LED Lights.

Image: A selection of heating and lighting devices, such as heat mats, ceramic emitters, and various bulbs, indicating their compatibility with the timer socket.
Setting the PID Temperature Socket
The PID temperature socket maintains a constant temperature by dimming the connected heating device.
- Premeu el botó TEMP button once. The target temperature (SV) display will flash.
- Utilitza el + or - buttons to adjust the desired target temperature (range: 50-140°F).
- Premeu el botó TEMP button again to confirm the setting. The thermostat will now work to maintain this temperature.
The PID algorithm ensures temperature accuracy within ±1°F by smoothly adjusting the power output to the heating device, preventing sudden temperature fluctuations.

Image: Visual guide on setting the target temperature using the thermostat's buttons.
Compatible Devices for PID Temperature Socket (up to 260W): Heat Mats, Ceramic Emitters, Infrared Lamps, Daylight Bulbs, Sun Lamps.
Nota: UVB Bulbs and LED Lights are generally not compatible with dimming control and should be connected to the Timer Socket.
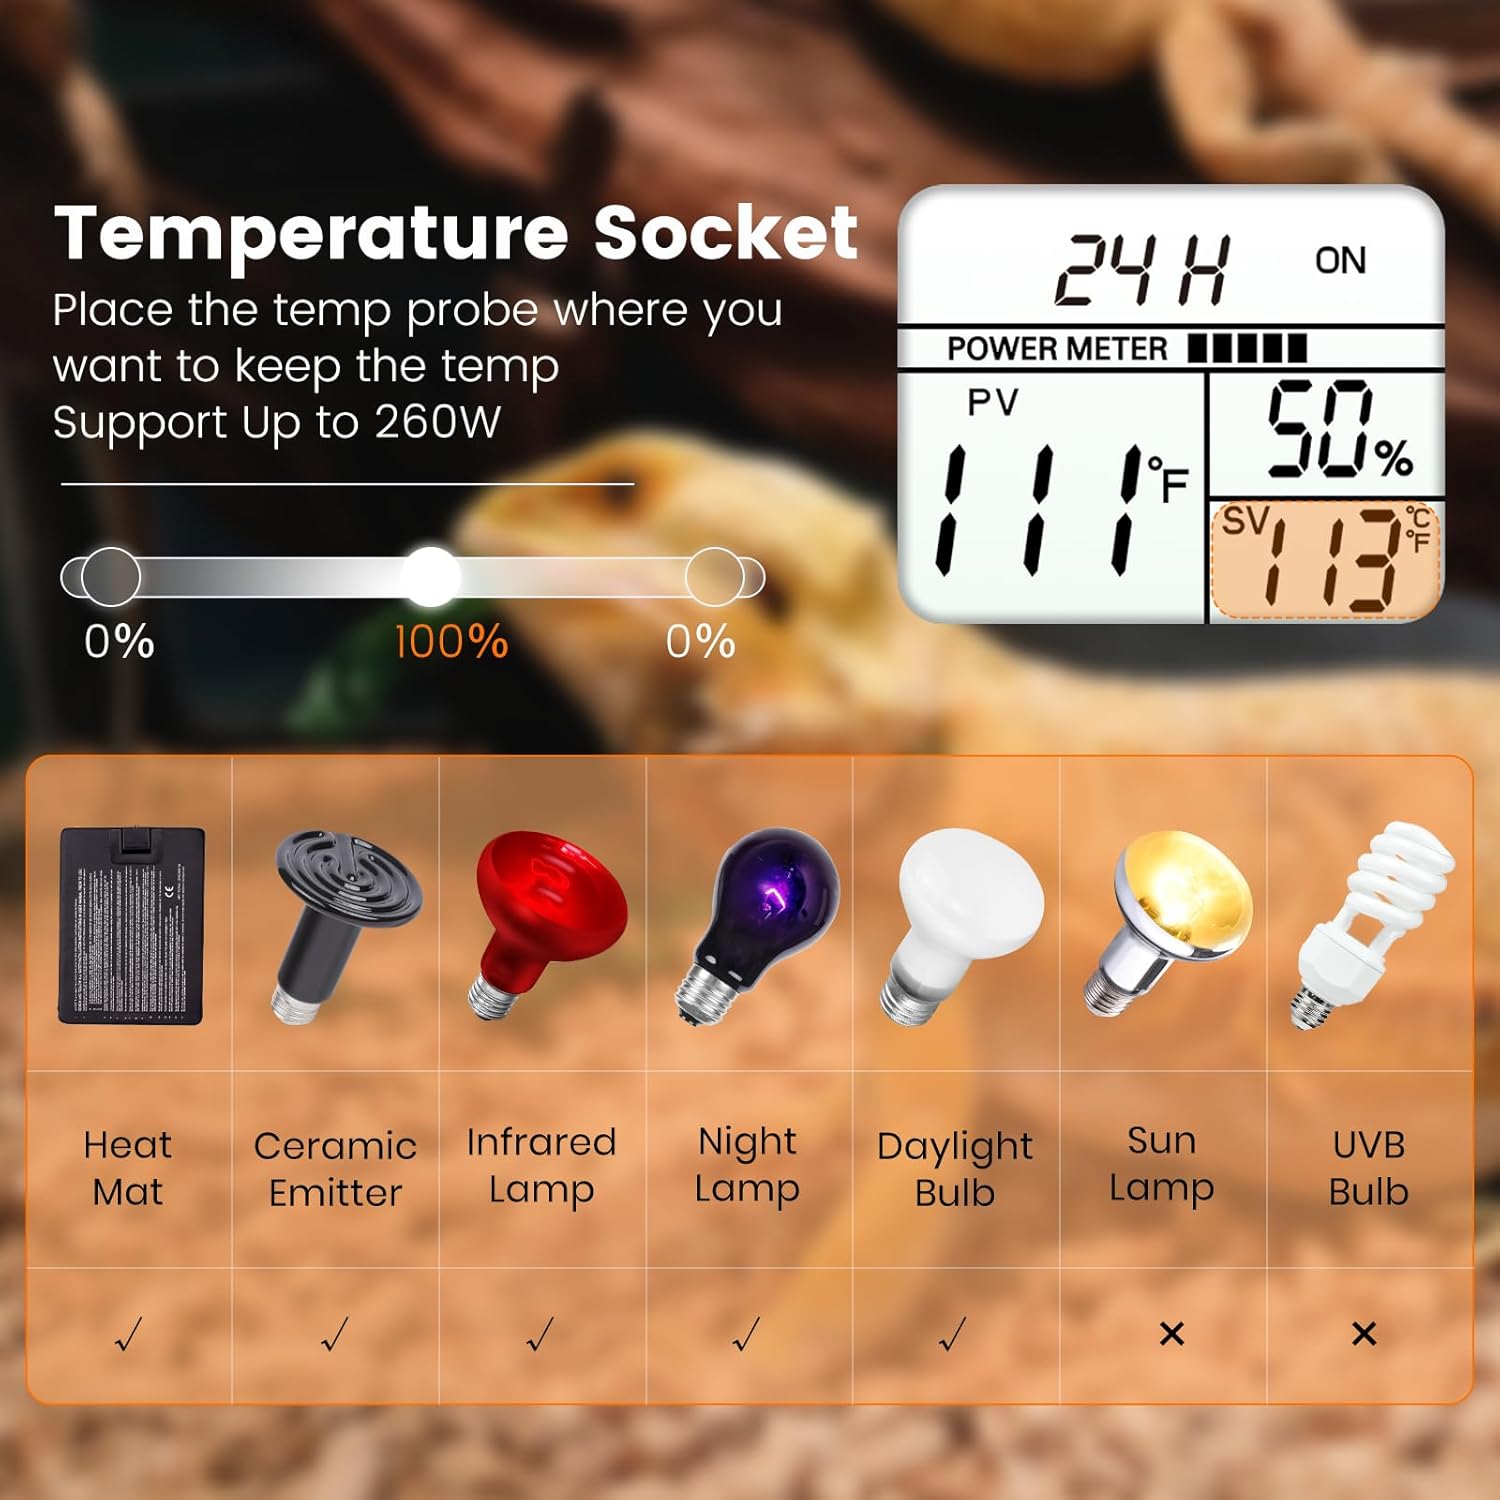
Image: A selection of heating devices, including heat mats and various bulbs, indicating their compatibility with the temperature socket, with UVB and LED bulbs marked as incompatible.
Manteniment
- Neteja: Disconnect the thermostat from power before cleaning. Wipe the unit with a dry, soft cloth. Do not use abrasive cleaners or immerse in water.
- Cura del sensor: Keep the temperature sensor clean and free from debris. Ensure it is securely placed and not obstructed.
- Inspecció del cable: Periodically check all cables for signs of wear, cuts, or damage.
Resolució de problemes
| Problema | Causa possible | Solució |
|---|---|---|
| La pantalla està apagada. | Sense font d'alimentació. | Check if the thermostat is properly plugged into a working outlet. |
| Temperature not reaching set point (SV). | Heating device wattage is too low; sensor placement is incorrect. | Replace the heating bulb/device with one of higher wattage (up to 260W). Ensure the sensor is in the basking area and not obstructed. |
| Timer socket device not turning on/off as scheduled. | Timer not set correctly; device malfunction. | Review the timer setting instructions. Test the connected device directly in a wall outlet. |
| PID socket device not maintaining stable temperature. | Sensor issue; incompatible device. | Ensure the sensor is clean and properly placed. Verify the connected device is compatible with dimming control. |
Especificacions
| Característica | Detall |
|---|---|
| Model | PT02T |
| Entrada Voltage | 100-120V |
| Max Output (per socket) | 260W |
| Interval de configuració de temperatura | 50-140°F (10-60°C) / OFF |
| Precisió de la temperatura | ±1 °F |
| Interval de configuració del temporitzador | 1-24 hores |
| Tipus de visualització | Digital |
| Longitud del cable del sensor | 5.8 ft (approx. 177 cm) |
| Longitud del cable d'alimentació | 5 ft (approx. 152 cm) |
| Socket Cord Length | 0.9 ft (approx. 27 cm) |
| Material | Plàstic |
| Característiques especials | PID Dimming, Programmable, Timer Function, Memory Function |

Image: Visual representation of the thermostat's dimensions and the lengths of its temperature sensor, power cord, and socket cords.
Garantia i Suport
For warranty information, please refer to the detailed warranty description provided in the original product packaging or contact REPTITRIP customer service. Keep your purchase receipt for warranty claims.


