1. Introducció
Thank you for choosing the GYMAX Outdoor Trampoline. This manual provides essential information for the safe assembly, operation, and maintenance of your trampoline. Please read all instructions carefully before assembly and use to ensure safety and prolong the life of your product. This trampoline is designed for recreational use and is available in 8FT, 10FT, and 12FT sizes.

Imatge 1: acabatview of the GYMAX Outdoor Trampolina.
2. Informació de seguretat
Your safety is paramount. This trampoline complies with ASTM and CPSIA standards for reliable use. Adhere to the following safety guidelines:
- Supervisió d'adults: Assegureu-vos sempre de la supervisió d'un adult quan els nens utilitzin el trampolina.
- Un saltador a la vegada: Per evitar col·lisions i lesions, només una persona ha de pujar al trampen línia en qualsevol moment.
- Límits de pes: Do not exceed the specified static and dynamic weight capacities for your trampoline size. Refer to the 'Specifications' section for details.
- Liquidació: Assegureu-vos que hi hagi una distància suficient, tant a dalt com a l'entorn, respecte a estructures, arbres i altres obstacles.
- Inspecció: Inspeccioneu regularment el trampConsulteu en línia per comprovar si hi ha peces danyades, desgastades o que falten abans de cada ús. No utilitzeu si algun component està compromès.
- Xarxa de tancament: Utilitzeu sempre el trampoline with the enclosure net properly installed and secured.
- Sense tombarelles ni acrobàcies: Avoid dangerous maneuvers like flips, which can lead to serious injury.
- Condicions meteorològiques: No utilitzeu el trampen línia en cas de vents forts, pluja o altres condicions meteorològiques adverses.

Image 2: Children enjoying the trampoline safely, highlighting ASTM and CPSIA compliance.
3. Què hi ha a la caixa
En desembalar-lo, comproveu que tots els components que s'enumeren a continuació siguin presents i no estiguin danyats:
- Trampoline Frame Components
- Estora de salt
- Springs (42/54/72 pcs depending on size)
- Net del recinte
- Net Poles with Foam Sleeves
- Spring Cover Pad
- Escala
- Guia de l'usuari (aquest document)
- Assembly Hardware and Tools (if applicable)
4. Muntatge i muntatge
Assembly requires at least two adults. Follow the steps below for proper installation. Refer to the included user guide for detailed diagrams.
4.1 Muntatge del marc
- Connect the galvanized steel frame tubes to form the circular base. Ensure all connections are secure.
- Attach the curved outward-facing legs to the main frame. These legs provide enhanced stability.
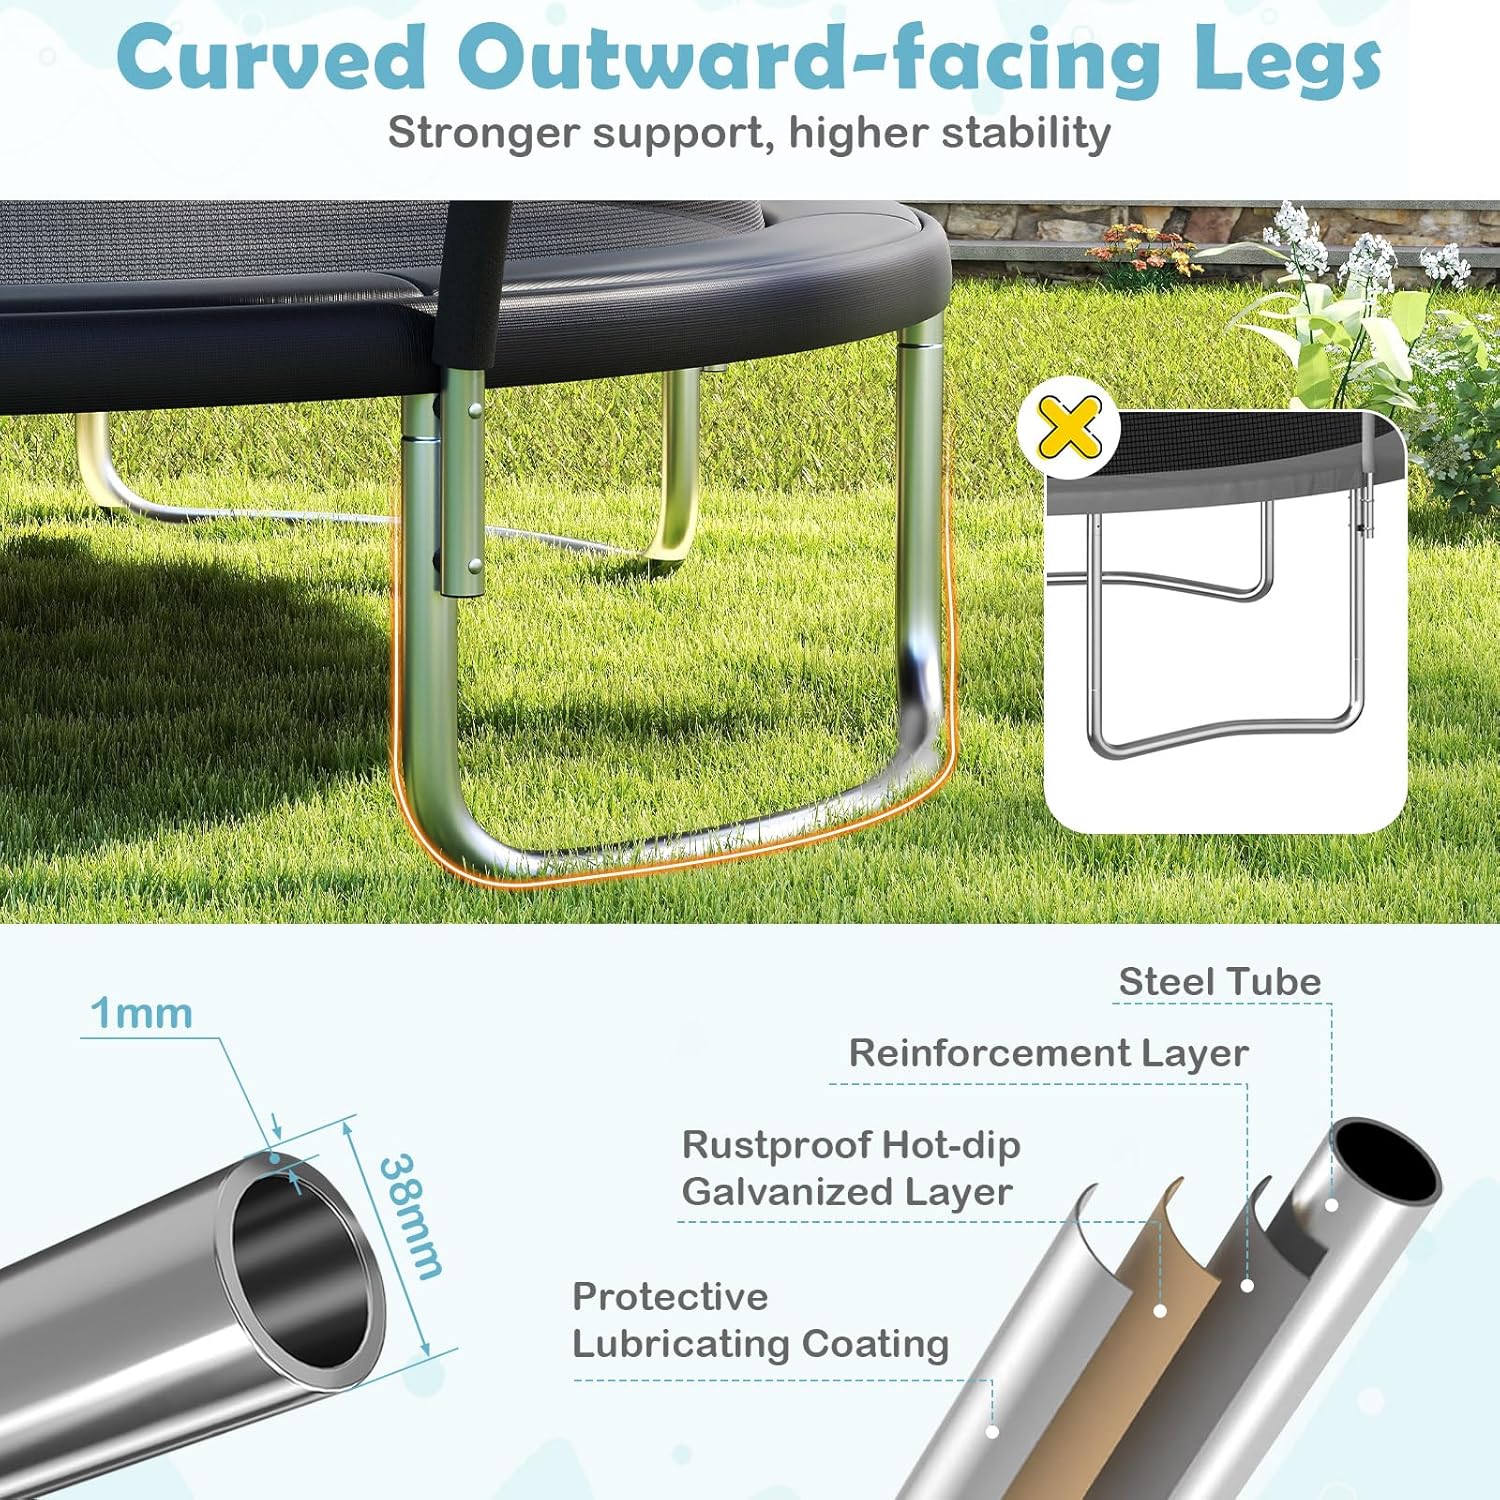
Image 3: Detail of the curved outward-facing legs for stronger support and higher stability.
4.2 Instal·lació de la lona de salt i la molla
- Lay the 8-row stitched PP jumping mat evenly within the frame.
- Attach the high-tensile springs from the frame to the mat's V-rings using the provided spring tool. Install springs symmetrically to ensure even tension.

Image 4: Illustration of the high-tensile springs providing an excellent bouncing experience.

Image 5: Detail of the 8-row stitched PP jumping mat, highlighting its tear-resistant and sun-protective qualities.
4.3 Enclosure Net and Pole Installation
- Assemble the curved net poles and slide the anti-collision foam sleeves onto each pole.
- Secure the net poles to the trampoline frame. The curved design ensures a safe distance from the jumping area.
- Drape the high-density enclosure net over the poles and secure it at the bottom to the jumping mat using the included string for a seamless design, preventing contact with springs and poles.
- Ensure the double-sided zipper door with safety buckle is fully functional.

Image 6: Curved net poles with anti-collision foam sleeves ensure a safe distance from the jumping area.

Image 7: The seamless design, achieved by tying the net to the mat, prevents contact with poles and springs.
4.4 Fixació d'escala
- Attach the heavy-duty, non-slip ladder to the trampoline frame for easy and secure access.

Image 8: Key safety and convenience features including the double-sided zipper, safety buckle, thick padded spring cover, and non-slip ladder.
5. Instruccions de funcionament
Per garantir una experiència segura i agradable, seguiu aquestes pautes operatives:
- Entrada i sortida: Always use the ladder to enter and exit the trampen línia. No saltis del trenampoline a terra.
- Supervisió: Els nens sempre han d'estar supervisats per un adult responsable.
- Usuari únic: Only one person should be on the trampen línia a la vegada per evitar col·lisions.
- Proper Jumping: Jump in the center of the mat. Avoid jumping too high or attempting complex maneuvers.
- Sense objectes: No porteu objectes punxants, joguines o altres objectes al trampolina.
- Calçat: Bare feet or trampoline socks are recommended. Avoid shoes that can damage the mat.
6. Manteniment
Regular maintenance will ensure the longevity and safety of your trampolina.
- Inspecció de rutina: Before each use, check all nuts, bolts, springs, and frame connections for tightness and wear. Ensure the enclosure net, jumping mat, and spring cover are free from tears or damage.
- Neteja: Clean the jumping mat and enclosure net with mild soap and water. Rinse thoroughly and allow to air dry. Avoid harsh chemicals.
- Coberta de primavera: Ensure the thick padded spring cover is always in place to protect users from springs and the frame.
- Protecció meteorològica: In harsh weather conditions (heavy snow, strong winds), consider disassembling and storing the trampoline indoors, or at least securing it to prevent damage.
- Peces de recanvi: If any part becomes damaged, replace it immediately with genuine GYMAX replacement parts. Do not use the trampoline with damaged components.
7. Solució De Problemes
Aquesta secció tracta els problemes habituals que podeu trobar:
- Soroll de grinyol: Check all frame connections and spring attachments. Apply a silicone-based lubricant to joints if necessary.
- Rebot desigual: Ensure all springs are correctly attached and evenly tensioned. Inspect the jumping mat for any stretching or damage.
- Caiguda de la xarxa: Verify that the enclosure net is properly secured to the poles and the bottom of the mat. Check for any loose straps or ties.
- Inestabilitat de l'escala: Ensure the ladder is correctly hooked onto the frame and that all steps are secure.
Si teniu problemes que no figuren aquí o necessiteu més ajuda, poseu-vos en contacte amb l'atenció al client.
8. Especificacions
The following table details the specifications for the different GYMAX Outdoor Trampoline models:
| Característica | 8 FT Model | 10 FT Model | 12 FT Model |
|---|---|---|---|
| Diàmetre total | 8 peus | 10 peus | 12 peus |
| Alçada total | 7.8 peus | 8 peus | 8.8 peus |
| Alçada de la cama | 23.5" | 27" | 35" |
| Static Weight Capacity | 880 lliures | 880 lliures | 1100 lliures |
| Capacitat de pes dinàmica | 220 lliures | 220 lliures | 265 lliures |
| Pes net | 76 lliures | 99 lliures | 119 lliures |
| Nombre de fonts | 42 | 54 | 72 |
| Material | Galvanized Steel, PE, EPE, PVC | ||
| Compliment | ASTM, CPSIA | ||
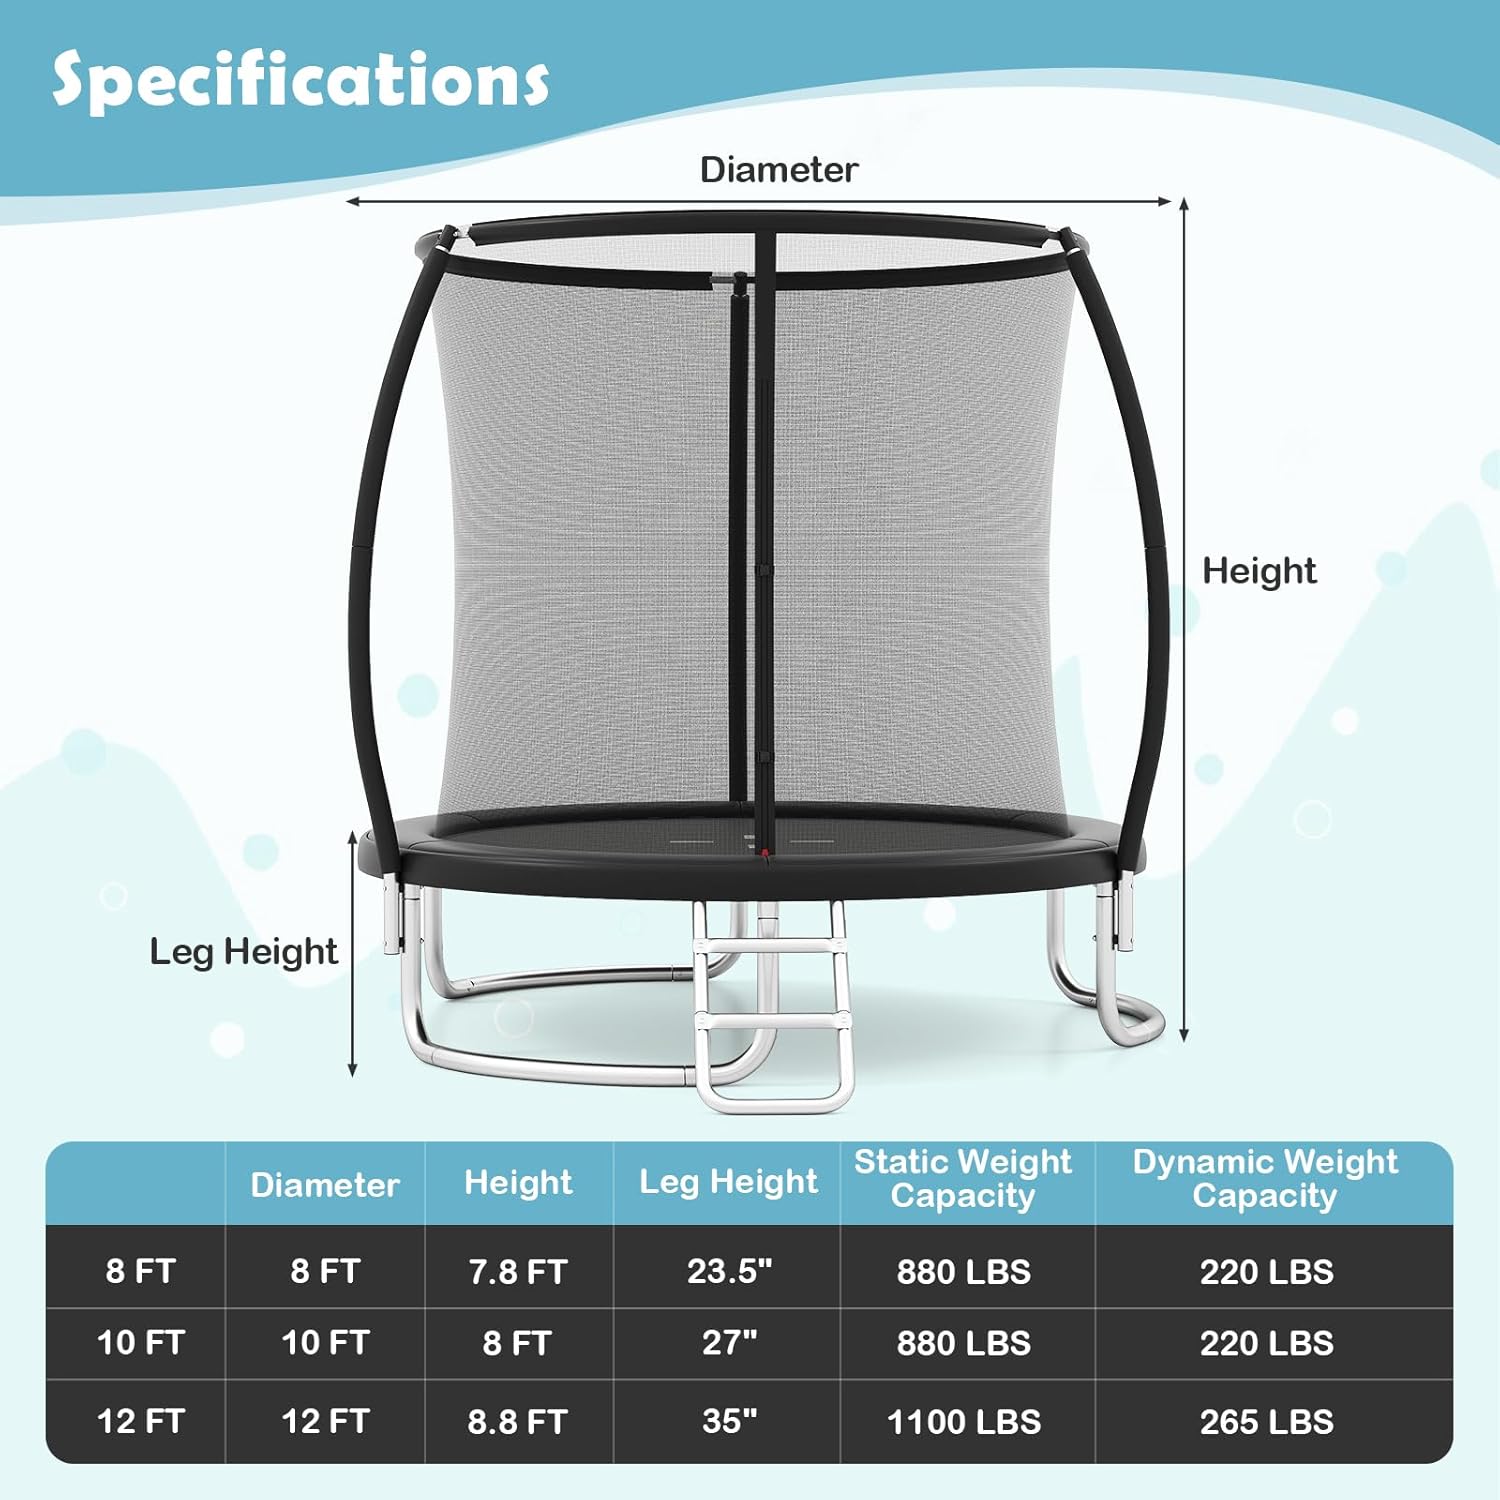
Image 9: Visual representation of trampoline dimensions and weight capacities across different sizes.
9. Informació de la garantia
The GYMAX Outdoor Trampen línia ve amb un 90 dies de garantia from the date of purchase. This warranty covers manufacturing defects under normal use. It does not cover damage resulting from misuse, accidents, improper assembly, lack of maintenance, or normal wear and tear. Please retain your proof of purchase for warranty claims.
10. Atenció al client
For any questions, concerns, or assistance with your GYMAX Outdoor Trampoline, please contact our customer support team. Refer to your purchase documentation for specific contact details or visit the official GYMAX weblloc.