
1. Informació de seguretat
Always operate the ANYCUBIC Photon P1 in a well-ventilated area, away from direct sunlight or strong UV light sources (such as fluorescent lamps o desinfecció UV lamps). Ensure the printer is placed on a stable, level workbench. Wear appropriate personal protective equipment, including gloves and a mask, when handling resin to prevent skin contact or inhalation of fumes.
2. Desembalatge i configuració inicial
2.1 Verificació del contingut del paquet
Upon receiving your ANYCUBIC Photon P1, carefully unbox the printer and verify all accessories are present and undamaged. Refer to the packing list for a complete inventory.

Image: The ANYCUBIC Photon P1 3D printer with its various components and accessories laid out after unboxing.
2.2 Installing the Dual Print Platform
The Photon P1 supports dual-material printing. To install the dual print platform:
- Remove the resin vat and any pre-installed print platform.
- Carefully place the dual-material print platform onto the Z-axis assembly.
- Ensure it is securely seated.
- On the printer's touchscreen, navigate to the home menu and switch to "Dual Mode" to activate the dual printing functionality.
Video: This video demonstrates the unboxing process, installation of the dual print platform, and initial setup steps for the Anycubic Photon P1.
2.3 Leveling the Build Plate
The Photon P1 features Smart Leveling 3.0, which includes factory calibration and automatic self-checks. To perform assisted leveling:
- On the touchscreen, select "Advanced Functions".
- Choose "Assisted Leveling".
- Select "Dual-Platform" and initiate the leveling process.
- Wait for the Z-axis to stop.
- Adjust the leveling screws as prompted on the screen to complete the leveling process.
2.4 Installing the Dual Resin Vat Unit
Before installing the resin vats, inspect the release film for any dents or damage. Replace if necessary to prevent printer damage. Ensure you are wearing gloves and a mask.
- Place the location ring into position.
- Insert the two resin vats into their respective slots.
- Bloqueu els pestells als dos costats.
- Slide the switches on the ring to the "Lock" position to secure the vats.
3. Funcionament
3.1 Dual-Color/-Material Printing
The ANYCUBIC Photon P1 allows simultaneous printing with two different materials and colors. This feature is ideal for complex designs and can reduce resin consumption for smaller models, optimizing the use of high-priced resins.

Image: A visual representation of the dual-color and dual-material printing capability, showing two different resins being used simultaneously.
3.2 Resin Compatibility and Handling
The Photon P1 is compatible with ultra-high viscosity resins, up to 8,000 cps, which is 40 times the viscosity of standard resins. This broad compatibility supports professional applications. Pre-configured settings for Anycubic resins are available for immediate use without manual calibration.

Image: A bar chart illustrating the compatibility of the Photon P1 with various resin types, including high-viscosity options up to 8000 cps.
3.3 Tall i impressió
Use the provided slicing software (e.g., Photon Workshop 4.0) to prepare your 3D models for printing. When using dual mode, import your models and set the parameters. If both L and R areas use the same-named parameter group of the same resin, the parameters will be identical. For different parameters, choose a parameter group from a different resin or create a custom parameter group with different resin names. Layer thickness and anti-aliasing parameters must be the same for both areas.

Image: A screenshot of the Photon Workshop 4.0 software interface, highlighting features like one-click smart slicing, remote operation, and resin presets library.
3.4 AI Monitoring and Reliability
The AI-powered inspection system performs dual verification of build plate installation and bottom layer separation. It also monitors resin levels and detects residue in the vat, identifying potential issues early to ensure reliable printing. Note: AI detection is disabled by default. Enabling this feature may trigger video recording warnings.

Image: A diagram illustrating the smart detection and AI re-verification features of the Photon P1, including build plate inspection, resin level inspection, bottom layer separation inspection, and residue inspection.
4. Manteniment
4.1 Wave Release Technology
The Wave Release Technology generates micro-airflow during plate lifting, reducing release force by 60%. This facilitates easier model detachment and lowers failure rates, contributing to reliable long-term printing. Regularly inspect the release film for wear and tear.

Image: A cutaway diagram showing the Wave Release Film and NFEP film, illustrating how the technology reduces release force by 60% compared to traditional smooth-surface NFEP films.
4.2 Resin Vat and Build Plate Care
After each print, carefully clean the resin vat and build plate. Use a soft, non-abrasive cloth and appropriate cleaning solutions for resin. Ensure no cured resin particles remain in the vat or on the build plate, as this can affect future prints. The quick-release design for the build plate and resin vat simplifies cleaning and maintenance.

Image: A visual demonstrating the quick-release mechanism for both the build plate and the resin vat, designed for easy removal and cleaning.
4.3 Resin Drip Hanger and Pouring Spout
Utilize the resin drip hanger to reduce resin waste after printing. The improved pouring spout facilitates effortless resin recycling back into its container.

Image: A split image showing the resin drip hanger on the left, designed to minimize resin waste, and an improved pouring spout on the right for easy resin recycling.
5. Solució De Problemes
5.1 Problemes d'impressió habituals
- Failed Prints: Check leveling, exposure settings, and resin quality. Ensure the build plate is clean and properly installed.
- Layer Separation: Verify the Wave Release Technology is functioning correctly and the release film is not damaged. Adjust lift speed if necessary.
- Poor Detail: Ensure the 14K LightTurbo 4.0 light source is clean and functioning optimally. Check XY pixel resolution settings in your slicing software.
5.2 AI Monitoring for Diagnostics
Utilize the AI monitoring system to diagnose issues related to build plate installation, bottom layer separation, resin level, and vat residue. The system provides real-time feedback to help identify and resolve problems quickly.
6. Especificacions
| Característica | Especificació |
|---|---|
| Dimensions del producte | 28 x 14 x 13 polzades (71.12 x 35.56 x 33.02 cm) |
| Pes de l'article | 39 lliures (17.69 kg) |
| Volum de construcció | 8.78 x 4.96 x 9.05 polzades (223 x 126 x 230 mm) |
| Material | Alumini |
| Resolució de visualització | 13312 x 5120 px (14K) |
| XY Pixels | 16.8 x 24.8 µm |
| Font de llum | LightTurbo 4.0 (Light Uniformity > 92%, Light Source Error ≤ 5%) |
| Resin Compatibility | Up to 8,000 cps viscosity |
| Nivell de soroll | ≤ 45dB |
| Connectivitat | Compatible with Laptop, Personal Computer, Smartphone |

Image: A visual representation of the Photon P1's large build volume, indicating dimensions of 223mm x 126mm x 230mm (8.78 x 4.96 x 9.05 inches) and a total volume of 6.5L.
7. Característiques addicionals
7.1 Stable Ball Screw and Precision Guide Rails
The printer incorporates a stable ball screw and precision guide rails, creating a solid printing platform. This design minimizes motion vibration, leading to smoother lifts and consistently accurate details in printed models. This is more stable than traditional T-shaped lead screw printing.
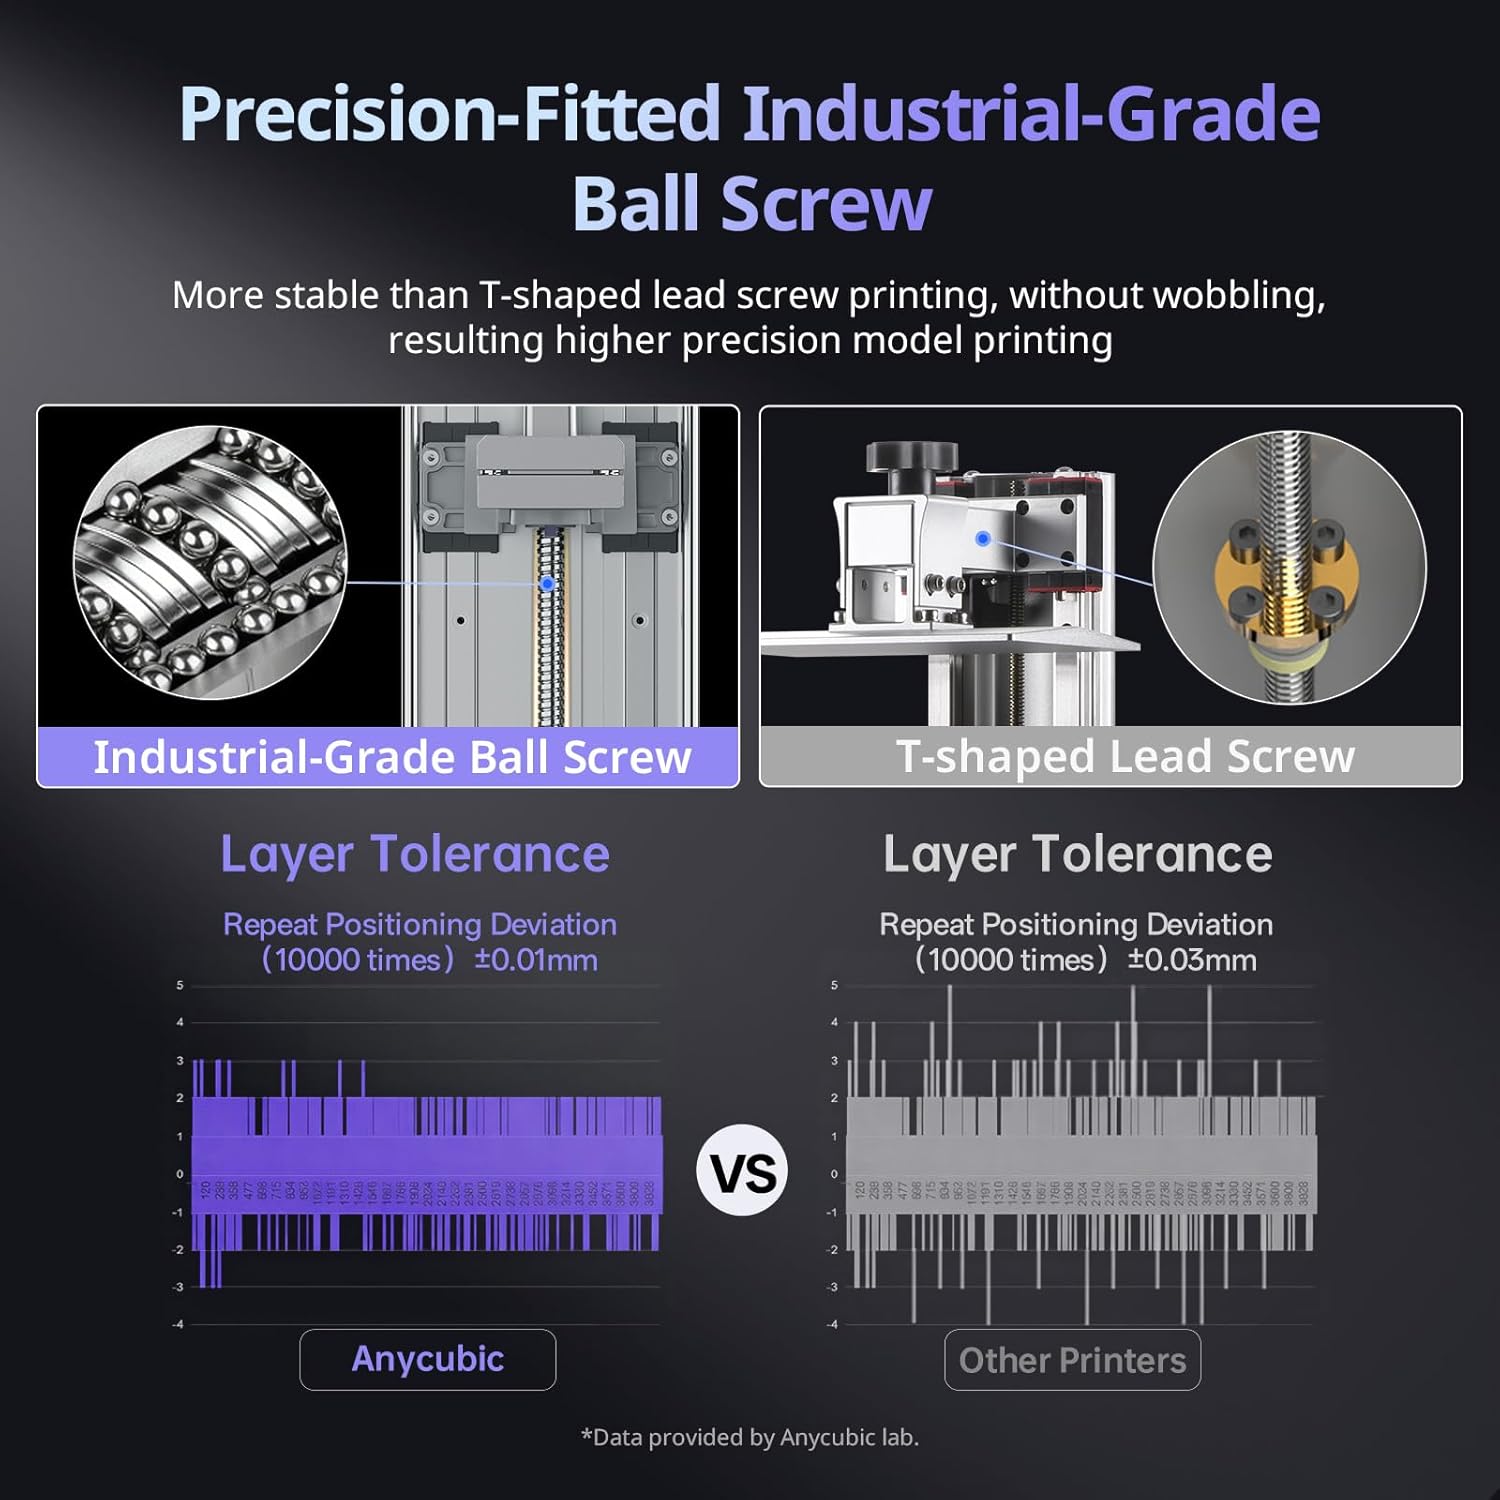
Image: A comparison illustrating the industrial-grade ball screw mechanism used in the Anycubic Photon P1 versus a T-shaped lead screw, highlighting the superior stability and precision of the ball screw.
7.2 Consistent Light Source: 14K LightTurbo 4.0
The 14K LightTurbo 4.0 light source provides high resolution (13312x5120 px) and excellent light uniformity (>92%) with a low light source error (≤5%). This ensures precise curing and highly detailed prints.

Imatge: Un diagrama que mostraasing the 14K LightTurbo 4.0 consistent light source, detailing its resolution, XY pixels, light uniformity, and light source error for precise printing.
7.3 Stepless Hinged Lid
The stepless hinged lid can hold at any angle, providing convenience during operation and maintenance. It also offers an ambient UVA blocking rate of over 99.99%.

Imatge: Un primer pla view of the stepless hinged lid, demonstrating its ability to stay open at any angle and its high UVA blocking rate.
7.4 Quiet Printing
The Photon P1 operates at a noise level of ≤ 45dB, making it suitable for office or home environments.

Image: A graphic illustrating the quiet printing operation of the Photon P1, with a noise level of ≤ 45dB, suitable for various environments.
7.5 Air Pure 2.0 (Optional)
The Air Pure 2.0 system (not included in the package) can be integrated to directly eliminate odors, contributing to a healthier printing environment.

Image: A depiction of the Air Pure 2.0 system connected to the Photon P1, showing its function in eliminating odors for a cleaner printing space.
8. Suport
For further assistance, technical support, or warranty information, please refer to the official ANYCUBIC website or contact their customer service. Keep your purchase receipt and product serial number handy for any inquiries.