
1. Introducció
1.1 Producte acabatview
The Hikvision DS-7108HGHI-M1/T is an 8-channel Turbo HD DVR designed for reliable surveillance recording in various environments. This digital video recorder supports 1080p Lite recording, providing clear video footage. It incorporates H.265 Pro+ compression technology for efficient storage and video quality. Features include Motion Detection 2.0 for intelligent event identification, 2-way audio support for communication, and HDMI/VGA output options for display connectivity. Remote viewing is available via the Hik-Connect application.
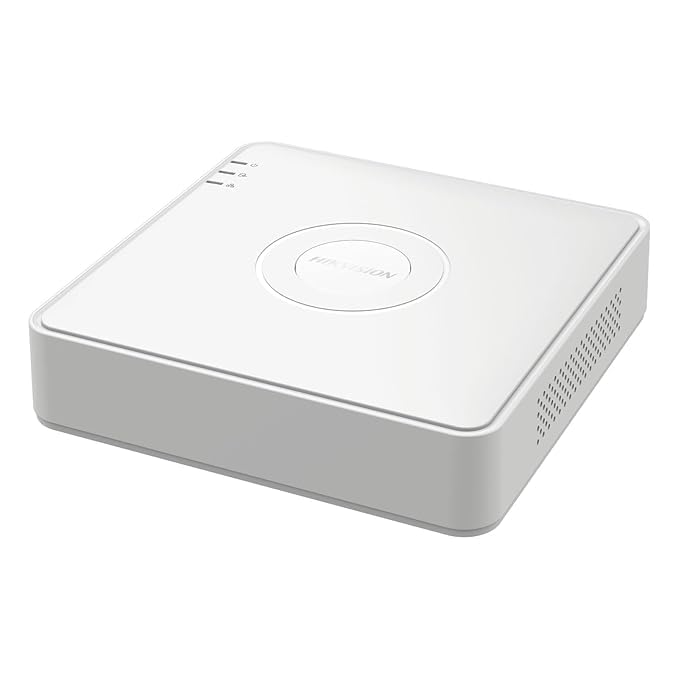
Figura 1: superior view of the Hikvision DS-7108HGHI-M1/T DVR. This image displays the device's compact white casing with the Hikvision brand logo centrally located. Indicator lights for power, hard drive activity, and network status are visible on the left side of the top panel.
1.2 Característiques clau
- 8-Channel Turbo HD DVR: Supports up to 8 analog cameras with 1080p Lite recording resolution.
- Compressió avançada: Utilizes H.265 Pro+ video compression for reduced bandwidth and storage while maintaining video quality.
- Two-Way Audio Support: Enables real-time communication through connected cameras via built-in audio input and output.
- Detecció de moviment 2.0: Intelligent motion detection technology for improved accuracy and reduced false alarms.
- Connectivitat flexible: Equipped with HDMI and VGA outputs, a network port for remote viewing via Hik-Connect, and USB ports for data backup.
1.3 Contingut del paquet
Verifiqueu que tots els elements siguin presents al paquet:
- 1 x 4 Channel DVR Recorder (Note: Product title indicates 8-channel, but package content lists 4-channel. Please verify actual product received.)
- 2 x 2MP ColorVu Dome Cameras
- 2 x 2MP ColorVu Bullet Cameras
- 1 x 1TB Surveillance Hard Disk Drive
- 1 x 4 Channel SMPS Power Supply
- 8 x BNC Connectors
- 4 x DC Power Connectors
- 1 x cable HDMI
- 1 x ratolí USB
- 1 adaptador de corrent per a DVR
- 1 x Cable Roll (90 Metres)
- 6 x cargols de muntatge
- Accessoris d'instal·lació
2. Configuració
2.1 Instal·lació física
Before connecting, ensure the DVR is placed on a stable, flat surface with adequate ventilation. Avoid direct sunlight, heat sources, and areas with high humidity or dust.
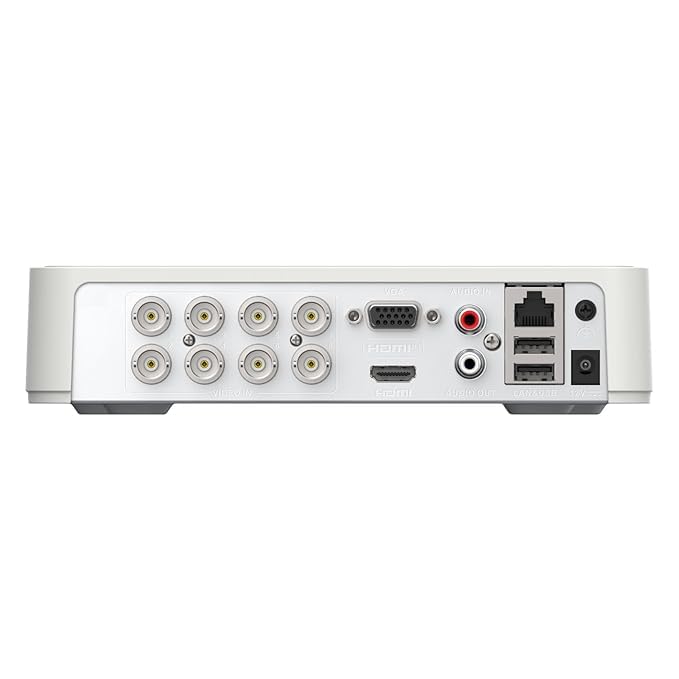
Figure 2: Rear panel of the Hikvision DS-7108HGHI-M1/T DVR. This image illustrates the various connectivity ports available on the back of the device, including multiple BNC connectors for camera inputs, VGA and HDMI outputs for display, audio input and output jacks, an Ethernet port for network connection, USB ports for peripherals, and the DC power input.
2.2 Connecting the DVR
- Connectar càmeres: Attach your analog cameras to the BNC video input ports on the rear panel (refer to Figure 2).
- Connecta el monitor: Connect a monitor to the DVR using either the HDMI or VGA output port.
- Connectar la xarxa: Per a comandament a distància viewing and network access, connect an Ethernet cable from the DVR's LAN port to your router or network switch.
- Connectar dispositius USB: Plug the included USB mouse into one of the USB ports for navigation. Additional USB ports can be used for external storage for backup.
- Connectar àudio (opcional): If using cameras with audio or an external microphone, connect to the Audio In port. Connect speakers to the Audio Out port for two-way audio communication.
- Connectar l'alimentació: Connecteu l'adaptador de corrent proporcionat a l'entrada d'alimentació del DVR i després a una presa de corrent.
2.3 Engegada i configuració inicials
After connecting all necessary cables, power on the DVR. The system will boot up, and you will be guided through an initial setup wizard on the connected monitor. Follow the on-screen prompts to set up basic parameters such as language, date/time, network settings, and administrator password. It is crucial to set a strong password for security.
3. Instruccions de funcionament
3.1 Viu View
Once the DVR is powered on and cameras are connected, the live view of all connected cameras will be displayed on the monitor. You can switch between single-camera view, graella multicàmera view, and sequence display using the on-screen controls or the USB mouse.
3.2 Enregistrament
The DVR supports various recording modes:
- Gravació contínua: Registres 24/7.
- Enregistrament programat: Registres durant períodes de temps especificats.
- Enregistrament activat per moviment: Només registra quan es detecta moviment.
- Enregistrament d'esdeveniments: Records based on other events like alarm input.
Configure recording schedules and parameters through the DVR's menu system. The H.265 Pro+ compression technology optimizes storage space while maintaining video quality.
3.3 Reproducció
Per tornarview foo gravattage:
- Access the 'Playback' menu from the main interface.
- Seleccioneu la(es) càmera(es) desitjada(es) i l'interval de data/hora.
- Use the timeline to navigate through recordings. Playback controls (play, pause, fast forward, rewind) are available.
3.4 Remot Viewing via Hik-Connect
The Hik-Connect application allows remote access to your DVR from a smartphone or computer. To set up:
- Ensure the DVR is connected to the internet.
- Download and install the Hik-Connect app on your mobile device.
- Create a Hik-Connect account and add your DVR by scanning the QR code or manually entering the serial number.
- Follow the app's instructions to view live feeds, play back recordings, and receive notifications remotely.
3.5 Motion Detection 2.0
Motion Detection 2.0 is an advanced feature that intelligently identifies movement, reducing false alarms caused by environmental factors. Configure motion detection zones and sensitivity settings in the DVR's menu. When motion is detected, the DVR can trigger recording, send notifications, or activate alarms.
3.6 Àudio bidireccional
If your cameras support audio and are connected to the DVR's audio input/output, you can use the two-way audio feature. This allows you to listen to audio from the camera's location and speak through a connected speaker, enabling interactive communication.
4. Manteniment
4.1 Manteniment general
- Neteja: Regularly clean the DVR's exterior with a soft, dry cloth. Do not use liquid or aerosol cleaners.
- Ventilació: Ensure the DVR's ventilation openings are clear and not obstructed to prevent overheating.
- Actualitzacions de firmware: Reviseu periòdicament el fabricant weblloc web per a actualitzacions de firmware per garantir un rendiment i una seguretat òptims.
4.2 Gestió d'emmagatzematge
- Estat del disc dur: Monitor the health status of the internal hard drive through the DVR's system information menu.
- Còpia de seguretat de dades: Feu còpies de seguretat regulars de les gravacions importants en una unitat USB externa o en un emmagatzematge de xarxa per evitar la pèrdua de dades.
- Mode de sobreescritura: Configure the DVR to overwrite older recordings when the hard drive is full, or set it to stop recording.
5. Solució De Problemes
5.1 Problemes comuns i solucions
- Sense visualització de vídeo:
- Check power connections to the DVR and monitor.
- Verify HDMI/VGA cable connections.
- Ensure the correct input source is selected on the monitor.
- Sense imatge de càmera:
- Check camera power supply.
- Verify BNC cable connections between camera and DVR.
- Ensure camera is compatible with the DVR's technology (e.g., TVI, CVI, AHD, CVBS).
- Remot Viewing Not Working:
- Confirm the DVR is connected to the internet (check network cable and router status).
- Verify network settings on the DVR.
- Ensure the Hik-Connect app is correctly configured and the DVR is added.
- Sense gravació:
- Check if the hard drive is installed and initialized.
- Verify recording schedules and settings.
- Check hard drive health status.
6. Especificacions
6.1 Especificacions tècniques
| Característica | Detall |
|---|---|
| Número de model | DS-7108HGHI-M1/T |
| Marca | HIKONECT (Manufacturer: Hikvision) |
| Nombre de canals | 8 |
| Tecnologia de connectivitat | Ethernet, HDMI, USB, VGA |
| Dispositius compatibles | Càmera |
| Dimensions del producte (L x A x A) | 12L x 14W x 5H centímetres |
| Pes de l'article | 750 grams |
| Nom del tipus d'element | DVR |
7. Garantia i Suport
7.1 Informació de la garantia
Aquest producte ve amb un Garantia del fabricant de 2 anys. Please retain your proof of purchase for warranty claims. The warranty covers defects in materials and workmanship under normal use. It does not cover damage caused by misuse, accidents, unauthorized modifications, or improper installation.
7.2 Atenció al client
For technical assistance, troubleshooting, or warranty inquiries, please contact your retailer or the manufacturer's customer support. Refer to the contact information provided with your purchase or visit the official Hikvision weblloc de recursos de suport.