
1. Producte acabatview
The ASUS ExpertCenter PN54-S1 is a compact and efficient barebone mini PC designed for various applications, from business to everyday use. It features an AMD Ryzen 200 series processor and integrated Radeon 700M graphics, supporting up to four 4K displays. This model is a barebone unit, meaning it requires the installation of RAM and storage (SSD) to function. Its design emphasizes tool-less access for easy upgrades and maintenance, housed in a durable 0.6L chassis.
Les característiques clau inclouen:
- Powerful AMD Ryzen 200 Series Processors for efficient multitasking.
- Integrated AMD Radeon 740M Graphics for 4K visuals across multiple displays.
- Ultrafast connectivity with Wi-Fi 7 and Bluetooth 5.4.
- Versatile I/O with 6 USB ports, dual 2.5G LANs, and dual DisplayPort.
- Tool-free design for quick component upgrades.
- Compact and durable 34mm chassis.
2. Contingut del paquet
Verifiqueu que tots els elements siguin presents al paquet abans de continuar amb la configuració:
- ASUS ExpertCenter PN54-S1 Mini PC Unit
- Kit de muntatge VESA
- Adaptador de corrent alterna
- Cable d'alimentació

Image: The ASUS ExpertCenter PN54-S1 Mini PC shown with its packaging, AC power adapter, power cord, and VESA mount.
3. Guia de configuració
3.1. Installing RAM and Storage (SSD)
This is a barebone unit. Before initial use, you must install DDR5 SO-DIMM RAM and an M.2 NVMe SSD.
- Apagueu i desconnecteu: Ensure the Mini PC is powered off and all cables are disconnected.
- Xassís d'accés: Place the unit upside down. Locate the 'PUSH' tab on the bottom cover. Slide the tab to unlock and remove the bottom cover. The design allows for tool-less access.
- Instal·lació de la memòria RAM: Locate the DDR5 SO-DIMM slots. Gently insert the RAM module(s) into the slots at a 45-degree angle, then push down until the clips on both sides secure the module.
- Instal·leu SSD M.2: Locate the M.2 slot. Insert the M.2 SSD into the slot, then secure it with the provided screw.
- Torneu a col·locar la coberta: Align the bottom cover and slide it back into place until it clicks, securing the chassis.

Image: The bottom of the Mini PC, highlighting the 'PUSH' tab for tool-less chassis access.
3.2. Connexió de perifèrics
Connect your monitor(s), keyboard, mouse, and network cable (if using wired Ethernet).
- Visualització: Connect your monitor(s) to the DisplayPort or HDMI ports on the rear of the unit. The PN54-S1 supports up to four 4K displays.
- Dispositius USB: Connect your keyboard, mouse, and other USB devices to the available USB ports (USB 3.2 Gen 2 Type-A, USB 3.2 Gen 2 Type-C, USB 2.0) on the front and rear panels.
- Xarxa: For a wired connection, connect an Ethernet cable to one of the dual 2.5G LAN ports. For wireless, ensure your Wi-Fi 7 antenna (if external) is connected or that the internal antenna has clear signal.
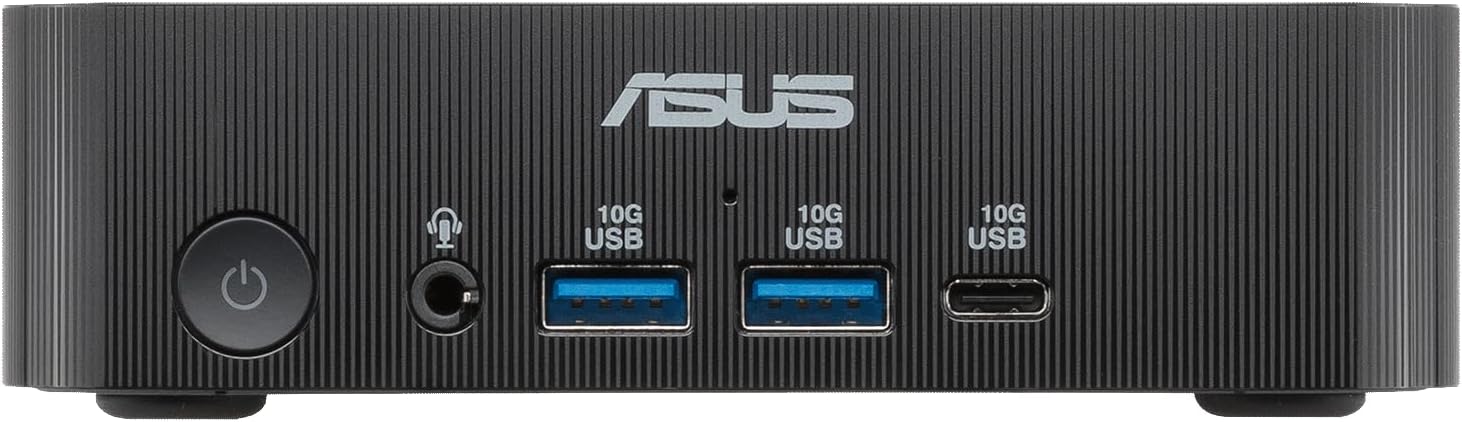
Image: Front panel of the Mini PC, showing the power button, audio jack, two USB 10G Type-A ports, and one USB 10G Type-C port.

Image: Rear panel of the Mini PC, featuring DisplayPort, 2.5G LAN, USB 2.0, USB 10G, HDMI, DC-in, and a 40G USB-C port with DisplayPort functionality.
3.3. Connexió d'alimentació
Connect the AC power adapter to the DC-IN port on the rear of the Mini PC, then plug the power cord into an electrical outlet.
4. Instruccions de funcionament
4.1. Encès / apagat
- Per encendre: Premeu el botó d'engegada situat al panell frontal. L'indicador lluminós d'engegada s'il·luminarà.
- Per apagar: From your operating system, select the shutdown option. Alternatively, press and hold the power button for 4 seconds to force a shutdown (use only when necessary).
4.2. Configuració de la pantalla
The Mini PC supports multiple displays. After connecting your monitors, the operating system should automatically detect them. You can adjust display settings (resolution, orientation, extended/duplicated desktop) through your operating system's display settings.
4.3. Connectivitat de xarxa
- Cablejat (LAN): Once an Ethernet cable is connected to a 2.5G LAN port, the system should automatically establish a wired network connection.
- Sense fil (Wi-Fi): Access your operating system's network settings to connect to an available Wi-Fi 7 network. Enter the network password if required.
4.4. Dispositius Bluetooth
To connect Bluetooth 5.4 devices (e.g., headphones, keyboard, mouse), enable Bluetooth in your operating system settings and pair with the desired device.
5. Manteniment
5.1. Internal Component Access
The tool-less chassis design allows for easy access to internal components for upgrades or maintenance. Refer to Section 3.1 for instructions on opening the chassis.
5.2. Neteja
- Exterior: Use a soft, dry cloth to clean the exterior surfaces. Avoid abrasive cleaners or solvents.
- Ventilació: Periodically check the ventilation grilles for dust accumulation. Use compressed air to gently clear dust from the vents to ensure proper airflow and prevent overheating.

Imatge: Lateral view of the Mini PC, illustrating the ventilation grilles for heat dissipation.
6. Solució De Problemes
If you encounter issues with your ASUS ExpertCenter PN54-S1, refer to the following common troubleshooting steps:
- Sense energia:
- Assegureu-vos que l'adaptador de corrent estigui connectat correctament tant al Mini PC com a una presa de corrent que funcioni.
- Verifiqueu que la presa de corrent funciona provant-la amb un altre dispositiu.
- Sense pantalla:
- Check that the monitor is powered on and the video cable (DisplayPort/HDMI) is securely connected to both the Mini PC and the monitor.
- Assegureu-vos que la font d'entrada correcta estigui seleccionada al monitor.
- If using multiple monitors, try connecting only one at a time to isolate the issue.
- Sense connexió de xarxa:
- Amb cable: Check the Ethernet cable connection and ensure your router/modem is working correctly.
- Sense fil: Verify Wi-Fi is enabled in your operating system and you are connected to the correct network with the correct password. Restart your router/modem if necessary.
- Perifèric no detectat:
- Prova de connectar el perifèric a un port USB diferent.
- Assegureu-vos que els controladors del perifèric estiguin instal·lats correctament al vostre sistema operatiu.
- System Instability/Performance Issues:
- Ensure RAM and SSD are correctly installed (refer to Section 3.1).
- Check for overheating by ensuring ventilation is clear (refer to Section 5.2).
- Update your operating system and drivers to the latest versions.
7. Especificacions
| Característica | Especificació |
|---|---|
| Marca | ASUS |
| Nom del model | PN54-S1-BB5000ETL |
| Model de CPU | AMD Ryzen 5 220 |
| Velocitat de la CPU | 3.2 GHz |
| Coprocessador gràfic | Integrated AMD Radeon Graphics (740M) |
| Tecnologia de memòria RAM | DDR5 |
| Mida màxima de la memòria RAM | 32 GB |
| Velocitat de memòria | 5600 MHz |
| Descripció del disc dur | SSD (M.2 NVMe, PCIE x 4) |
| Connectivitat sense fil | Wi-Fi 7 (802.11.be), Bluetooth 5.4 |
| LAN | Dual 2.5G Ethernet |
| Ports USB | 6 Total (USB 3.2 Gen 2, USB 2.0, USB-C with DisplayPort) |
| Sortida de vídeo | DisplayPort, HDMI (Supports up to 4x 4K displays) |
| Resolució de visualització màxima | 3840x2160 pixels (4K) |
| Consum d'energia | 120 watts |
| Dimensions de l'article (LxWxH) | 1.34 x 5.12 x 5.12 polzades |
| Pes de l'article | 1.2 lliures |
| Components inclosos | AC Power Adapter, Power Cord, VESA Mount |
8. Informació de la garantia
The ASUS ExpertCenter PN54-S1 Mini PC comes with a 3 any de garantia del fabricant. Please retain your proof of purchase for warranty claims. For detailed terms and conditions, refer to the warranty card included with your product or visit the official ASUS support weblloc.
9. Suport
Per obtenir més ajuda, assistència tècnica o descàrregues de controladors, visiteu el lloc web d'assistència oficial d'ASUS. weblloc:
You may also find additional resources and FAQs on the product page for the ASUS ExpertCenter PN54-S1.