1. Important Safety Regulations
WARNING: High pressure jet danger!
- Never put your fingers or any part of your body on the nozzle.
- Never point the spray gun at yourself, others, or animals.
- In case of skin injury by sprayed paint or solvent, consult a doctor immediately for special treatment and inform the doctor of the paint or solvent used.
Normes generals de seguretat:
- Ensure the spraying area is fully circulated to avoid accumulation of combustible gases.
- Avoid any sources of ignition. The site must be equipped with a readily available fire extinguisher.
- Always follow the precautions and operating procedures specified by paint and solvent manufacturers.
- Remove the nozzle every time you rinse or clean the machine.
- Do not use bleach or chlorine-containing paint.
- If inhaling harmful gases is possible, use a gas mask.
- Wear protective clothing as specified by the paint manufacturer.
- If the spraying site is restricted by explosion-proof regulations, do not use this sprayer.
- No moure la màquina mentre està en marxa.
Before Starting the Machine:
- The spray gun must be closed.
- Defective parts must never be used.
- Check the maximum pressure allowed by the high-pressure pipe and spray gun.
- Check each of the machine parts for leaks.
If Work Process is Interrupted:
- Open the return valve to release pressure from the tube and the lance.
- Ensure the safety plug on the spray gun is secure.
- Turn off the machine power switch and unplug the power cord.
2. Producte acabatview i Components
The VEVOR 450 Airless Paint Sprayer is designed for efficient and professional painting tasks. Familiarize yourself with its main components and accessories.

Figure 1: VEVOR 450 Airless Paint Sprayer main unit with accessories.
Components principals:
- Mànec: Per portar la unitat.
- Interruptor d'alimentació: Per encendre/apagar la unitat.
- Interruptor de protecció contra sobrecàrregues: Safety feature.
- Manòmetre: Displays current operating pressure.
- Vàlvula reguladora de pressió: Adjusts spray pressure.
- Exhaust Pressure Valve: Releases pressure.
- Filtre de fluid: Filters paint for smoother application.
- Pistola de polvorització: Handheld device for paint application.
- Broquet: Controls spray pattern and flow.
- Suport de broquet: Secures the nozzle to the spray gun.
- Barra d'extensió: Extends reach for high or distant areas.
- High Pressure Feed Pipe: Connecta el polvoritzador a la pistola polvoritzadora.
- Suction Tube (Feeding Pipe): Draws paint from the container.
- Return Pipe: Returns excess paint to the container.
- Inhale Mouth: Part of the suction system.
- Connector: Connects various hoses.
- Refueling Port: For adding lubricating oil.
- Backflow Valve: Controls paint flow and pressure release.

Key functional components: 1. Dust-proof Switch, 2. Pressure Adjustment, 3. Exhaust Pressure Valve, 4. Fluid Filter.
3. Especificacions
| Característica | Detall |
|---|---|
| Nom de marca | VEVOR |
| Número de model | 450 |
| Tipus | Pistola Airless |
| Aplicació | Paint Spray Gun (for walls, ceilings, floors, furniture, decks, fences, home exteriors) |
| Tipus de potència | Elèctric |
| Potència del motor | 1500W / 1800W (depending on model variant) |
| Caudal màxim | 2.2 L / Min |
| Pressió màxima | 3300 PSI |
| Diàmetre del broquet | 0.4 - 0.5 cm (0.15 - 0.21 in) |
| Dimensions de l'article (L x A x A) | 32.2 x 40 x 40.6 cm (12.7 x 15.7 x 16 polzades) |
| Voltage | 110V / 220V (depending on region/model) |
| Freqüència | 50 Hz / 60 Hz (depending on region/model) |
| Certificació | CE |
| Origen | Xina continental |
| Pes del producte | Aproximadament 18.54 kg |
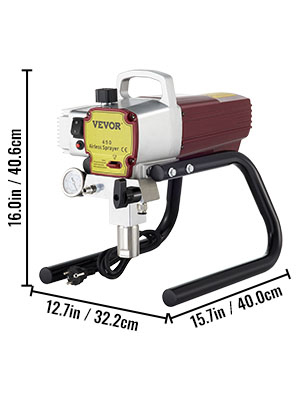
Product dimensions: 16.0 inches (40.6 cm) height, 12.7 inches (32.2 cm) width, 15.7 inches (40.0 cm) length.
4. Configuració i instal·lació
Follow these steps to properly set up your VEVOR 450 Airless Paint Sprayer before operation.
Assemblea inicial:
- Install the High Pressure Pipe: Connect the high pressure pipe as shown in Figure 1 (Product Overview).
- Install the Spray Gun: Attach the spray gun to the high pressure pipe.
- Install the Extension Rod: If needed, install the extension rod. Ensure the white gasket is correctly positioned at the connection point.

Ensure the white gasket is in place when installing the extension rod, and the nozzle arrow points forward.
- Install the Nozzle Holder: Attach the nozzle holder to the spray gun or extension rod.
- Install Nozzle Gasket and Nozzle: Install the nozzle gasket first, then the nozzle, ensuring the arrow on the nozzle points forward.
- Install the Suction Tube: Attach the suction tube to the main unit, securing it with the snap ring.

Connect the suction tube and return pipe to the main unit.
5. Funcionament
Once the sprayer is assembled, follow these steps for proper operation.
Priming and Initial Start-up:
- Install the Return Pipe: Attach the return pipe to the main unit.
- Position Tubes: Place both the suction tube and the return tube into the paint container.
- Power On and Prime: Turn on the power switch. Ensure the return valve is in a vertically upwards position (backflow state). Set the pressure regulating knob to the maximum position. Water (or priming fluid) will drain out of the return pipe, indicating the system is priming.
- Pressuritzar el sistema: Turn the return valve clockwise to a horizontal position. The machine will start to pressurize. The pressure gauge pointer should show approximately 3000 PSI. The motor will stop working once this pressure is reached.
- Comenceu a ruixar: Trigger the spray gun to start spraying. The motor will restart and the pressure gauge pointer should maintain around 2000 PSI during operation.
Adjusting Flow and Pressure:
- Vàlvula reguladora de pressió: Adjust this valve clockwise to increase pressure and counter-clockwise to decrease pressure.
- Backflow Valve: When positioned vertically upwards, the machine is in backflow state (releases pressure). When adjusted horizontally (clockwise), the machine is working (increases pressure).
- Adjustable Flow Control Knob: Use the knob on the unit to control the flow rate for different paint outputs, allowing for a delicate, factory-like finish.
6. Manteniment
Regular maintenance ensures the longevity and optimal performance of your airless paint sprayer.
Neteja:
- The detachable design of the sprayer allows for quick and easy cleaning after each use.
- Always remove the nozzle before rinsing or cleaning the machine.
- Flush the system thoroughly with appropriate cleaning solution (water for latex, mineral spirits for oil-based paints) until clear.
- Clean the spray gun, nozzle, and filters thoroughly to prevent clogging.
Lubricació:
- Before using the machine each time, add approximately 5 drops of lubricating oil to the oil filler port.
- Use any oil with lubricating effect suitable for paint sprayers.
7. Solució De Problemes
Aquí teniu alguns problemes comuns i les seves possibles solucions.
- Sense polvorització o baixa pressió:
- Check if the high-pressure pipe, spray gun, and nozzle are correctly installed and free of leaks.
- Assegureu-vos que el tub d'aspiració estigui completament submergit a la pintura i que no aspiri aire.
- Verify the return valve is in the horizontal (working) position.
- Clean the nozzle and fluid filter for clogs.
- Check for sufficient lubricating oil.
- Patró de polvorització inconsistent:
- Netegeu o substituïu el broquet.
- Adjust the pressure regulating valve for optimal pressure.
- Ensure paint is properly thinned (if required by paint manufacturer).
- Motor Stops Working Prematurely:
- Check the overload protection switch.
- Ensure the unit is not overheating.
- Verify power supply is stable.
- Compatibilitat de pintura:
- This sprayer is designed for non-particle free materials with good fluidity.
- It can spray various emulsions, latex, enamel, primer, transparent sealant, and varnish.
- For specific paint types like plastic paint, rubber paint, epoxy, or PU paints, always consult the paint manufacturer's specifications for airless sprayer compatibility and recommended thinning ratios.
- Peces que falten o danyades:
- If a part like a snap ring is lost or damaged, contact VEVOR customer support or your seller for replacement parts.
8. Consells d'usuari
Practical advice from other users and general best practices for using your airless paint sprayer.
- Pre-use Oiling: Always remember to add 5 drops of lubricating oil to the oil filler port before each use to ensure smooth operation and extend pump life.
- Paint Selection: For best results, use non-particle free materials with good fluidity. This helps prevent clogs and ensures a smooth finish.
- Cleaning is Key: Thorough cleaning after every use is crucial. The detachable design makes this easier, but don't skip cleaning the nozzle, filters, and hoses to maintain spray quality.
- Achieve Smooth Finishes: Airless spraying is known for producing smooth, uniform finishes without brush marks. Practice on a scrap surface to get a feel for the spray pattern and flow control.
- Adjust for Your Project: Utilize the adjustable flow control knob and pressure regulating valve to fine-tune the spray for different materials and surfaces. Lower pressure for thinner materials, higher for thicker.
- Llarg abast: Avançanttage of the 15m high-pressure hose and 0.5m extension rod for large areas or hard-to-reach spots like ceilings and high walls.
9. Contingut del paquet
The following items are included with your VEVOR 450 Airless Paint Sprayer:
- 1 x VEVOR 450 Airless Paint Sprayer Main Unit
- 1 x pistola de polvorització
- 1 x 15M High-Pressure Pipe
- 1 x Extension Rod (0.5m)
- 1 x Boquilla
- 1 x Suction Tube (Feeding Pipe)
- 1 x Return Pipe
- 1 x User Manual (PDF available online: View Manual PDF)
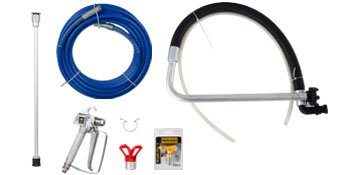
Visual representation of included accessories.
10. Garantia i Suport
For warranty information, technical support, or to inquire about replacement parts, please contact VEVOR customer service or your authorized seller. Keep your purchase receipt as proof of purchase.


