1. Introducció
Thank you for choosing the VEVOR BJS-Series Badge Maker Machine. This versatile tool allows you to easily create custom button pins for various purposes, including personal use, gifts, or small businesses. This manual provides detailed instructions for the safe and efficient operation of your badge maker. Please read it thoroughly before use and keep it for future reference.

2. Instruccions de seguretat
- Feu servir la màquina sempre sobre una superfície estable i plana.
- Keep hands and fingers clear of moving parts, especially during pressing operations.
- Ensure all components are correctly assembled and secured before use.
- Do not force the handle; if resistance is met, check for obstructions or incorrect material placement.
- Keep out of reach of small children. Adult supervision is recommended when children are using the machine.
- Use only compatible badge making materials and dies with your machine.
3. Contingut del paquet
The VEVOR BJS-Series Badge Maker Machine kit typically includes the following components. Please note that quantities and specific parts may vary slightly depending on the chosen badge size (e.g., 25mm, 32mm, 58mm, 75mm).
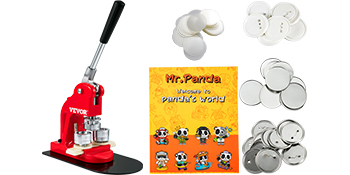
- 1 x Badge Maker Machine Body
- 1 x Set of Button Molds (e.g., 25mm, 32mm, 58mm, or 75mm)
- 1 x Circle Paper Cutter (corresponding to chosen badge size)
- 250 x Iron Bottom Parts (corresponding to chosen badge size)
- 250 x Plastic Bottom Parts (corresponding to chosen badge size)
- 500 x Tin Up Covers (corresponding to chosen badge size)
- 50 x Blank Papers (corresponding to chosen badge size)
- 500 x Transparent Films (corresponding to chosen badge size)
- 2 claus hexagonals
- 1 x Mr. Panda Magic Book (design patterns)
- 1 x Manual d'usuari
4. Especificacions
| Atribut | Valor |
|---|---|
| Model | BJS-Series (e.g., BJS-25-RD-01 for 25mm) |
| Die Diameter | 1 in / 25 mm (Other sizes: 1.25 in / 32 mm, 2.25 in / 58 mm, 3 in / 75 mm) |
| Operació Camí | Manual |
| Material | Iron & ABS |
| Pes (aprox.) | 17 lbs / 7.7 kg (for 25mm model) |
| Dimensions (L x A x A) | 11.4 x 6.1 x 19 inch / 29 x 15.5 x 48.5 cm (for 25mm model) |

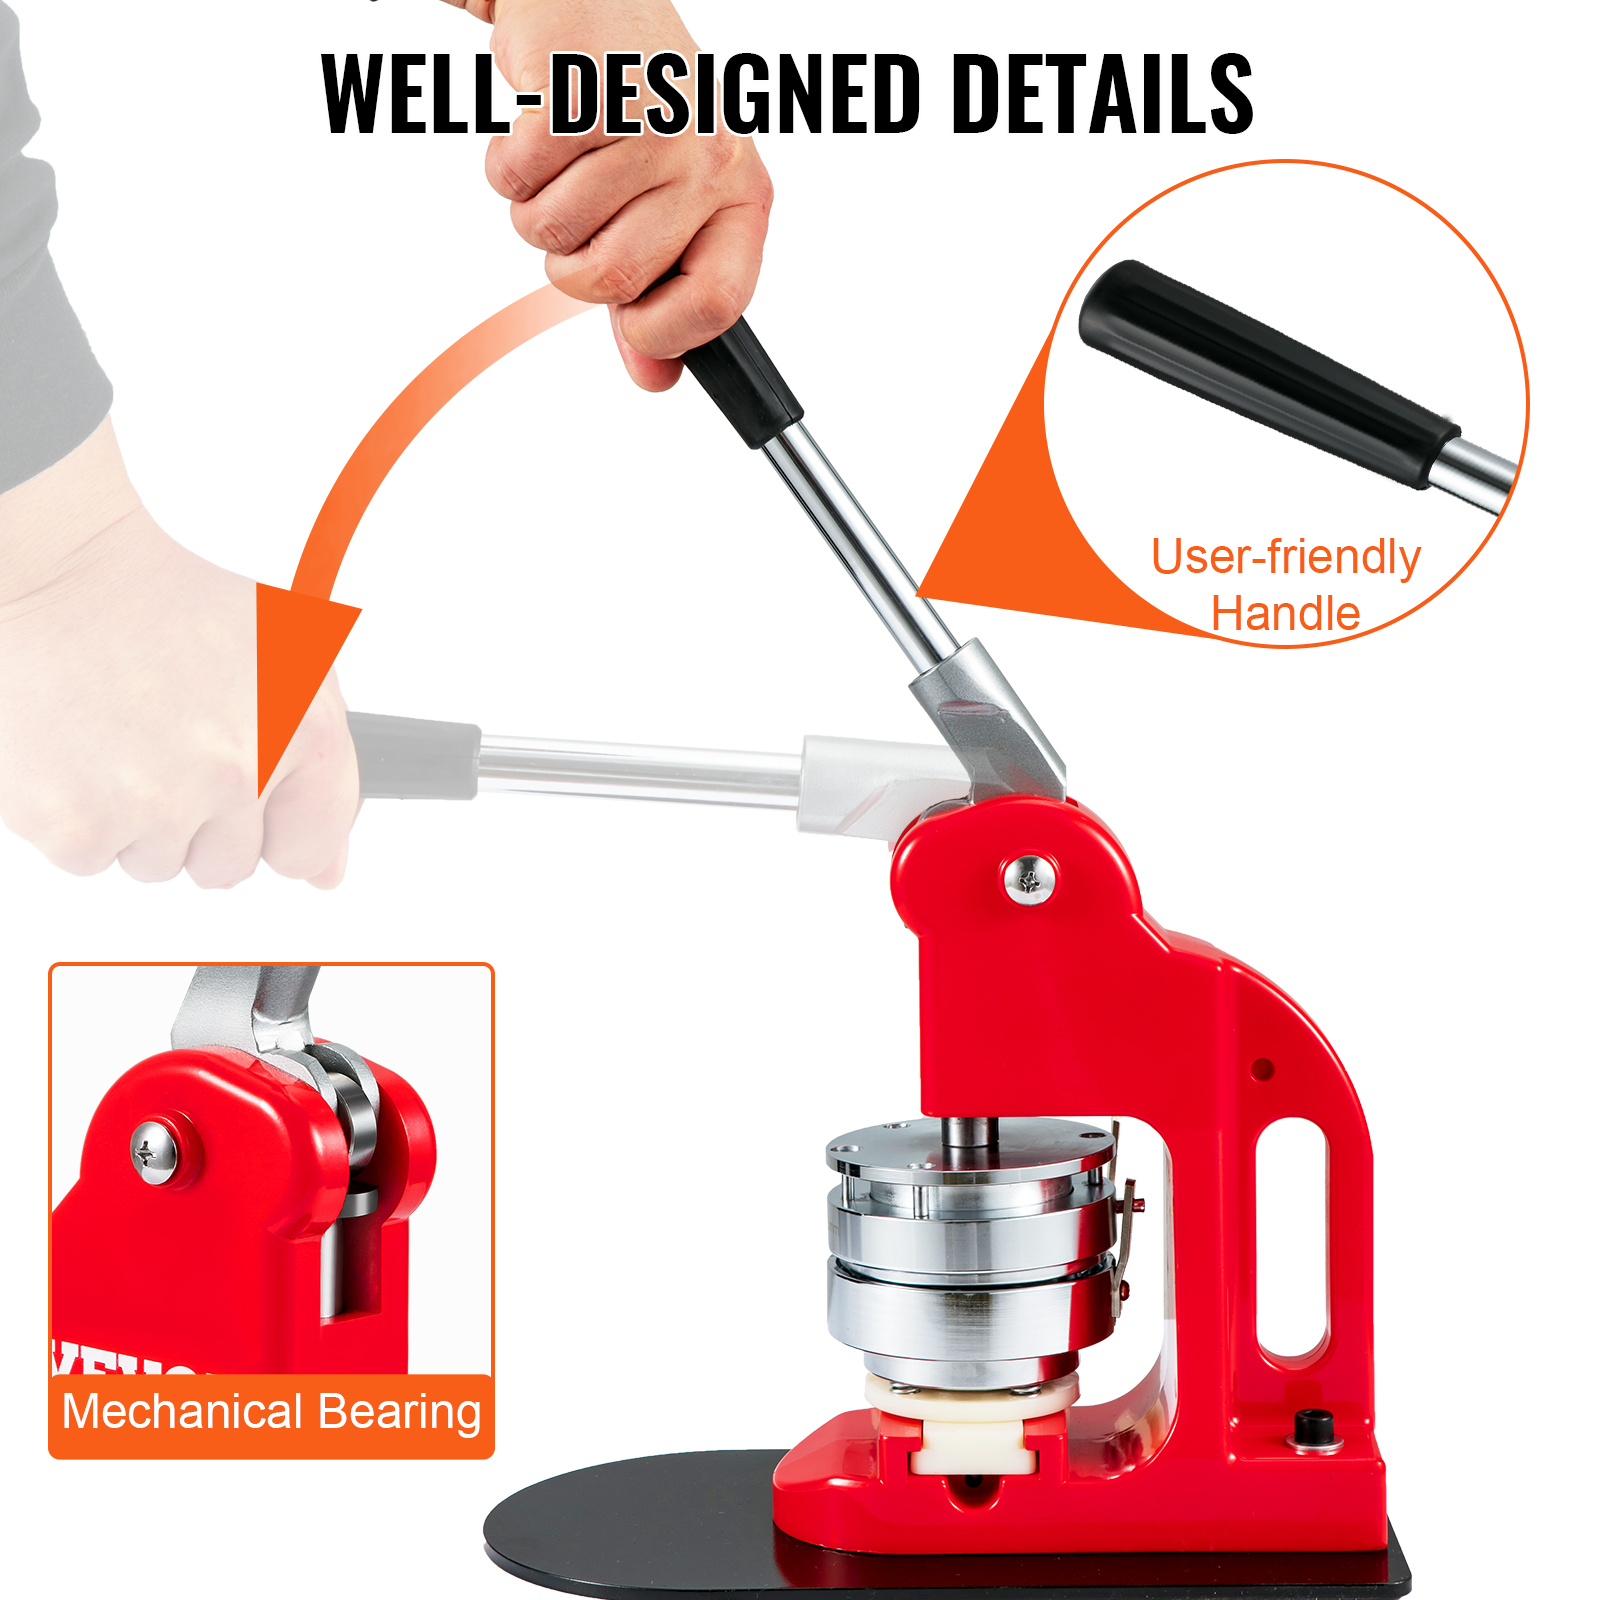
5. Configuració i instal·lació
Follow these steps for quick and easy setup of your badge maker machine:
- Connect the body and base: Securely attach the main body of the machine to its metal base.
- Rotate and fix the handle: Insert the handle into its designated slot and rotate it until it is firmly fixed.
- Align the upper mold: Ensure the upper mold is correctly positioned and aligned with the pressing mechanism.
- Slide in the lower mold to the groove: Place the lower mold into its groove on the base.
- Twist positioning screw to suitable depth: Adjust the positioning screw to ensure the correct depth for your badge materials.
- Instal·lació completa: Your badge maker is now ready for operation.

6. Operation (Making a Button Pin)
Follow these steps to create a button pin in minutes:
- Prepare Required Materials: Gather your tin up cover, printed paper design, and transparent film.
- Put on tin up cover, paper and plastic film: Place the tin up cover into the left lower mold, followed by your paper design, and then the transparent film.
- Push the lower die from left to right & Align: Slide the left lower mold (with materials) under the upper mold.
- Press the handle: Firmly press the handle down to crimp the front part of the badge.
- Put on plastic back part: Place the plastic back part (with pin) into the right lower mold.
- Push the lower die from left to right & Align: Slide the right lower mold (with back part) under the upper mold.
- Press the handle: Firmly press the handle down again to complete the badge assembly.
- Upper mold hinge (merged state) & Pin passes through the hole: The upper mold will hinge, and the pin will pass through the hole, securing the badge.
- Congratulations! A badge is done: Remove your finished button pin.

7. Manteniment
- Neteja: Wipe down the machine with a soft, dry cloth after each use to remove any dust or debris. Avoid using abrasive cleaners or solvents.
- Lubricació: Periodically apply a small amount of light machine oil to the moving parts, such as the handle pivot and slide mechanism, to ensure smooth operation.
- Emmagatzematge: Store the badge maker in a dry, clean environment when not in use to prevent rust and damage.
- Die Care: Keep the molds clean and free of adhesive residue. If necessary, gently clean them with a soft brush.
8. Solució De Problemes
- Badge not forming correctly:
- Ensure all materials (tin cover, paper, film, back part) are correctly oriented and centered in the molds.
- Verify that the positioning screw is set to the appropriate depth for your materials.
- Apply firm and even pressure when pressing the handle.
- Handle is stiff or difficult to press:
- Check for any obstructions in the mechanism.
- Apply lubrication to the moving parts as described in the Maintenance section.
- Ensure the molds are clean and free of debris.
- Materials getting stuck in the mold:
- Ensure the transparent film is not too thick or too thin for the mold.
- Clean the molds thoroughly to remove any sticky residue.
9. Consells d'usuari
- Practice with spare materials: Before using your final designs, practice with a few spare sets of materials to get a feel for the machine's operation and ensure consistent results.
- Design considerations: When creating your paper designs, remember to account for the crimping process, which will wrap the edges of the paper around the badge. Leave a small margin around your main design.
- Creative uses: Beyond traditional pin badges, consider using your machine to create custom keychains, bottle openers, or other small crafts with compatible components.
10. Garantia i Suport
For any questions, technical assistance, or warranty claims, please contact VEVOR customer support. Refer to your purchase documentation for specific warranty terms and contact information.


