1. Introducció
The VEVOR 801D Battery Spot Welder is a high-performance, capacitor energy storage pulse welding machine designed for precision spot welding of various battery types, pure nickel strips, hardware, and electronic components. Featuring a powerful 14.5KW pulse output and 290J peak welding energy, it is capable of welding pure nickel from 0.1mm to 0.3mm thickness. This manual provides essential information for the safe and effective operation, maintenance, and troubleshooting of your VEVOR 801D spot welder.
2. Instruccions de seguretat
- Always wear appropriate personal protective equipment (PPE), including safety glasses and gloves, when operating the spot welder.
- Assegureu-vos que l'àrea de treball estigui ben ventilada i lliure de materials inflamables.
- Do not operate the welder in wet conditions or with wet hands.
- Mantingueu els nens i el personal no autoritzat allunyats de la zona d'operació.
- Desconnecteu l'alimentació abans de realitzar qualsevol manteniment o canviar accessoris.
- Do not attempt to repair the unit yourself. Refer to qualified service personnel.
- Assegureu-vos la correcta connexió a terra de l'equip.
3. Producte acabatview
3.1 Components
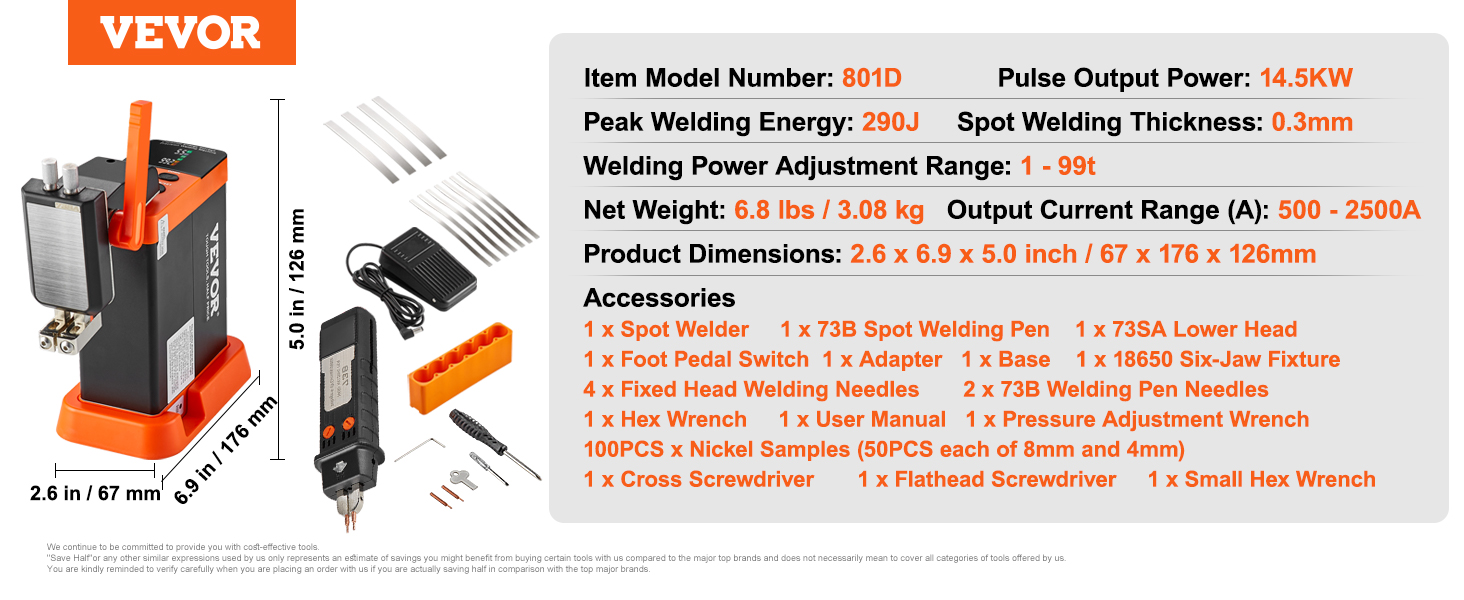
The VEVOR 801D spot welder comes with the following main components and accessories:

- Spot Welder Main Unit
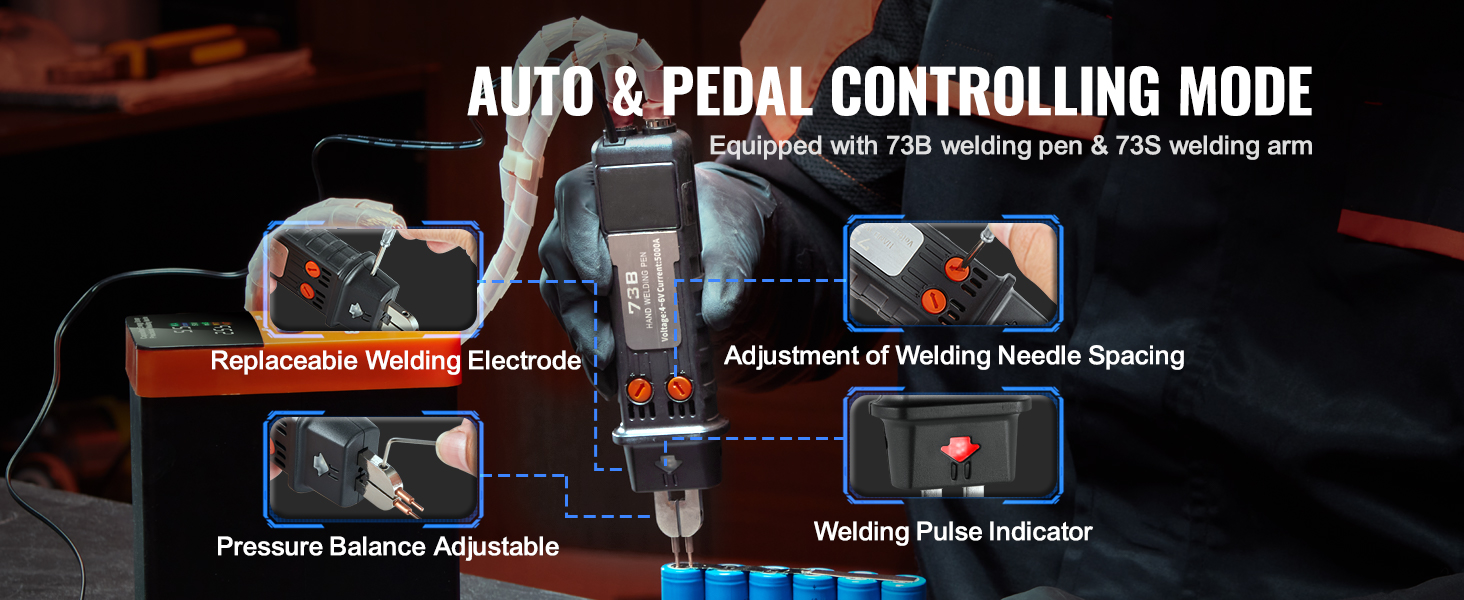
- 73B Spot Welding Pen
- 73SA Lower Head
- Interruptor de pedal
- Adaptador d'alimentació
- Base
- 18650 Six-Jaw Fixture
- Fixed Welding Needles (4 pcs)
- 73B Welding Pen Needles (2 pcs)
- Llave hexagonal
- Tornavís creuat
- Tornavís de cap pla
- Clau hexagonal petita
- Nickel Samples (100 pcs: 50x 8mm, 50x 4mm)
3.2 Característiques clau
- Enhanced Welding Strength: Capable of welding 0.1mm to 0.3mm thick pure nickel.
- Powerful Pulse Output: 14.5KW max welding power with 290J peak welding energy.
- Capacitor Energy Storage: Ensures stable and reliable welding results.
- Dual Welding Modes: Automatic (AT) for efficiency and Pedal-Controlled (MT) for precision.
- Intelligent LED Panel Display: Real-time monitoring of charging voltage, actual welding current, and energy grade.
- Nivells d'energia ajustables: Welding power adjustable within a 1-99t range.
- Aplicacions versàtils: Suitable for pure nickel, batteries, electronic components, and hardware.
- Disseny compacte i portàtil: Lleuger i fàcil de transportar.
4. Instruccions de configuració
4.1 Desembalatge i inspecció
- Traieu amb cura tots els components de l'embalatge.
- Inspect all parts for any signs of damage during transit. If any damage is found, do not proceed with setup and contact customer support.
- Verify that all accessories listed in Section 3.1 are present.
4.2 Assembly and Connections
- Place the main spot welder unit on a stable, flat, and non-flammable surface.
- Connect the 73B Spot Welding Pen to the designated port on the main unit. Ensure a secure connection.
- If using the foot pedal for manual control, connect the Foot Pedal Switch to its corresponding port.
- Connect the power adapter to the main unit and then plug it into a suitable power outlet.
4.3 Engegada i càrrega inicials
- Press the PWR/SET button to power on the unit.
- The LED panel will display the charging voltage. Allow the unit to charge until the charging voltage stabilizes, indicating the capacitors are fully charged and ready for operation.
5. Instruccions de funcionament
5.1 Understanding the LED Panel Display

The intelligent LED panel provides real-time feedback on key welding parameters:
- Vol. De càrregatage (DCV): Mostra el volum actualtage of the capacitors.
- Actual Welding Current (KA SW): Shows the actual current delivered during a weld.
- Energy Grade (mS AT/MT): Indicates the set welding energy level (1-99t) and the selected welding mode (AT for Automatic, MT for Manual/Pedal).
5.2 Ajust dels paràmetres de soldadura
- Use the 'UP' and 'DOWN' buttons on the control panel to adjust the welding energy grade (1-99t).
- The optimal energy grade depends on the material thickness and type. Start with a lower setting and gradually increase until satisfactory welds are achieved.
5.3 Selecting Welding Modes

The VEVOR 801D supports two welding modes:
- Automatic (AT) Mode: Ideal for fast and efficient welding of large quantities. The welder automatically detects contact with the workpiece and initiates the weld.
- Pedal-Controlled (MT) Mode: Provides precise control over the welding process. The weld is initiated by pressing the foot pedal switch. This mode is suitable for fine-tuning and intricate tasks.
Switch between modes using the PWR/SET button or as indicated on the display.
5.4 Procés de soldadura

- Prepare the workpieces: Ensure the surfaces to be welded are clean, dry, and free of oxidation.
- Place the nickel strip (or other material) onto the battery terminal or workpiece.
- Position the welding pen needles firmly onto the nickel strip, ensuring good contact with both the strip and the underlying material.
- For AT Mode: The weld will automatically trigger once proper contact and pressure are detected.
- For MT Mode: Press the foot pedal to initiate the weld.
- After the weld, lift the welding pen. Inspect the weld for strength and appearance. Adjust energy settings as needed.
5.5 Aplicacions

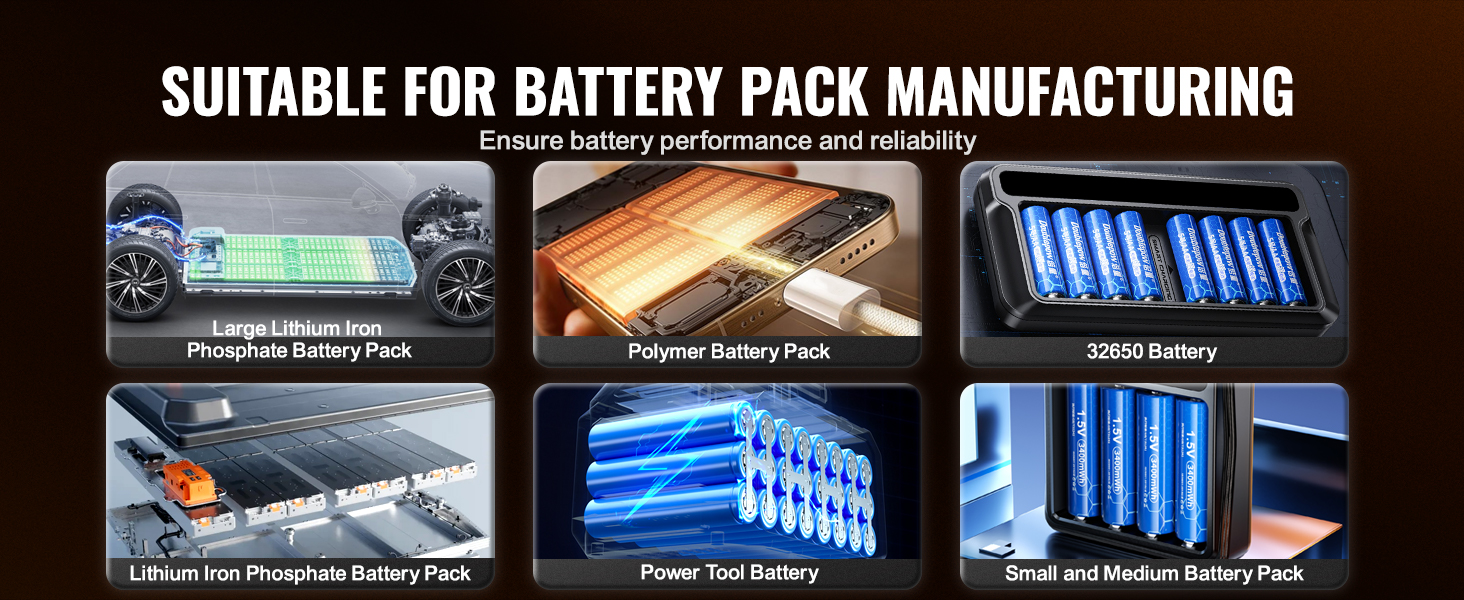
The VEVOR 801D is suitable for:
- Spot welding pure nickel strips (0.1-0.3mm)
- Assembling various battery packs (e.g., large lithium iron phosphate, polymer, 32650, power tool batteries)
- Welding small hardware components
- Connecting electronic components
6. Manteniment
6.1 Neteja
- Regularly clean the welding pen needles and the contact points on the main unit to ensure optimal conductivity.
- Use a soft, dry cloth to wipe down the exterior of the unit. Do not use abrasive cleaners or solvents.
6.2 Substitució d'elèctrodes
- Over time, the welding pen needles will wear down. Replace them when they become blunt or pitted to maintain welding quality.
- Refer to Figure 5 for guidance on replacing the welding electrodes. Ensure the new electrodes are securely installed.
6.3 Emmagatzematge
- When not in use, store the spot welder in a cool, dry place, away from direct sunlight and moisture.
- Keep the unit and accessories in their original packaging or a protective case to prevent damage.
7. Solució De Problemes
Aquesta secció tracta els problemes habituals que podeu trobar. Per a problemes que no figuren aquí, poseu-vos en contacte amb l'atenció al client.
| Problema | Causa possible | Solució |
|---|---|---|
| No weld or weak weld | Low energy setting Poor contact with workpiece Worn welding needles Dirty workpiece surfaces | Increase energy grade Ensure firm pressure on welding pen Replace welding needles Clean workpiece surfaces thoroughly |
| La unitat no s'encén | L'adaptador d'alimentació no està connectat Problema amb la presa de corrent Falla de la unitat | Comproveu la connexió de l'adaptador de corrent Test power outlet with another device Contacta amb l'assistència al client |
| Sobreescalfament | Continuous operation without rest Ventilació bloquejada | Allow unit to cool down between uses Ensure ventilation openings are clear |
8. Especificacions
| Paràmetre | Valor |
|---|---|
| Número de model | 801D |
| Pulse Output Power | 14.5KW |
| Energia màxima de soldadura | 290J |
| Interval de corrent de sortida | 500 - 2500A |
| Welding Power Adjustment Range | 1 - 99t |
| Spot Welding Thickness | 0.1 - 0.3mm (Pure Nickel) |
| Pes net | 6.8 lliures / 3.08 kg |
| Dimensions del producte (L x A x A) | 2.6 x 6.9 x 5.0 polzades / 67 x 176 x 126 mm |
| Certificació | CE |
| Origen | Xina continental |
9. Consells d'usuari
Based on general usage and common practices for spot welders:
- Practice on Scrap: Before working on critical projects, practice welding on scrap nickel strips and old battery cells to find the optimal energy setting for your specific materials.
- Pressió consistent: Apply consistent and firm pressure on the welding pen for uniform welds.
- La neteja és clau: Always ensure both the nickel strip and the battery terminals are clean and free of any residue or oxidation for the best weld quality.
- Needle Maintenance: Keep an eye on the welding needles. If they become dull or pitted, replace them promptly to avoid poor welds and potential damage to the unit.
- Ventilació: Ensure adequate ventilation in your workspace to dissipate any fumes generated during welding.
10. Garantia i Suport
For warranty information, technical support, or service inquiries, please refer to the contact information provided by your seller or the official VEVOR weblloc web. Conserveu el rebut de compra com a comprovant de compra per a reclamacions de garantia.


