Introducció
The ANCEL ANJ600 GDI Piezo is a state-of-the-art fuel injector cleaning and testing machine designed for both automobiles and motorcycles. It integrates ultrasonic cleaning technology with microcomputer oil pressure closed-loop control for comprehensive cleaning and inspection. This product simulates various engine working conditions and cleans and inspects various automobiles and motorcycle fuel injectors. Its unique design saves weight and volume, while further optimizing the product's functionality. This manual provides detailed instructions for the safe and effective operation of your ANJ600 GDI Piezo unit.


Informació de seguretat
- Ensure the device is connected to the correct power supply (110V or 220V) as specified for your region.
- Utilitzeu la màquina en una zona ben ventilada.
- Keep away from open flames (no naked flame within 2m).
- Maintain a relative humidity of less than 85%.
- Ensure the intensity of the outer magnetic field is less than 400A/m.
- Do not use alcohol or corrosive cleaning liquids in the test solution.
- Utilitzeu equips de protecció individual (EPI) adequats, com ara guants i ulleres de protecció.
Components del producte i mésview


Configuració
- **Power Supply Selection**: Before connecting, ensure the machine is set to the correct voltage (110V or 220V) for your region. This is a critical step for proper operation and to prevent damage.
- **Prepare Test Solution**: Use a funnel to add the appropriate test solution into the machine's fuel tank (Item 9 in Figure 3). The liquid level indicator (visible on the side of the machine) should be observed. Nota: Do not use alcohol or corrosive cleaning liquids.
- **Install Injectors**:
- Choose a proper adaptor according to the injector type and mount it to the fuel separator assembly (Item 2 in Figure 3).
- Install the injectors in the forward direction. Apply a small amount of lubricating grease on the O-rings to ensure a proper seal.
- Use PTFE tape as an aid to ensure a tight connection for GDI injectors.
- Fix the fuel separator assembly with the installed injectors onto the plate of the test tube.
- **Connect Signal Cables**: Connect the injector pulse signal wires to each injector.
- **Connect Fuel Outlet Hose**: Connect the fuel outlet hose (Item 6 in Figure 3) to the appropriate port.
- **Connect Power**: Connect the power cable to the machine and a suitable power outlet.
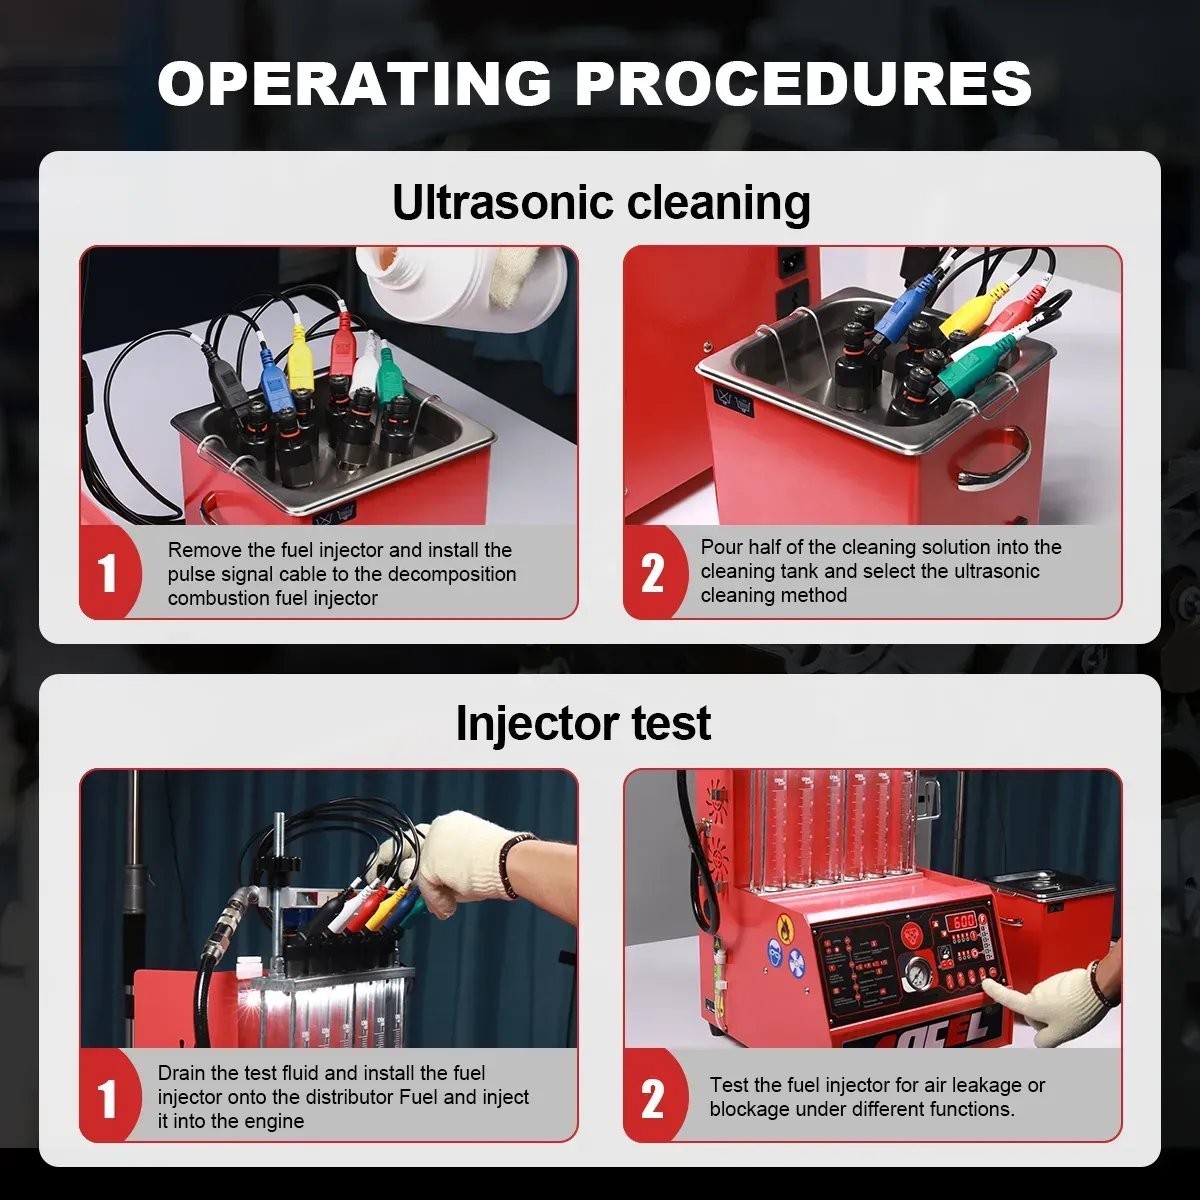
Procediments operatius
The ANJ600 offers various cleaning and testing functions. It is recommended to perform the complete cleaning and testing procedures in the following order: Ultrasonic cleaning, Uniformity/Sprayability test, Leakage test, Injecting flow test, and Working modes test.
Tauler de control acabatview

Funcions clau:
- **Injector Type Selection**: Press the key to choose between 12V Conventional, 75V GDI, or 125V GDI-Piezo injectors.
- **Start/Stop**: Press to start or pause current procedures.
- **Drain**: Opens the solenoid valve to drain test liquid back to the fuel tank.
- **Light**: Turns the backlight on/off for observation.
- **Pressure Adjustment**: Use '+' and '-' buttons to adjust pressure when the program is running.
- **MS (Pulse Parameter)**: Default pulse parameter after start. Use '+' and '-' to adjust.
- **RPM**: Use '+' and '-' to adjust RPM.
- **CT (Count)**: Default count parameter. Use '+' and '-' to adjust.
- **ULTRA (Ultrasonic Cleaning)**: CT shows 15 minutes after pressing this key. Adjust working time with '+' and '-'. Indicator light and pulse output are available.
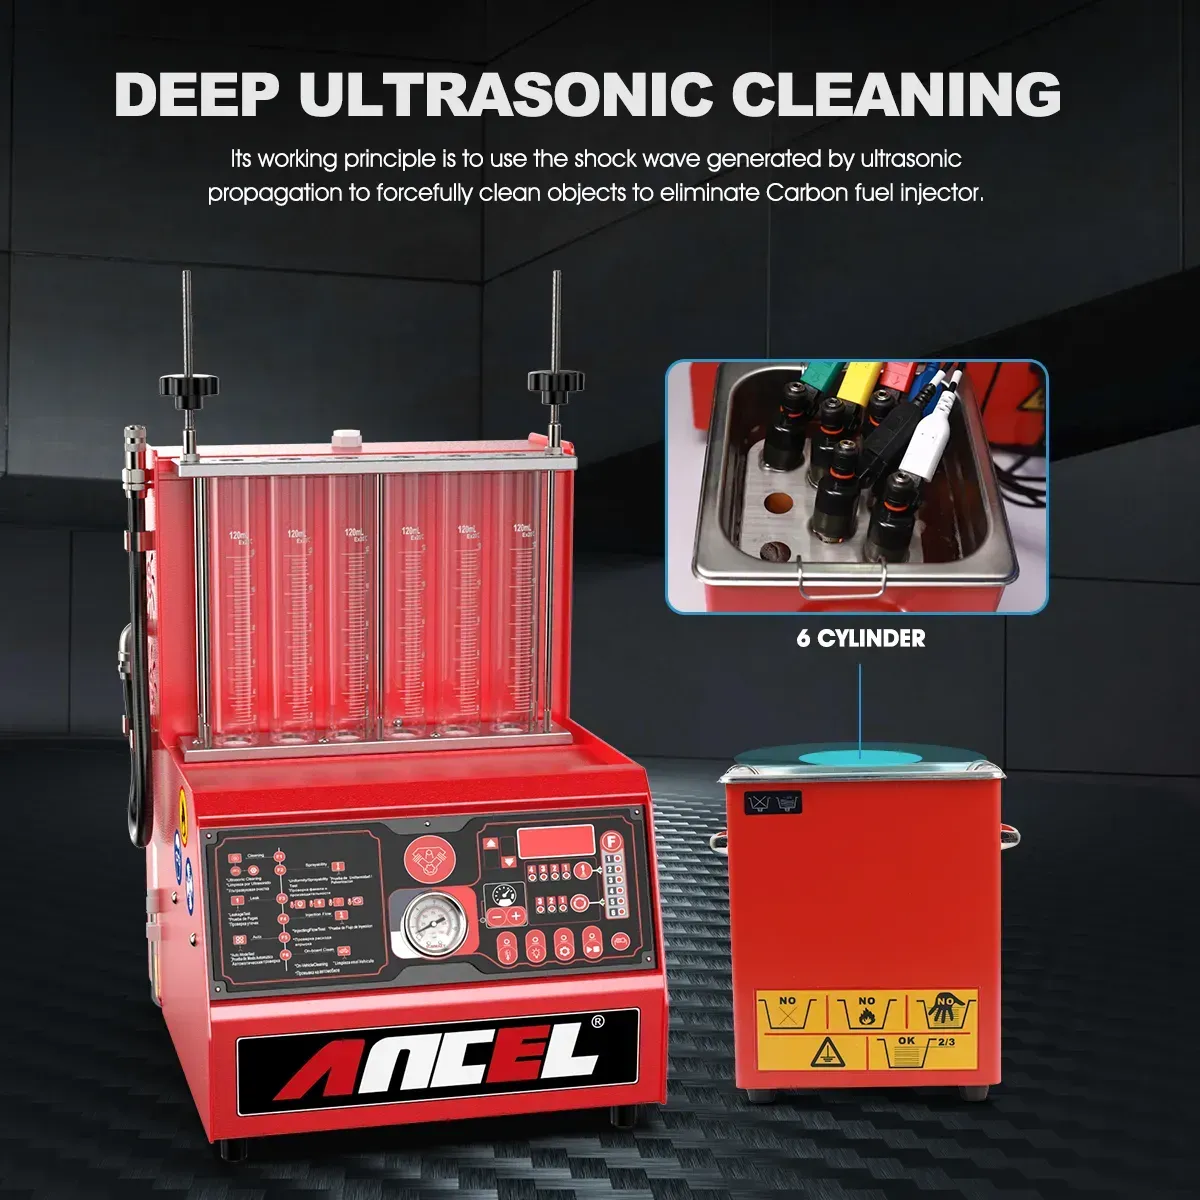
1. Neteja per ultrasons
This function uses ultrasonic vibrations to dislodge carbon deposits from injectors, ensuring thorough cleaning.
- Place the injectors (after surface cleaning) into the ultrasonic cleaner (Item 7 in Figure 3).
- Add enough injector detergent into the ultrasonic cleaner so that the liquid level is about 20mm above the needle valve of the injectors.
- Plug the pulse signal wire to each injector.
- Select the ultrasonic cleaning function on the control panel and set the desired time.
- Press the 'RUN' key to start the procedure.
- Enceneu l'interruptor de neteja per ultrasons al costat esquerre de la màquina.
- The process will stop automatically with a beeper sound when the set time is up.
- Turn off the ultrasonic cleaning switch and remove the injectors, wiping them with a dry soft cloth.
2. Resistance Test
This test measures the resistance of the fuel injector.
- Connecteu un extrem de la línia de mesura de resistència a la interfície del costat dret del dispositiu i l'altre extrem als dos elèctrodes de l'injector de combustible.
- Start the machine and press the appropriate key for resistance testing. The resistance value will be displayed on the screen.
- Measure several times if needed to confirm the value.
- After measurement, remove the fuel injector and the resistance measurement line.
3. Uniformity / Sprayability Test
This test checks the uniformity of injection volume and the spray pattern of each injector under the same working conditions.
- Ensure injectors are properly installed as described in the Setup section.
- Drain any residual test liquid from the measuring cups.
- Select the "Uniformity/Sprayability test" function on the control panel.
- Set corresponding parameters (refer to the appendix for pressure settings and vehicle manuals for other parameters).
- Press the 'RUN' key to start the test.
- Observe the spray pattern and volume in the observation window tubes (Item 3 in Figure 3).
- The equipment will automatically stop with a beeper sound when the test is completed.
4. Leakage Test
This test inspects the sealing conditions of the injector needle valve under system pressure to detect any dribbling.
- Ensure injectors are properly installed.
- Drain any residual test liquid from the measuring cups.
- Select the "Leakage Test" function and press the 'RUN' key to start.
- Adjust the system pressure using the '+' and '-' keys to observe dribbling. The pressure should preferably be 10% higher than the manufacturer's specifications.
- The equipment will automatically stop with a beeper sound when the test is completed.
5. Injecting Flow Test
This test checks if the injecting flow rate over 15 seconds meets specifications, indicating wear or clogging.
- Ensure injectors are properly installed.
- Drain any residual test liquid from the measuring cups.
- Choose the "Injecting Flow Test" function and press the 'RUN' key to start.
- Adjust the fuel pressure using the '+' or '-' keys according to the injector specification.
- The equipment will automatically stop with a beeper sound when the test is completed.
6. Working Modes Test
This function simulates various engine working conditions (Acceleration, Deceleration, Acceleration + Deceleration) to test the comprehensive performance of injectors.
- Ensure injectors are properly installed.
- Drain all test liquid from the measuring cups.
- Select the "Modes" function and choose the desired mode (e.g., Idle speed, Middle speed, High speed, Leaking, Cumulative, Simulation, Auto, Ultrasonic cleaning, Resistance testing).
- Press the 'RUN' key to start the test.
- Adjust the fuel pressure using the '+' or '-' keys as needed.
- The equipment will automatically stop with a beeper sound when the test is completed.

7. On-Vehicle Cleaning
The device comes with various disassembly-free cleaning connectors, allowing for on-vehicle cleaning and maintenance for different vehicle models. Specific procedures for on-vehicle cleaning will depend on the vehicle model and should be performed by qualified personnel following vehicle-specific service manuals.
Manteniment
- **Cleaning**: Regularly clean the exterior of the machine with a soft, dry cloth. Ensure no liquids enter the control panel or electrical components.
- **Test Liquid Management**: After each use, ensure all test liquid is drained back into the fuel tank or properly disposed of according to local regulations.
- **Storage**: Store the ANJ600 in a dry, clean environment, away from direct sunlight and extreme temperatures.
- **Injector Care**: Always apply a little lubricating grease on O-rings during installation to prevent wear and ensure proper sealing.
Resolució de problemes
| Problema | Causa possible | Solució |
|---|---|---|
| La màquina no s'encén | Vol incorrectetage selection (110V/220V), power cable not connected, power switch off. | Verifiqueu el voltage setting, ensure power cable is securely connected, check power switch. |
| Injectors not spraying or spraying poorly | Clogged injectors (require more cleaning), incorrect pulse signal connection, low fuel pressure. | Perform ultrasonic cleaning, check signal cable connections, verify fuel pressure settings. |
| Liquid leakage during test | Improper injector installation, damaged O-rings, loose connections. | Re-install injectors ensuring proper seating and O-ring condition, tighten all connections, use PTFE tape if necessary. |
| Resultats de proves inexactes | Contaminated test liquid, incorrect parameter settings, faulty injector. | Replace test liquid, verify all parameters against manufacturer specifications, test injectors individually to isolate issues. |
Especificacions
| Paràmetre | Valor |
|---|---|
| Font d'alimentació de la unitat principal | AC220V±10% 50Hz/60Hz o AC110V±10% 60Hz |
| Potència d'entrada | 230W |
| Ultrasonic cleaner power | 100W |
| Resistance test accuracy | 0.1Ω |
| Simulated RPM range | 100 ~ 9900 rpm, pas: 10 rpm |
| Interval de temps | 5~300s, pas: 5s |
| Amplada del pols | 0.1~30ms, step: 0.1ms |
| Capacitat del dipòsit de combustible | 2000 ml |
| Pressió laboral | 0-8 bar |
| Temperatura de funcionament | -10 ~ + 40 ℃ |
| Humitat relativa | <85% |
| Outer Magnetic Field Intensity | <400 A/m |

Consells per a l'usuari
- **Voltage Confirmation**: Always confirm the required voltage (110V or 220V) before purchasing and operating the device to ensure compatibility with your local power supply.
- **Accessory Storage**: Keep all accessories, especially various connectors and adaptors, organized to ensure they are readily available for different injector types.
- **Cleaning Solution**: Use only recommended injector detergent. Avoid alcohol or corrosive liquids to prevent damage to the machine and injectors.
Garantia i Suport
For warranty information, technical support, or service inquiries, please contact the manufacturer or your authorized dealer. Keep your purchase receipt and product serial number handy for faster service.


