Introducció
The Aquascape DIY Ecosystem Backyard Pond Kit (Model 99765) provides all the necessary components to construct a beautiful and functional 8-feet x 11-feet ecosystem pond. This manual outlines the steps for proper installation, operation, and maintenance to ensure a healthy and thriving water feature.

Image: All components included in the Aquascape DIY Ecosystem Backyard Pond Kit.
Components del kit
The Aquascape DIY Ecosystem Backyard Pond Kit comes complete with the following items:
- Signature Series 200 Pond Skimmer: Provides mechanical filtration by removing floating debris and houses the pump.
- Signature Series 1000 BioFalls Biological Filter with BioBalls Biological Filter Media: Supports beneficial bacteria for biological filtration and serves as the source for the waterfall.
- EcoWave 2000 Pond Pump: Energy-efficient and reliable pump for water circulation.
- Kink-Free Pipe – 1.5-inch x 25-feet: Durable hose for connecting filters and pump.
- 45 mil fish safe EPDM liner – 12-feet x 15-feet: Flexible and durable pond liner.
- 180 sq. ft. of protective underlayment: Fabric layer to protect the liner from punctures.
- Welcome Kit: Introductory materials to the Aquascape Lifestyle.
- Installation Kit: Includes silicone, pond and waterfall foam sealant, and other necessary items.
Configuració i instal·lació
Follow these steps carefully to ensure proper installation of your Aquascape pond kit.
1. Planning and Layout
Determine an appropriate location for your pond. Use a garden hose and brightly colored spray paint to lay out the desired shape on the ground. An irregular shape will look more natural. Use a tape measure to check the maximum dimensions to ensure you have enough pond liner.
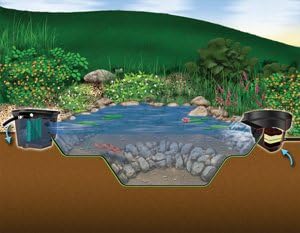
Image: Cross-section diagram illustrating the ecosystem approach of an Aquascape pond, showing skimmer, BioFalls, and pond shelves.
2. Filter Placement
Place the BioFalls filter and skimmer at opposite ends of the pond layout to ensure proper water circulation. Consider what will look best from main viewing areas both inside and outside your home. For the BioFalls, install the bulkhead fitting provided through the hole at the back of the filter. Apply silicone around the fitting threads when connecting the barbed pipe fitting to the bulkhead to create a watertight seal. A couple of turns past hand-tight should suffice. For the skimmer, ensure it is placed where debris can easily flow into it.
3. Excavation
Begin excavating the pond by digging the first shelf approximately 8 to 10 inches deep. Your total depth should end up around 24 inches, or as specified by your pond kit. Avoid following the exact contour of the first shelf to help naturalize the feature. Design a fish feeding area by cutting in one of the shelves closest to the main viewing area, or create a wide shelf along the back wall for aquatic plants. Ensure vertical walls are cut straight for easy rock placement and structural integrity, and pond shelves are flat and level to handle rock and gravel.
4. Liner and Underlayment Installation
Before installing the liner, clean up any rocks or debris remaining on the bottom of the pond. The underlayment is a thick woven fabric that protects the pond liner from punctures and helps alleviate hydrostatic pressure caused by groundwater trapped underneath. Unfold the underlayment and cover the surface area of the pond, conforming it to the pond shelves by starting at the bottom and working your way up. Next, bring in the fish-safe EPDM rubber pond liner. Much like the underlayment, start at the bottom and pull down the liner to conform it to the pond shelves, doing your best to remove any large folds along the way.
5. Rock Placement
Once the liner is set in place, begin rocking in the pond by placing boulders along the vertical walls of the pond floor. Start at the bottom and use a variety of stone sizes as you stack rocks, much like building a stone retaining wall. If a boulder doesn't fit, flip it, turn it, and twist it in place. If it still doesn't fit, set it aside and try a different one that will lock in place. Ensure the tops of the stacked boulders sit higher than the vertical walls to retain the gravel on the shelves. Continue to work your way up from the bottom, making sure the stone walls are stable as you go. Consider the waterfall while rocking in the pond and use larger stones to frame out a waterfall entry point into the pond. Flat stones will create a sheet-type waterfall, and round stones will create more of a rapids look.
6. Skimmer and Waterfall Hookup
Before filling the pond, you will need to hook up the skimmer and BioFalls. For the skimmer, hold the liner up to the face of the skimmer, leaving slack at the bottom. Use your finger or a screwdriver to trace out the skimmer opening. Using the trace line as a guide, cut out the section of liner 1.5 inches inside of the mark. Rounding the corners of the cutout will prevent the liner from tearing when stretched. Insert the skimmer faceplate through the cutout and stretch the liner firmly around the component, ensuring the holes from the skimmer weir door are at the bottom of the component when installed. Temporarily attach the liner to the front of the skimmer by lining up the top corner screws of the faceplate. Unthread the screws and pull back the liner to re-expose the skimmer opening. Wipe down the face of the skimmer and the backside of the liner around the faceplate to remove any dirt or dust. Use a thick bead of silicone over the screw inserts and then permanently reattach it to the skimmer by lining up the previously set screws. Install the four corner screws first, and then the rest in any order. Complete the installation by tightening down the screws to form a watertight seal around the skimmer faceplate.
For the BioFalls, much like installing the skimmer faceplate, temporarily attach the liner to the BioFalls with the BioFalls snout and screws provided. Once the top corner screws are lined up, pull the liner back and remove any dirt or dust from the face of the BioFalls and the back of the liner. Use a thick bead of silicone over the screw inserts and permanently reattach the liner by installing the snout to the BioFalls. The top corner screws should be lined up and installed first, and then the rest in any order. Once sealed, you can cut the excess liner from the BioFalls spillway and finish building the main waterfall of your feature. Black waterfall foam is used to fill in the gaps and voids between the rocks and keep the water flowing visibly over the rocks. Allow the foam time to cure before molding it in place. Use gravel and rock dust to help disguise the foam before it fully cures and hardens.
7. Passos finals
Use a garden hose to rinse down the stones from top to bottom. Remove the dirty water with the pond pump and extra hose from the kit. Once the pond has been rinsed down a few times and the dirty water removed, pull the pump and begin to fill the pond. Trim the excess liner around the pond, leaving approximately 6 inches for edging. Dig a small trench behind the perimeter boulders and fold the liner down against them. Backfill the trench with loose soil and compact the dirt to avoid settling. Gravel can be used around the edges of the pond to help transition into the landscape, but avoid the unnatural look of a solid gravel edge around the entire perimeter.
Before the pond is filled, you will need to hook up the pump and plumbing inside of the skimmer. Prepare to hook up the pump by running the plumbing into the open side port of the skimmer. Drop the pump in the skimmer and determine the amount of pipe you'll need to connect the plumbing. Cut the pipe and connect the pump to the plumbing with the use of the barbed hose adapter and rotational ball fitting included. Once the pump is installed, run the electrical cord out of the unused side port. Complete the installation by inserting the skimmer debris net and covering the unit with the lid provided. Before turning on the waterfall, remove any dirt or debris from the BioFalls and place the filter pads into the unit with a rock to weigh them down. Optional media like BioBalls can also be added at this time for additional filtration.
Video: Detailed installation guide for the Aquascape DIY Pond Kit.
Funcionament
The Aquascape DIY Ecosystem Backyard Pond Kit operates on an ecosystem approach, promoting a balanced natural environment. The skimmer removes surface debris, protecting the pump and reducing maintenance. The BioFalls filter provides biological filtration, fostering beneficial bacteria that keep the water clean and clear. The EcoWave pump ensures continuous water circulation, which is vital for the health of the pond's ecosystem, including any fish or plants.
Manteniment
Regular maintenance is crucial for the longevity and clarity of your pond. This includes:
- Regularly emptying the skimmer basket to remove leaves and other debris.
- Periodically cleaning the BioFalls filter pads and BioBalls to ensure optimal biological filtration.
- Monitoring water levels and topping off as needed, especially during dry periods.
- Trimming aquatic plants to prevent overgrowth and maintain water quality.
- Adding beneficial bacteria treatments as recommended to support the ecosystem.
Resolució de problemes
If you encounter issues with your pond, consider the following common problems and solutions:
- Aigua ennuvolada: Check filter media for clogging, ensure proper water circulation, and consider adding beneficial bacteria or a water clarifier.
- Baix cabal d'aigua: Inspect the skimmer basket for debris, check the pump for clogs, and ensure the pump is fully submerged and operating correctly.
- Algae Growth: Excessive sunlight or nutrients can cause algae. Introduce more aquatic plants for shade, reduce fish feeding, or use an algaecide if necessary.
- Water Loss: Check the liner for punctures (though unlikely with proper underlayment), inspect plumbing connections for leaks, and ensure the waterfall is not splashing water outside the pond.
Especificacions
| Dimensions del producte | 70 x 96 x 24 polzades |
| Pes de l'article | 72 lliures |
| Fabricant | Aquascape, Inc. |
| Número de model de l'article | 99765 |
Garantia i Suport
For specific warranty information and customer support, please refer to the documentation included in your Aquascape DIY Ecosystem Backyard Pond Kit or visit the official Aquascape weblloc. És possible que hi hagi plans de protecció addicionals disponibles per a la compra.


