1. Introducció
This instruction manual provides detailed guidance for the assembly and care of your Tamiya 35271 Leopard 2 A6 Main Battle Tank model kit. The Leopard 2 A6 is a highly detailed 1/35 scale plastic assembly kit, accurately reproducing the modern main battle tank known for its powerful 55 caliber 120mm smoothbore main gun and advanced armor. Please read all instructions carefully before beginning assembly.

Figura 1.1: Fully assembled Tamiya Leopard 2 A6 Main Battle Tank model kit. This image displays the completed model from a front-quarter view, espectacleasing its camouflage paint scheme, long main gun, and detailed turret with crew figures.
2. Informació de seguretat
ADVERTIMENT: PARTS PETITES. This model kit contains small parts which may pose a choking hazard for young children. Keep all components and tools out of reach of children under 3 years of age. Adult supervision is recommended during assembly. Always use tools carefully and in a well-ventilated area. Avoid inhaling paint or glue fumes. Refer to the safety instructions provided with any adhesives or paints used.
3. Parts List and Overview
Before starting assembly, carefully check all sprues and components against the kit's parts diagram (refer to the included printed manual for the full diagram). Ensure all parts are present and undamaged. This kit includes:
- Plastic sprues for tank hull, turret, tracks, and various details.
- Components for the long 55 caliber 120mm smoothbore main gun.
- Photo-etched parts for mesh baskets and other fine details.
- Clear plastic parts for periscopes and vision blocks.
- Decal sheet for markings, license plates, and road signs.
- Poly caps for movable parts.
- Quadern d'instruccions.

Figura 3.1: Example of clear plastic parts sprue. This image shows a sprue of clear plastic components, including small goggles, which are used for transparent elements of the model.

Figura 3.2: Decal sheet for various markings. This image displays the decal sheet, featuring German license plates, tactical markings, and various road signs for diorama creation.
4. Instruccions de muntatge
Follow the steps outlined in the included printed instruction booklet for detailed assembly. The following sections highlight key areas and considerations during construction.
4.1. Hull and Running Gear
Begin by assembling the lower hull and suspension components. Ensure all road wheels and drive sprockets are securely attached. The tracks are typically link-and-length or rubber band type; follow the specific instructions for your kit variant.
4.2. Turret Assembly
Assemble the turret components, paying close attention to the main gun mounting. The Leopard 2 A6 features a distinctively longer 55 caliber 120mm smoothbore main gun compared to earlier variants. Ensure the gun barrel is straight and securely fitted.

Figura 4.2.1: Comparison of gun barrels. This image illustrates the difference in length between the A5 and the newly designed A6 55 caliber main gun barrels, highlighting the A6's extended length.
Install the commander and gunner hatches. Crew figures are included and can be assembled and painted separately before insertion into the turret hatches.
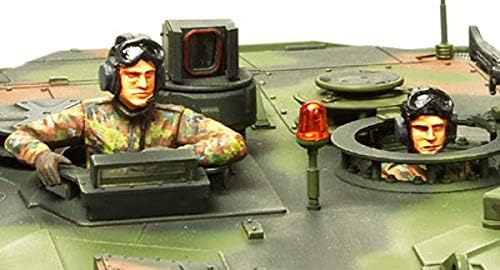
Figura 4.2.2: Turret detail with crew figures. This close-up shows the commander and gunner figures positioned in their respective hatches on the tank's turret, complete with headsets and uniforms.
4.3. External Details and Photo-Etched Parts
Attach all external details such as tools, smoke grenade launchers, and the rear engine deck grilles. The kit includes photo-etched parts for the turret's mesh storage baskets and other fine grilles. Handle these delicate parts with care and use appropriate adhesive.
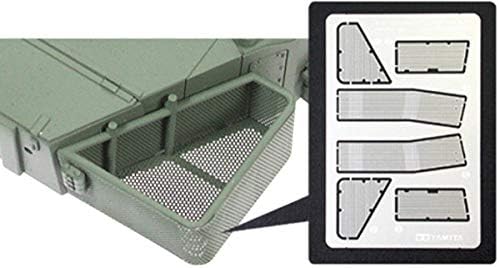
Figura 4.3.1: Photo-etched parts for mesh baskets. This image shows a section of the tank's rear with a partially assembled mesh storage basket, alongside the flat photo-etched fret from which these delicate parts are cut.

Figura 4.3.2: Rear hull detail. A close-up of the rear of the tank model, showing the engine deck, rear lights, a German license plate, and a coiled tow cable, illustrating the intricate details.
4.4. Painting and Decals
Once assembly is complete, prepare the model for painting. The Leopard 2 A6 typically features a three-tone NATO camouflage scheme. Apply decals carefully using decal setting solutions for best adhesion and a painted-on look. The kit includes extra road signs for diorama creation.
5. Handling and Display
This Tamiya model is a static display item. Handle the completed model with care to avoid damaging delicate parts, paint, or decals. When moving the model, support it from the main hull rather than by the gun barrel or small accessories. Display the model in a stable, dust-free environment away from direct sunlight and extreme temperature fluctuations to preserve its finish and structural integrity.
6. Manteniment
To maintain the appearance of your Tamiya Leopard 2 A6 model:
- Pols: Regularly dust the model with a soft, dry brush or a can of compressed air. Avoid abrasive cloths or chemical cleaners.
- Neteja: For stubborn dust or light smudges, gently wipe with a slightly damp cloth (water only), then immediately dry with a soft, lint-free cloth. Do not use solvents or harsh cleaning agents, as these can damage paint and plastic.
- Emmagatzematge: If storing the model, place it in a protective display case or box to prevent dust accumulation and accidental damage.
7. Troubleshooting Common Assembly Issues
Most issues during model assembly can be resolved by careful attention to the instructions. Here are some common points:
- Peces que no encaixen: Ensure parts are correctly oriented and that any excess plastic (flash) has been removed from the sprue gates. Dry-fit parts before applying glue.
- Gaps between parts: Small gaps can be filled with plastic putty or stretched sprue.
- Adhesius no adherits: Use a decal setting solution to help decals conform to irregular surfaces and adhere better. Ensure the surface is clean and glossy before application.
- Broken delicate parts: Small broken parts can often be re-attached with plastic cement or super glue. For very fine parts, consider replacing with stretched sprue or wire.
For further assistance, refer to the detailed diagrams in your original Tamiya instruction booklet or contact Tamiya customer support.
8. Especificacions
| Marca | TAMIYA |
| Número de model | 35271 |
| Escala | 1/35 |
| Tipus de producte | Plastic Assembly Model Kit |
| Edat recomanada | 16 anys i més |
| Dimensions del producte (muntat) | Approximately 15.13 x 2.75 x 9.75 inches (length x width x height) |
| Pes de l'article | 1.27 ounces (kit weight) |
9. Garantia i Suport
Tamiya products are known for their quality and precision. For specific warranty information or technical support regarding missing or defective parts, please refer to the contact information provided in your original kit packaging or visit the official Tamiya website. Please note that this is a model kit and does not typically come with an operational warranty beyond manufacturing defects.


