1. Producte acabatview
The SINGER MONICA pixy 5710 is a practical electronic sewing machine designed for ease of use and versatility. It features a robust build with aluminum die-cast and ABS resin components, ensuring stability during operation. This model is equipped with various functions to simplify your sewing projects, from basic stitches to more complex tasks like buttonholes.

Figura 1.1: Frontal view of the SINGER MONICA pixy 5710 Electronic Sewing Machine. The machine is white with clear markings for stitch selection and controls.
2. Característiques clau
- One-Touch Start/Stop: Effortless start and stop with a single button press. The needle automatically stops in the up position for convenience.
- Automatic Tension: Smooth thread tension control adapts to various fabrics, from thin to thick, ensuring consistent stitch quality.
- Automatic Needle Threading: Simplifies the threading process by guiding the thread through the needle eye with ease.
- Front Feed Dog: A feed dog positioned in front of the needle hole ensures smoother fabric feeding, allowing for easy and continuous sewing, even on thick materials.
- Simple Stitch Pattern Selection: Easily select from 11 patterns, including straight stitch, zigzag stitch, mending stitch, blind hem stitch, and buttonhole.
- Easy Bobbin Setup: Features a horizontal full-rotary hook beneath a transparent slide plate. Simply insert the bobbin to prepare for sewing. This design minimizes thread tangles, and the remaining bobbin thread is visible at a glance.
- One-Dial Buttonhole: Create buttonholes as desired for various applications. The two-step operation makes it very simple.
- Controlador de peu: Includes a foot controller for flexible start/stop and speed adjustment, particularly convenient for tasks requiring hand concentration.
- Free Arm Conversion: Remove the auxiliary bed to transform the machine into a free arm, ideal for sewing cuffs, sleeves, and other cylindrical items.
- Horizontal Spool Pin: The horizontal spool pin on the machine body prevents thread tangles and breakage, ensuring smooth thread delivery.

Figure 2.1: Diagram illustrating key features such as one-touch start/stop, automatic tension, and automatic needle threading. This image highlights the user-friendly design elements of the machine.
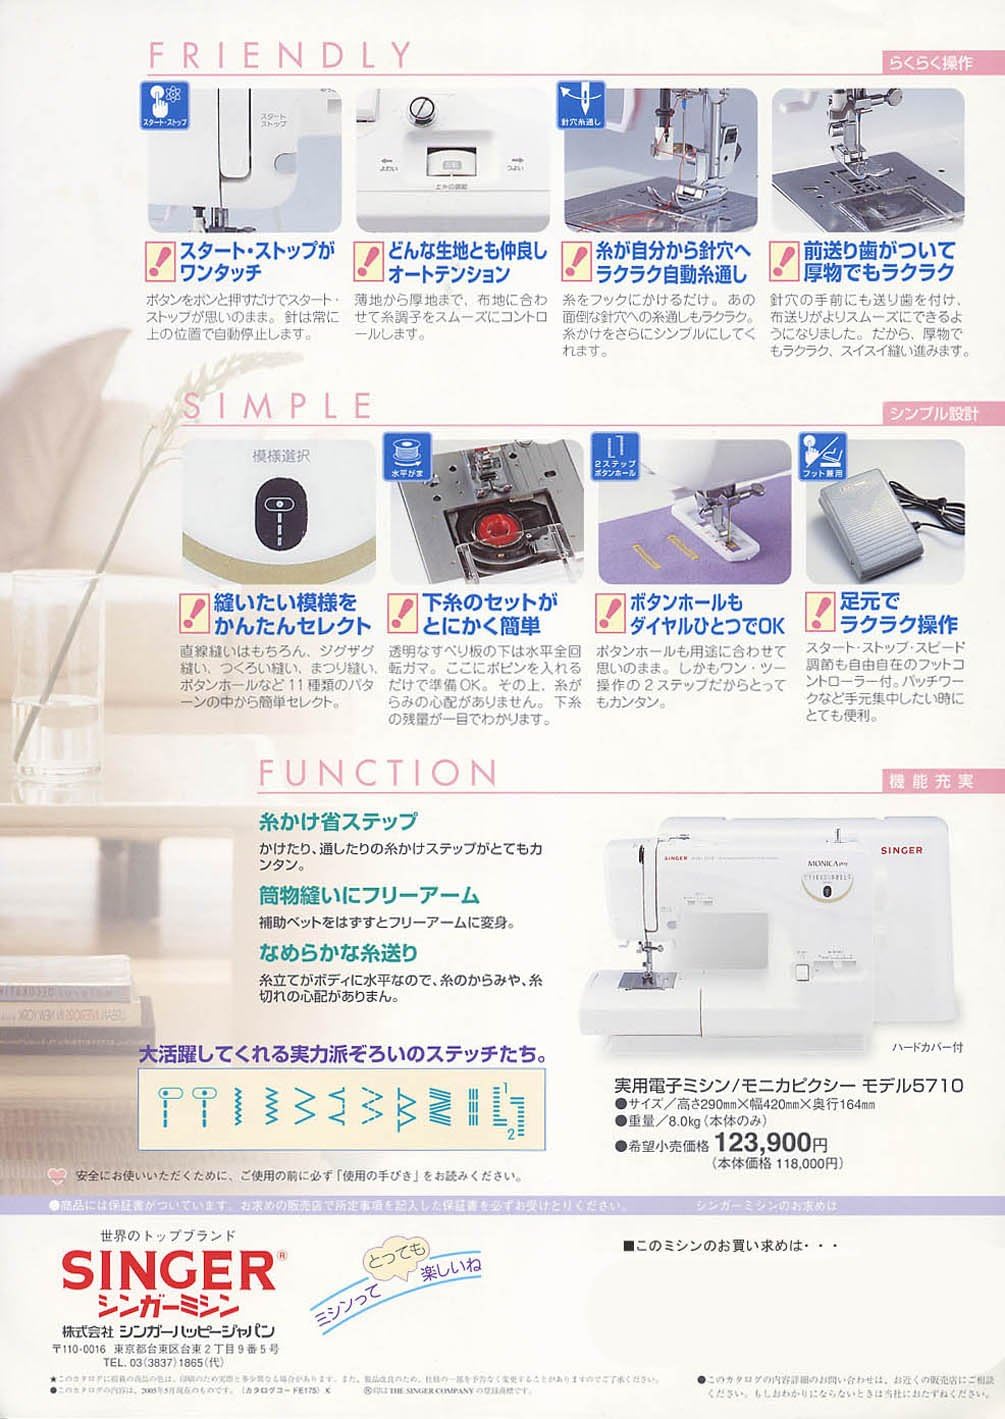
Figure 2.2: Diagram showing the stitch pattern selection dial, the easy bobbin setup, and the foot controller. It also illustrates the free arm function and the horizontal spool pin.
3. Configuració
3.1 Connexió d'alimentació
- Assegureu-vos que l'interruptor d'alimentació de la màquina estigui en la posició OFF.
- Connect the power cord to the machine's power input.
- Plug the power cord into a standard AC100V (50/60Hz) electrical outlet.
3.2 Enrotllament i inserció de la bobina
- Place a spool of thread on the horizontal spool pin.
- Follow the thread path for bobbin winding as indicated by the machine's markings.
- Col·loqueu una bobina buida a l'eix de la bobinadora i empenyeu-la cap a la dreta.
- Start the machine to wind the bobbin. The machine will stop automatically when the bobbin is full.
- Open the transparent slide plate located under the needle plate.
- Introduïu la bobina enrotllada a la caixa de la bobina, assegurant-vos que el fil es desenrotlli en la direcció correcta.
- Guide the bobbin thread through the tension spring and into the thread guide.
- Tanqueu la placa lliscant.
3.3 Enfilat superior
- Aixequeu la palanca del peu premsador.
- Place a spool of thread on the horizontal spool pin.
- Follow the numbered thread path guides on the machine, ensuring the thread is securely seated in all tension discs and take-up lever.
- Feu servir l'enfilador d'agulles automàtic per passar fàcilment el fil per l'ull de l'agulla.
- Pull about 15 cm of thread through the needle eye and place it under the presser foot.
4. Funcionament
4.1 Selecció d'un patró de puntada
Turn the stitch pattern selection dial located on the front of the machine to choose one of the 11 available patterns. The selected pattern will be indicated on the dial.
4.2 Inici i aturada de la costura
- Using the One-Touch Button: Press the Start/Stop button to begin sewing. Press it again to stop. The needle will automatically stop in the up position.
- Using the Foot Controller: Connect the foot controller to the machine. Press down on the foot controller to start sewing, and release to stop. The sewing speed can be adjusted by the pressure applied to the foot controller.
4.3 Ajust de la velocitat de costura
The sewing speed can be controlled using the foot controller. For precise control, especially on intricate projects, apply lighter pressure. For faster sewing, apply more pressure.
4.4 Sewing Thick Fabrics
The SINGER MONICA pixy 5710 is designed to handle various fabric thicknesses. The front feed dog assists in smoothly feeding thicker materials. Ensure the correct needle size (e.g., #16) is used for heavy fabrics to prevent needle breakage and skipped stitches.
4.5 Ús del braç lliure
To convert the machine to free arm mode, slide off the auxiliary bed (accessory storage compartment). This exposes the narrow free arm, which is useful for sewing small, tubular items like sleeves, cuffs, and pant hems.
5. Manteniment
5.1 Neteja
Regularly clean the bobbin area and feed dogs to remove lint and thread buildup. Use a small brush (often included with accessories) to gently sweep away debris. Disconnect the machine from power before cleaning.
5.2 Lubricació
Refer to the detailed instruction manual for specific oiling points and frequency. Use only sewing machine oil (a small oiler is included with accessories) to lubricate designated areas, ensuring smooth operation and longevity of the machine.
5.3 Substitució de l'agulla
Replace needles regularly, especially when sewing different fabric types or if the needle becomes bent or dull. Always use the correct needle type and size for your fabric to prevent damage to the machine and ensure proper stitching.
6. Solució De Problemes
- Punts saltats: Check if the needle is inserted correctly and is not bent or dull. Ensure the correct needle type and size are used for the fabric. Verify proper threading of both upper and bobbin threads.
- Trencament del fil: Inspect the thread path for any obstructions or sharp edges. Ensure the thread tension is correctly set for the fabric. Check if the needle is inserted correctly and is not damaged.
- La tela no s'alimenta: Ensure the presser foot is lowered. Check if the feed dogs are engaged (not dropped for free-motion sewing). Clean any lint buildup around the feed dogs.
- Sense energia: Verify that the power cord is securely plugged into both the machine and the electrical outlet. Check the power switch.
- Funcionament sorollós: Excessive noise can indicate a need for cleaning and oiling. Check for any loose parts or thread tangles in the bobbin area.
7. Especificacions
| Atribut | Detall |
|---|---|
| Número de model | 5710 |
| Dimensions (L x P x A) | 42 cm x 16.4 cm x 29 cm |
| Pes de la unitat | 8 kg |
| Materials | Aluminum die-cast, ABS resin |
| Font d'alimentació | CA 100V (50/60Hz) |
| Consum d'energia | 80W |
| Tipus de ganxo | Horizontal Full-Rotary Hook |
| Longitud del cable | 1.8 m |
| País d'origen | Taiwan |
| Accessoris estàndard | Needle case (total 5 needles: 1 each of #11, #14, #16; 1 each of knit needle #11, #14), bobbins, screwdriver, seam ripper, oiler, zigzag presser foot, zipper presser foot, buttonhole presser foot, overcasting presser foot, spool cap, foot controller, instruction manual, hard cover case. |
8. Garantia i Suport
Aquest producte ve amb un 1 any de garantia from the date of purchase. Please retain your proof of purchase for warranty claims. For technical support or service inquiries, please refer to the contact information provided in your original instruction manual or visit the official Singer weblloc per a la vostra regió.


