1. Introducció
This manual provides essential information for the correct installation, use, and maintenance of your Fiamma Awning Bracket Kit, Model 98655-745. This kit is designed to securely mount a Fiamma awning to specific vehicle models. Please read these instructions thoroughly before beginning installation to ensure safety and proper function.
2. Instruccions de seguretat
- Instal·lació professional recomanada: If you are unsure about any step, consult a qualified professional for installation.
- Eines: Use appropriate tools for installation. Ensure all tools are in good working condition.
- Subjecció segura: All brackets and fasteners must be securely tightened according to torque specifications (if provided by awning manufacturer). Loose components can lead to failure.
- Compatibilitat de vehicles: Verify that this bracket kit is compatible with your specific vehicle model and year before installation.
- Límits de pes: Ensure the vehicle structure can support the weight of the awning and brackets.
- Inspecció periòdica: Periodically check all mounting points and fasteners for tightness and signs of wear or damage.
3. Contingut del paquet
The Fiamma Awning Bracket Kit (Model 98655-745) includes the following components:
- 2 x 20 cm Brackets
- 1 x 12 cm Bracket
- Closing rubber joints (for sealing and protection)
- Necessary fasteners (bolts, nuts, washers) - (Assumed, as typical for bracket kits)
Imatge 1: Ex.ample of Fiamma Awning Bracket Kit components. This image displays the various metal brackets and associated hardware included in the kit, essential for mounting an awning to a vehicle.
4. Compatibilitat del vehicle
This bracket kit is specifically designed for the following vehicle models manufactured from June 2006 onwards:
- Fiat Ducato (L2 - 5420 mm and L3 - 5998 mm chassis lengths)
- Peugeot boxer
- Citroën Jumper
Ensure your vehicle matches these specifications for proper fitment.
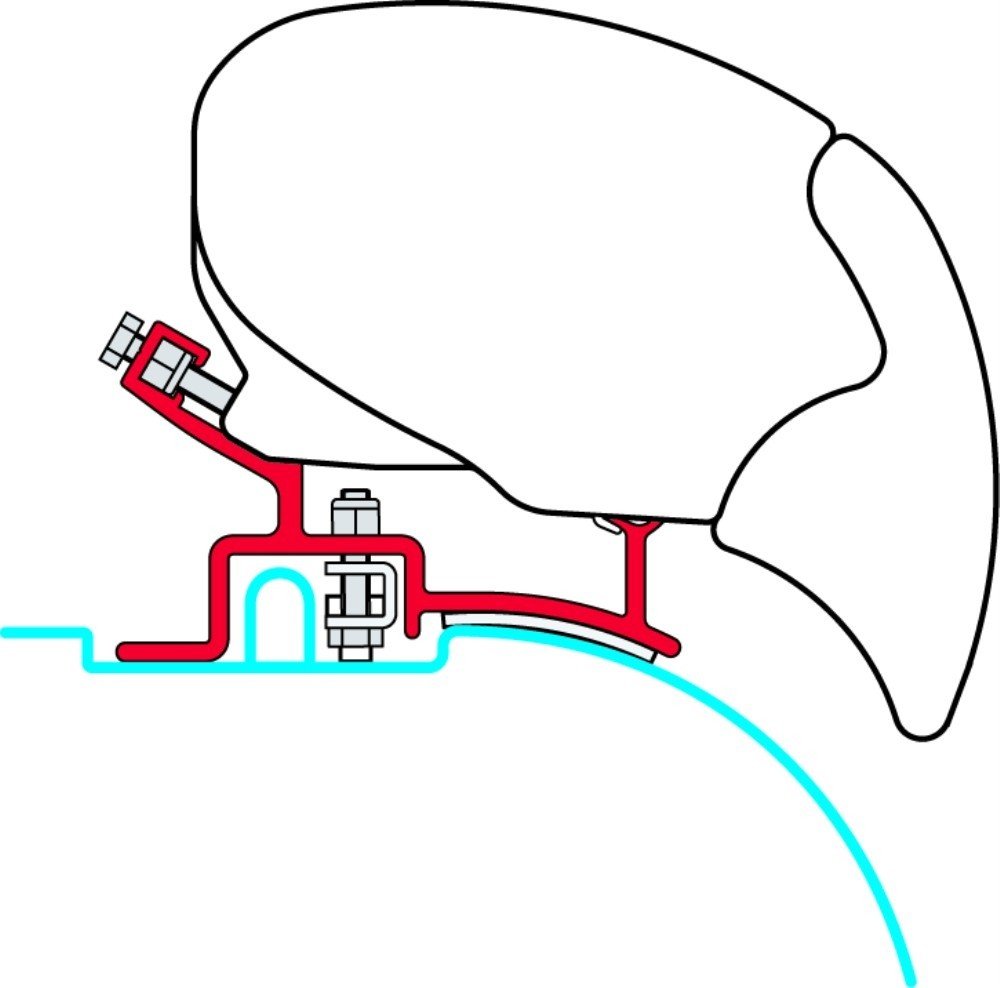
5. Configuració i instal·lació
The following steps outline a general installation procedure. Always refer to the specific awning's instruction manual for detailed mounting points and torque specifications.
- Preparar el vehicle: Park the vehicle on a level surface and engage the parking brake. Ensure the installation area is clean and free of obstructions.
- Identificar els punts de muntatge: Locate the designated mounting points on your vehicle's roof or side panel, as specified by your awning manufacturer. These brackets are typically designed to integrate with existing vehicle features.
- Parèntesis de posició: Carefully position the 20 cm and 12 cm brackets at their respective mounting locations. The longer brackets are generally used at the ends, and the shorter one in the middle, depending on the awning length and vehicle design.
- Perforar forats pilot (si cal): If drilling is required, mark the precise locations for pilot holes. Use appropriate drill bits and take precautions to avoid damaging internal wiring or components.
- Suports segurs: Attach the brackets using the provided fasteners. Ensure all bolts are tightened securely, but do not overtighten. Apply the closing rubber joints as directed to seal and protect the mounting points.
- Tendal de muntatge: Once all brackets are firmly installed, proceed with mounting your Fiamma awning onto these brackets, following the awning's specific instructions.
- Comprovació final: After installation, double-check all fasteners for tightness. Ensure the awning is securely attached and operates smoothly.
6. Manteniment
Proper maintenance ensures the longevity and safe operation of your awning bracket kit.
- Inspecció periòdica: Periodically inspect all brackets and fasteners for signs of corrosion, damage, or loosening. This is especially important after long trips or exposure to harsh weather conditions.
- Apretar els elements de fixació: Re-tighten any loose bolts or nuts to the recommended torque.
- Clean Brackets: Clean the brackets with mild soap and water to remove dirt and grime. Avoid abrasive cleaners that could damage the finish.
- Check Rubber Joints: Ensure the closing rubber joints are intact and providing a proper seal. Replace if cracked or damaged.
7. Solució De Problemes
| Problema | Causa possible | Solució |
|---|---|---|
| Brackets feel loose after installation. | Elements de fixació no prou apretats. | Re-tighten all bolts and nuts to the manufacturer's recommended torque. |
| Awning does not sit flush or is misaligned. | Incorrect bracket positioning or vehicle incompatibility. | Verify bracket placement against awning instructions. Confirm vehicle compatibility (model and year). |
| Water leakage around mounting points. | Damaged or improperly installed rubber joints/seals. | Inspect and replace any damaged rubber joints. Ensure they are correctly seated to create a watertight seal. |
8. Especificacions
| Característica | Detall |
|---|---|
| Número de model | 98655-745 |
| Marca | Fiamma |
| Compatibilitat | Fiat Ducato, Peugeot Boxer, Citroen Jumper (from 06/2006 onwards) |
| Bracket Lengths | 2 x 20 cm, 1 x 12 cm |
| Material | Metall |
| Tipus de muntatge | U-bolt (as per product specifications, specific application may vary) |
| Pes de l'article | 2.22 kg (4.88 lliures) |
| Dimensions del producte (L x A x A) | 11.85 x 11.57 x 6.22 polzades |
9. Garantia i Suport
Fiamma products are manufactured to high standards and are typically covered by a manufacturer's warranty against defects in materials and workmanship. For specific warranty terms and conditions, please refer to the documentation provided with your purchase or visit the official Fiamma weblloc.
For technical assistance, spare parts, or warranty claims, please contact your authorized Fiamma dealer or the Fiamma customer support directly. When contacting support, please have your product model number (98655-745) and purchase information readily available.
Fiamma Official Weblloc: www.fiamma.it (Note: This is a general link; specific regional sites may apply.)


