1. Introducció
The SparkFun Pro Mini ATmega328-5V/16MHz Development Board is a compact microcontroller board designed for embedded applications where space is a premium. It is compatible with Arduino boards and the Arduino IDE, making it a versatile tool for hobbyists and professionals alike. This manual provides essential information for setting up, operating, and troubleshooting your Pro Mini board.

Figure 1: SparkFun Pro Mini ATmega328-5V/16MHz Development Board
2. Producte acabatview
The SparkFun Pro Mini is a minimalist microcontroller board. It features the ATmega328 microcontroller, operating at 5V with a 16MHz external resonator. Designed for projects requiring a small footprint, it lacks an on-board USB-to-serial converter, requiring an external FTDI Basic Breakout board (or similar device) for programming. The board supports auto-reset and includes a 5V regulator with a maximum 150mA output.
Vídeo 1: Producte acabatview of the Arduino Nano, showcasing its compact size and features. While the video features the Arduino Nano, the principles of compact microcontroller boards and their applications are similar to the SparkFun Pro Mini.
3. Característiques clau
- ATmega328 microcontroller running at 16MHz with external resonator (0.5% tolerance).
- No on-board USB connection; requires an external FTDI board for programming.
- Supports auto-reset for convenient code uploads.
- Integrated 5V regulator.
- Maximum 150mA output from the 5V regulator.
- Compact dimensions: 1.3 x 0.71 x 0.03 inches.
4. Diagrama de fixació
Understanding the pinout is crucial for connecting peripherals and programming the Pro Mini. The board features pins for power, ground, digital I/O, analog input, and communication interfaces.

Figure 2: Detailed pinout diagram for the Arduino Pro Mini (DEV-11113), showing digital, analog, power, and communication pins. Note the FTDI header for programming.
The pins are arranged around three sides of the board. The short side is dedicated to programming via the FTDI header. The other two sides provide various power and General Purpose Input/Output (GPIO) pins. Analog pins A4, A5, A6, and A7 are located on the back side of the board.
5. Donant poder a la junta
The SparkFun Pro Mini offers flexible power options:
- RAW Pin: This pin accepts unregulated input voltage, typically ranging from 3.4V to 12V. An on-board regulator steps this down to 5V for the microcontroller.
- VCC Pin: This pin is for regulated 5V input. If you are providing an already regulated 5V supply, connect it directly to the VCC pin. Do not connect unregulated voltage to VCC.
- GND Pin: Connexió a terra comuna.
Ensure your power source matches the board's 5V operating voltage. If using a 3.3V peripheral, level shifting may be required.
6. Programming the Board
To program the SparkFun Pro Mini, an external USB-to-serial converter, such as an FTDI Basic Breakout board, is required. Follow these steps:
- Connect FTDI Board: Align the FTDI Basic Breakout board with the programming header pins on the Pro Mini. Ensure the 'GRN' and 'BLK' labels on the FTDI board match the corresponding pins on the Pro Mini.
- Connexió a l'ordinador: Plug the FTDI board into your computer's USB port.
- Instal·leu els controladors: If necessary, install the appropriate drivers for your FTDI board.
- Open Arduino IDE: Launch the Arduino Integrated Development Environment.
- Selecciona la junta: Vés a
Tools > Boardi seleccioneuArduino Pro or Pro Mini. - Select Processor: Vés a
Tools > Processori seleccioneuATmega328 (5V, 16 MHz). - Seleccioneu el port: Vés a
Tools > Portand select the serial port corresponding to your FTDI board. - Upload Sketch: Write or open your Arduino sketch and click the 'Upload' button. The board's auto-reset feature will facilitate the upload process.
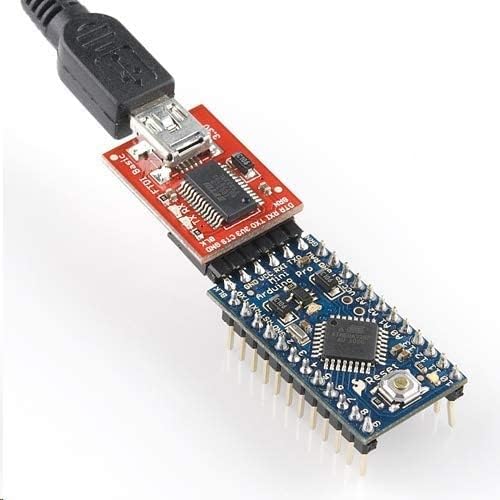
Figure 3: SparkFun Pro Mini connected to an FTDI Basic Breakout board, illustrating the setup for programming the microcontroller.
7. Funcionament del Consell
Once programmed, the Pro Mini will execute the uploaded sketch. It can interact with various sensors, actuators, and other electronic components through its digital and analog pins. Ensure all connections are secure and power requirements are met for stable operation.
8. Integration Examples
The compact size of the Pro Mini makes it ideal for embedding into projects where space is limited, such as wearables, small robots, or custom control systems.

Figure 4: The SparkFun Pro Mini mounted on a breadboard, demonstrating its compatibility for prototyping and circuit development.

Figure 5: The SparkFun Pro Mini integrated into a custom electronic project, showcasing its small form factor for embedded applications.
9. Especificacions tècniques
| Especificació | Valor |
|---|---|
| Microcontrolador | ATmega328 |
| Vol. Operatiutage | 5V |
| Entrada Voltage (RAW) | 3.4 V - 12 V |
| Velocitat del rellotge | 16 MHz |
| Memòria Flash | 32KB (ATmega328) |
| SRAM | 2KB (ATmega328) |
| EEPROM | 1KB (ATmega328) |
| Pins I / O digitals | 14 (6 provide PWM output) |
| Pins d'entrada analògics | 8 |
| Dimensions (LxWxH) | 1.3 x 0.71 x 0.03 polzades |
| Pes | 0.176 unces |
10. Solució De Problemes
- Placa no detectada: Ensure the FTDI drivers are correctly installed and the FTDI board is properly connected to both the Pro Mini and your computer. Check the selected serial port in the Arduino IDE.
- Errors de càrrega: Verify that the correct board (Arduino Pro or Pro Mini) and processor (ATmega328 (5V, 16 MHz)) are selected in the Arduino IDE. Check for any syntax errors in your code.
- Problemes d'alimentació: Confirm that the board is receiving adequate power (5V regulated to VCC or 3.4-12V to RAW). Incorrect voltagpot danyar la placa.
- Mal funcionament del component: Double-check all external wiring and component connections. Ensure components are compatible with 5V logic.
11. Garantia i Suport
This product is subject to a 30-day return policy for refunds or replacements. For detailed warranty information, technical support, or additional resources, please visit the official SparkFun Electronics website or contact their customer service. Online forums and community resources for Arduino and SparkFun products can also provide valuable assistance.


