1. Introducció
This manual provides detailed instructions for the assembly, painting, and care of your Italeri 1:72 scale Sherman M4A3 75mm model kit. Please read all instructions carefully before beginning assembly. This kit contains two models.
2. Informació de seguretat
- Edat recomanada: This product is not suitable for children under 14 years of age due to small parts and the use of sharp tools and adhesives.
- Peces petites: The kit contains small parts which may pose a choking hazard. Keep out of reach of young children.
- Eines: Assembly requires the use of hobby knives, cutters, and files. Always handle these tools with care and under adult supervision if applicable.
- Adhesives and Paints: Use model-specific adhesives and paints in a well-ventilated area. Follow the manufacturer's safety instructions for these products.
3. Contingut del paquet
Your Italeri 510007518 kit includes the following:
- Plastic sprues containing parts for two 1:72 scale M4A3 Sherman tank models.
- One decal sheet for markings.
- Instruction leaflet (this manual).
Note: Adhesives, paints, and tools are not included and must be purchased separately.
4. Instruccions de muntatge
Follow the numbered steps in the diagram below for proper assembly. Carefully cut parts from the sprues using a hobby cutter. Clean any excess plastic (flash) with a hobby knife or file before gluing. Use plastic cement sparingly to join parts.
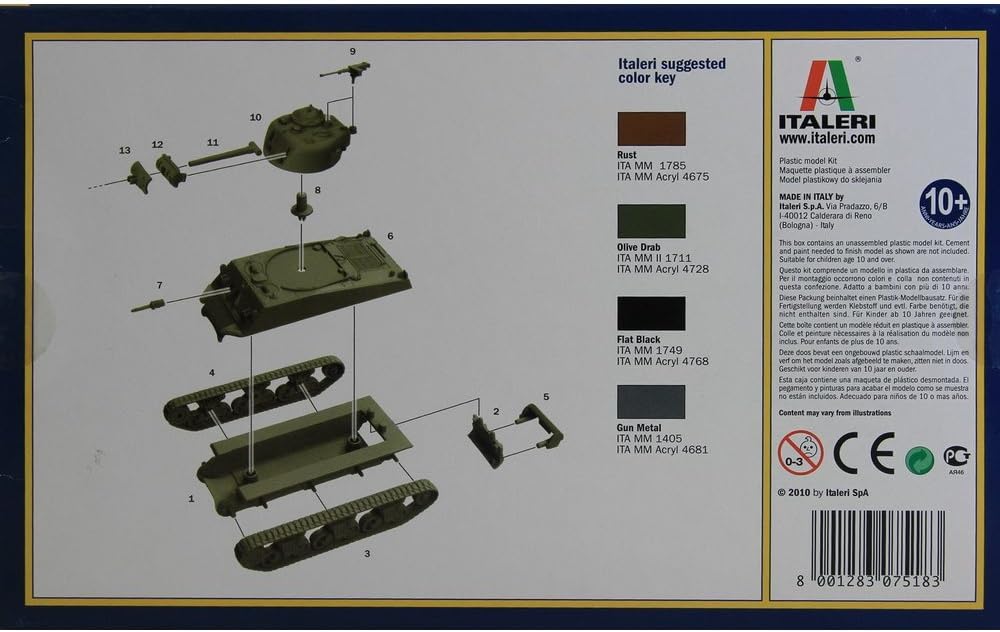
Figure 1: Assembly Diagram and Color Key
4.1. Lower Hull and Tracks
- Attach part 1 (lower hull base) to part 2 (side track assembly, left) and part 3 (side track assembly, right). Ensure correct orientation.
- Secure part 4 (front lower hull plate) to the front of the assembled lower hull.
- Attach part 5 (rear lower hull plate) to the rear of the assembled lower hull.
4.2. Upper Hull
- Attach part 6 (upper hull) to the assembled lower hull.
- Affix part 7 (front hull details) to the front of the upper hull.
4.3. Turret Assembly
- Assemble part 8 (turret base) with part 9 (turret top).
- Attach part 10 (main gun barrel) to the turret assembly.
- Add part 11 (turret side detail, left) and part 12 (turret side detail, right) to the turret.
- Secure part 13 (commander's cupola) to the top of the turret.
4.4. Assemblea Final
Once the hull and turret are complete, attach the assembled turret to the upper hull. Ensure the turret can rotate freely if desired.
5. Painting Guide
The following color key is suggested for painting your Sherman M4A3 model. These are general recommendations; specific historical accuracy may require further research.
Figure 2: Italeri Suggested Color Key
| Color | Italeri Model Master (MM) | Italeri Acrylic |
|---|---|---|
| Rovell | 1785 | 4675 |
| Olive Drab | II 1711 | 4728 |
| Negre pla | 1749 | 4768 |
| Gun Metall | 1405 | 4681 |
Apply paint in thin, even coats. Allow each coat to dry completely before applying the next. Consider using a primer for better paint adhesion.
6. Aplicació de calcomanies
Your kit includes a decal sheet for adding markings to your model. Refer to the box art or historical references for decal placement.

Figure 3: Decal Sheet and Parts Layout
- Cut out the desired decal as close to the edge of the design as possible.
- Dip the decal in lukewarm water for 10-20 seconds until it slides freely on its backing paper.
- Carefully slide the decal onto the desired position on your model.
- Gently blot away excess water with a soft cloth or cotton swab.
- Allow the decal to dry completely. A decal setting solution can be used to help the decal conform to surface details.
7. Especificacions
| Característica | Detall |
|---|---|
| Marca | Italeri |
| Nom del model | Sherman M4A3 75mm |
| Número de model | 510007518 |
| Escala | 1:72 |
| Nombre de models | 2 |
| Approx. Length (each) | 83 mm |
| Material | Plàstic |
| Edat recomanada | 14 anys i més |
| GTIN | 8001283075183 |
8. Manteniment
To ensure the longevity of your model, follow these simple maintenance guidelines:
- Neteja: Dust your model regularly with a soft brush or compressed air. Avoid using harsh chemicals or abrasive materials.
- Emmagatzematge: Store your model in a cool, dry place away from direct sunlight and extreme temperatures, which can cause plastic to warp or paint to fade.
- Manipulació: Handle the model carefully to avoid breaking delicate parts.
9. Solució De Problemes
If you encounter issues during assembly or with your finished model, consider the following:
- Les peces no s'ajusten: Ensure all flash (excess plastic) is removed from the parts. Dry-fit parts before applying glue. If a part is slightly warped, gentle heat (e.g., from a hairdryer) can sometimes help reshape it.
- Paint Issues: If paint is peeling or not adhering, ensure the surface was clean and free of oils before painting. Using a primer can improve adhesion. Apply paint in thin coats to avoid brush marks or clumping.
- Decal Problems: If decals are not adhering or are bubbling, ensure the surface is smooth. Use decal setting solutions to help them conform to irregular surfaces and eliminate air bubbles.
- Peces que falten: Double-check the sprues and packaging. If a part is genuinely missing, contact Italeri customer support.
10. Suport i contacte
For further assistance, missing parts, or technical inquiries, please visit the official Italeri website or contact their customer support. You can find more information at www.italeri.com.
11. Informació de la garantia
Specific warranty details for this model kit are not provided in the product information. Please refer to the retailer's return policy or contact Italeri directly for any warranty-related inquiries regarding manufacturing defects.


