1. Producte acabatview
The Thermaltake Contac 21 Universal CPU Cooler (CLP0600) is designed to provide efficient cooling for various CPU platforms. It features Direct-Touch Heat Transfer Technology with four 6mm copper heatpipes that make direct contact with the CPU, enhancing thermal transfer efficiency. The cooler includes one 92mm PWM fan and supports an additional 92mm fan for increased performance. It is compatible with Intel LGA-1366/1155/1156/775 and AMD FM1/AM3+/AM3/AM2+/AM2 sockets, supporting CPUs with a Thermal Design Power (TDP) up to 140W.
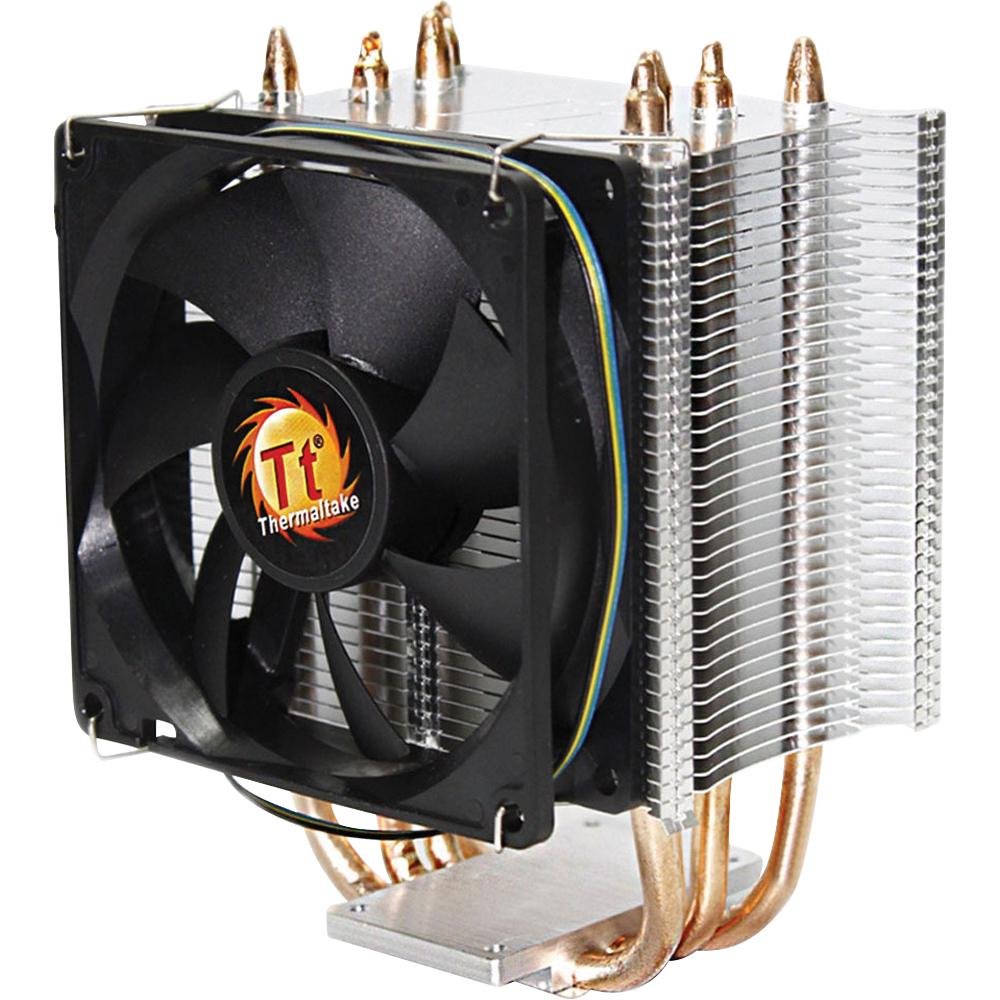
Figure 1: Thermaltake Contac 21 Universal CPU Cooler. This image shows the heatsink with its fins and heatpipes, and the attached 92mm PWM fan.
2. Informació de seguretat
- Desconnecteu sempre l'alimentació de l'ordinador abans de la instal·lació o el manteniment.
- Handle components with care to avoid damage. Sharp edges may be present on heatsink fins.
- Mantenir fora de l'abast dels nens.
- Ensure proper ventilation inside your computer case.
- Do not operate the CPU without a properly installed cooler.
3. Contingut del paquet
Verifiqueu que tots els elements siguin presents al paquet:
- Thermaltake Contac 21 Heatsink
- 92mm PWM Fan (x1)
- Fan Mounting Clips (for one or two fans)
- Universal Mounting Kit (backplate, brackets, screws, spacers)
- Thermal Grease (pre-applied or in a small tube)
- Manual d'usuari (aquest document)
4. Configuració i instal·lació
Important: Installation requires access to the rear of the motherboard. In some computer cases, the motherboard may need to be removed to install the backplate. Refer to your computer case manual for details on motherboard access.
Passos generals d'instal·lació:
- Prepareu la CPU: Ensure the CPU socket is clean. If replacing an old cooler, carefully clean off any old thermal paste from the CPU surface using isopropyl alcohol.
- Aplicar greix tèrmic: If thermal grease is not pre-applied to the cooler's base, apply a small, pea-sized amount to the center of the CPU's integrated heat spreader (IHS). Do not spread it manually; the pressure from the cooler will distribute it evenly.
- Instal·leu la placa posterior: Position the universal backplate on the rear side of the motherboard, aligning the holes with the CPU socket mounting holes.
- Col·loqueu els suports de muntatge: On the front side of the motherboard, place the appropriate mounting brackets (Intel or AMD) over the CPU socket, aligning them with the backplate screws. Secure them loosely with the provided standoffs/screws.
- Mount Heatsink: Carefully place the heatsink onto the CPU, ensuring the heatpipes make direct contact. Align the heatsink's mounting holes with the brackets.
- Secure Heatsink: Using the provided screws, alternately tighten the screws in a diagonal pattern until the heatsink is firmly seated. No apretar massa. Ensure even pressure.
- Connectar ventilador: Use the included fan clips to attach the 92mm PWM fan to the heatsink. Ensure the fan is oriented to blow air through the heatsink fins towards the rear or top of the case.
- Connectar el cable del ventilador: Plug the 4-pin PWM fan connector into the CPU_FAN header on your motherboard.
- Optional Second Fan: If installing a second 92mm fan (not included), use the additional fan clips and connect it to an available fan header on your motherboard (e.g., CHA_FAN or SYS_FAN).
Notes específiques de la plataforma:
- Intel LGA775/1156/1155/1366: Use the Intel-specific mounting brackets and hardware. Ensure the backplate is correctly oriented for your socket type.
- AMD FM1/AM3+/AM3/AM2+/AM2: Use the AMD-specific mounting brackets and hardware. Some users have reported challenges with AMD instructions; proceed carefully, ensuring all components fit without excessive force. If issues arise, double-check component alignment and consult online resources for visual guides specific to your motherboard and CPU socket.
5. Instruccions de funcionament
Once installed, the Thermaltake Contac 21 operates automatically. The 92mm PWM fan's speed is controlled by your motherboard based on CPU temperature, ensuring optimal cooling performance while minimizing noise.
- Arrencada inicial: After installation, power on your computer and enter the BIOS/UEFI settings. Verify that the CPU fan is detected and spinning. Monitor CPU temperatures during initial operation.
- Monitorització de la temperatura: Use motherboard monitoring software or third-party utilities to keep track of your CPU temperature, especially under load, to ensure the cooler is functioning effectively.
- Control de velocitat del ventilador: Most motherboards allow customization of PWM fan curves in the BIOS/UEFI. You can adjust these settings to prioritize quieter operation or maximum cooling performance as desired.
6. Manteniment
Un manteniment regular ajuda a garantir la longevitat i el rendiment òptim del refrigerador de la CPU.
- Eliminació de pols: Periodically (every 3-6 months, depending on environment) use compressed air to blow dust out of the heatsink fins and fan blades. Hold the fan blades gently to prevent over-spinning during cleaning, which can damage the fan motor.
- Inspecció del ventilador: Check the fan for any signs of wear, unusual noise, or obstructions. Ensure the fan cable is securely connected.
- Thermal Grease: The thermal grease typically lasts for several years. If you notice a significant increase in CPU temperatures over time, consider reapplying fresh thermal grease. This requires removing the cooler, cleaning both surfaces, and applying new paste.
7. Solució De Problemes
| Problema | Causa possible | Solució |
|---|---|---|
| Temperatures altes de la CPU |
|
|
| El ventilador no gira |
|
|
| Soroll del ventilador excessiu |
|
|
| Difficulty with Installation |
|
|
8. Especificacions
| Característica | Especificació |
|---|---|
| Número de model | CLP0600 |
| Compatibilitat | Intel LGA775/1156/1155/1366, AMD FM1/AM3+/AM3/AM2+/AM2 |
| Suport TDP | Fins a 140 W |
| Heatpipe Material | Copper (4 x 6mm Direct-Touch) |
| Material de l'aleta | Alumini |
| Dimensions del ventilador | 92 x 92 x 25 mm |
| Velocitat del ventilador | 1000 ~ 2400 RPM (PWM controlled) |
| Nivell de soroll | 19.3 dBA (minimum) |
| Connector d'alimentació | PWM de 4 pins |
| Dimensions del producte | Aproximadament 15.24 x 10.16 x 8.89 cm (llargada x amplada x alçada) |
| Pes | Aproximadament 453.59 g |
| UPC | 841163043257 |
9. Garantia i Suport
Thermaltake products are manufactured to the highest quality standards. This product is covered by a limited warranty from the date of purchase. Please refer to the official Thermaltake weblloc web per obtenir informació detallada sobre els termes i condicions de garantia específics de la vostra regió.
For technical support, troubleshooting assistance, or warranty claims, please visit the official Thermaltake support website or contact their customer service department. Have your product model number (CLP0600) and proof of purchase ready when contacting support.
Oficial Weblloc: www.thermaltake.com
10. Recursos de vídeo
No official product videos from the seller were available in the provided data for embedding. Please refer to the manufacturer's official website or YouTube channel for any available video guides or demonstrations.


