1. Introducció
This manual provides essential instructions for the safe and effective operation, maintenance, and troubleshooting of your Cablematic YF-3700A Digital Multimeter. Please read this manual thoroughly before using the device to ensure proper function and to prevent potential hazards.
2. Informació de seguretat
Always adhere to the following safety precautions to prevent electric shock, injury, or damage to the multimeter or the equipment under test.
- No supereu els límits màxims d'entrada per a cap funció.
- Assegureu-vos que l'interruptor de funció estigui en la posició correcta per a la mesura que s'està realitzant.
- No connecteu mai els cables de prova a un voltage source when the function switch is set to current, resistance, or diode/continuity test.
- Tingueu precaució quan treballeu amb voltagper sobre de 30 V CA RMS, 42 V pic o 60 V CC, ja que representen un perill de descàrrega elèctrica.
- Inspeccioneu els cables de prova per detectar danys a l'aïllament o metall exposat abans d'utilitzar-los. Substituïu-los si estan danyats.
- No feu servir el multímetre si sembla que està danyat o si la carcassa està oberta.
- Remove test leads from the circuit before opening the battery cover or fuse compartment.
- Utilitzeu sempre els terminals, la funció i el rang adequats per a les vostres mesures.
3. Producte acabatview
The Cablematic YF-3700A is a digital multimeter designed for measuring various electrical parameters. It features a clear digital display and a rotary switch for function selection.
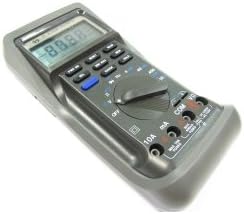
Figure 1: Cablematic YF-3700A Digital Multimeter. This image shows the overall view of the YF-3700A digital multimeter, featuring its grey casing, digital display, function buttons, rotary selector switch, and input jacks.

Figure 2: Cablematic YF-3700A Digital Multimeter Controls. A close-up view of the multimeter's control panel, highlighting the rotary switch with various measurement functions (V, Hz, mA, A, Ohm, Diode, Continuity), push buttons for features like RANGE, HOLD, MIN/MAX, and MEM, and the input terminals (10A, mA, COM, VΩ).
4. Configuració
4.1 Instal·lació de la bateria
The multimeter requires batteries for operation. Ensure the device is powered off and test leads are disconnected before proceeding.
- Locate the battery compartment cover on the rear of the multimeter.
- Feu servir un tornavís per afluixar el(s) cargol(s) que fixen la coberta.
- Remove the cover and insert the required batteries, observing correct polarity (+ and -).
- Torneu a col·locar la tapa del compartiment de la bateria i fixeu-la amb el(s) cargol(s).
4.2 Connexió dels cables de prova
Connect the test leads to the appropriate input jacks for the desired measurement.
- El COM (common) jack is for the black test lead.
- El VΩ jack is for the red test lead when measuring voltage, resistance, frequency, or performing diode/continuity tests.
- El mA jack is for the red test lead when measuring current up to 400mA.
- El 10A jack is for the red test lead when measuring current up to 10A.
5. Instruccions de funcionament
5.1 Engegada/apagada
To power on the multimeter, rotate the function switch from the OFF position to any desired measurement function. To power off, rotate the function switch back to the OFF posició.
5.2 Selecció de la funció
Use the central rotary switch to select the desired measurement function (e.g., V for voltage, Ω for resistance, A for current, Hz for frequency, Diode, Continuity).
5.3 Volum de mesuratage (AC/DC)
- Introduïu el cable de prova negre al COM presa i el cable de prova vermell al VΩ jack.
- Rotate the function switch to the desired AC Voltage (V~) o Volum de corrent continutage (V-) range.
- Connecteu les sondes de prova en paral·lel al component o circuit que s'ha de mesurar.
- Llegeix el voltage valor a la pantalla.
5.4 Mesura del corrent (CA/CC)
Precaució: No connecteu mai el multímetre en paral·lel amb un voltímetre.tagfont d'alimentació quan es mesura el corrent. Connecteu-ho sempre en sèrie amb la càrrega.
- Introduïu el cable de prova negre al COM jack.
- For currents up to 400mA, insert the red test lead into the mA jack. For currents up to 10A, insert the red test lead into the 10A jack.
- Rotate the function switch to the desired AC Current (A~) or DC Current (A-) range.
- Obriu el circuit on es vol mesurar el corrent i connecteu el multímetre en sèrie.
- Llegiu el valor actual a la pantalla.
5.5 Mesura de la resistència
- Introduïu el cable de prova negre al COM presa i el cable de prova vermell al VΩ jack.
- Gireu l'interruptor de funció a Ω (resistance) range.
- Assegureu-vos que el circuit o component que s'està provant estigui desenergitzat.
- Connecteu les sondes de prova a través del component.
- Llegiu el valor de resistència a la pantalla.
5.6 Prova de díodes
- Introduïu el cable de prova negre al COM presa i el cable de prova vermell al VΩ jack.
- Rotate the function switch to the diode symbol.
- Connecteu la sonda vermella a l'ànode i la sonda negra al càtode del díode. La pantalla mostrarà el volum directe.tage gota.
- Reverse the probes. The display should show 'OL' (open loop) for a good diode.
5.7 Prova de continuïtat
- Introduïu el cable de prova negre al COM presa i el cable de prova vermell al VΩ jack.
- Rotate the function switch to the continuity symbol.
- Connecteu les sondes de prova a través del circuit o component.
- If continuity exists (resistance below a certain threshold), the multimeter will emit an audible beep.
5.8 Funció de retenció de dades
Premeu el botó MANTENIM button to freeze the current reading on the display. Press it again to release the hold function.
5.9 Selecció de rang
The multimeter typically operates in auto-ranging mode. To manually select a range, press the GAMMA button. Subsequent presses will cycle through available ranges. To return to auto-ranging, press and hold the GAMMA botó.
6. Manteniment
6.1 Neteja
Netegeu el cas amb l'anunciamp cloth and a mild detergent. Do not use abrasives or solvents. Ensure the multimeter is completely dry before use.
6.2 Substitució de la bateria
When the battery indicator appears on the display, replace the batteries as described in Section 4.1. Always use the specified battery type.
6.3 Canvi de fusibles
If the current measurement function stops working, the fuse may need replacement. Refer to the specifications for the correct fuse type and rating. Ensure the multimeter is powered off and test leads are disconnected before opening the fuse compartment.
7. Solució De Problemes
| Problema | Causa possible | Solució |
|---|---|---|
| Sense pantalla o pantalla tènue | Piles gastades o baixes | Canviar les piles (Secció 4.1) |
| Lectures incorrectes | Incorrect function/range selected; Poor test lead connection; Damaged test leads | Verify function/range; Check lead connections; Replace test leads if damaged |
| La mesura de corrent no funciona | Fusible cremat | Canvieu el fusible (Secció 6.3) |
| 'OL' (Overload) displayed | Input exceeds selected range; Open circuit (for resistance/continuity) | Select a higher range; Check circuit for breaks |
8. Especificacions
| Paràmetre | Valor |
|---|---|
| Marca | Cablematic |
| Número de model | PN26021410525115347 (YF-3700A) |
| Tipus de font d'alimentació | Funciona amb bateria |
| Pes de l'article | 1.81 lliures (aprox. 821 g) |
| Dimensions del paquet | 21 x 13.4 x 6.4 cm |
| Norma de seguretat | IEC 61326 |
| Número d'identificació comercial global | 08433696103472 |
9. Informació de la garantia
This Cablematic YF-3700A Digital Multimeter is covered by a standard manufacturer's warranty. Please refer to the warranty card included with your purchase or contact Cablematic customer support for detailed terms and conditions. The warranty typically covers defects in materials and workmanship under normal use.
10. Suport
For technical assistance, troubleshooting beyond this manual, or warranty claims, please contact Cablematic customer support. Contact details can typically be found on the product packaging or the official Cablematic weblloc.


