1. Introducció
The Venstar Platinum Slimline Thermostat (Model CECOMINOD058081) is designed to provide reliable and flexible temperature control for your HVAC system. This programmable thermostat offers a range of features to enhance comfort and energy efficiency in your home or office.
Key features include 1-day programming with up to 4 time periods, auto changeover, compatibility with 2-stage calor i 1-stage cool systems (gas/electric, heat pump, electric & hydronic heat), and a large, easy-to-read backlit display. It also includes service indicators for filter and UV light maintenance.

Figura 1: Davant view of the Venstar Platinum Slimline Thermostat, showing the display screen and control buttons.
2. Informació de seguretat
Llegiu atentament totes les instruccions abans d'instal·lar o fer funcionar aquest termòstat. Si no seguiu aquestes instruccions, podeu patir danys materials, lesions personals o la mort.
- Desconnexió d'alimentació: Always disconnect power to the heating and cooling system before installing or servicing the thermostat.
- Instal·lació professional: Installation should be performed by a qualified HVAC technician.
- Voltage Requisit: This thermostat requires a 24V "common" wire (C-wire) for operation. It is not suitable for 2-wire, heat-only applications.
- Riscos elèctrics: Do not touch uninsulated wires or terminals.
3. Configuració i instal·lació
3.1 Llista de comprovació prèvia a la instal·lació
- Ensure power to the HVAC system is OFF at the circuit breaker.
- Gather necessary tools: screwdriver, wire strippers, drill (if needed for mounting).
- Confirm your system has a 24V common wire (C-wire) available at the thermostat location.
3.2 Muntatge del termòstat
The Venstar Platinum Slimline Thermostat is designed for wall mounting.
- Carefully separate the thermostat faceplate from the backplate.
- Position the backplate on the wall where the old thermostat was located, ensuring wires can pass through the opening.
- Mark the mounting holes and drill pilot holes if necessary.
- Fixeu la placa posterior a la paret amb els cargols proporcionats.
3.3 Instruccions de cablejat
Proper wiring is crucial for the thermostat's functionality. This model requires a 24V common wire (C-wire). Refer to the wiring diagram on the backplate and the image below.
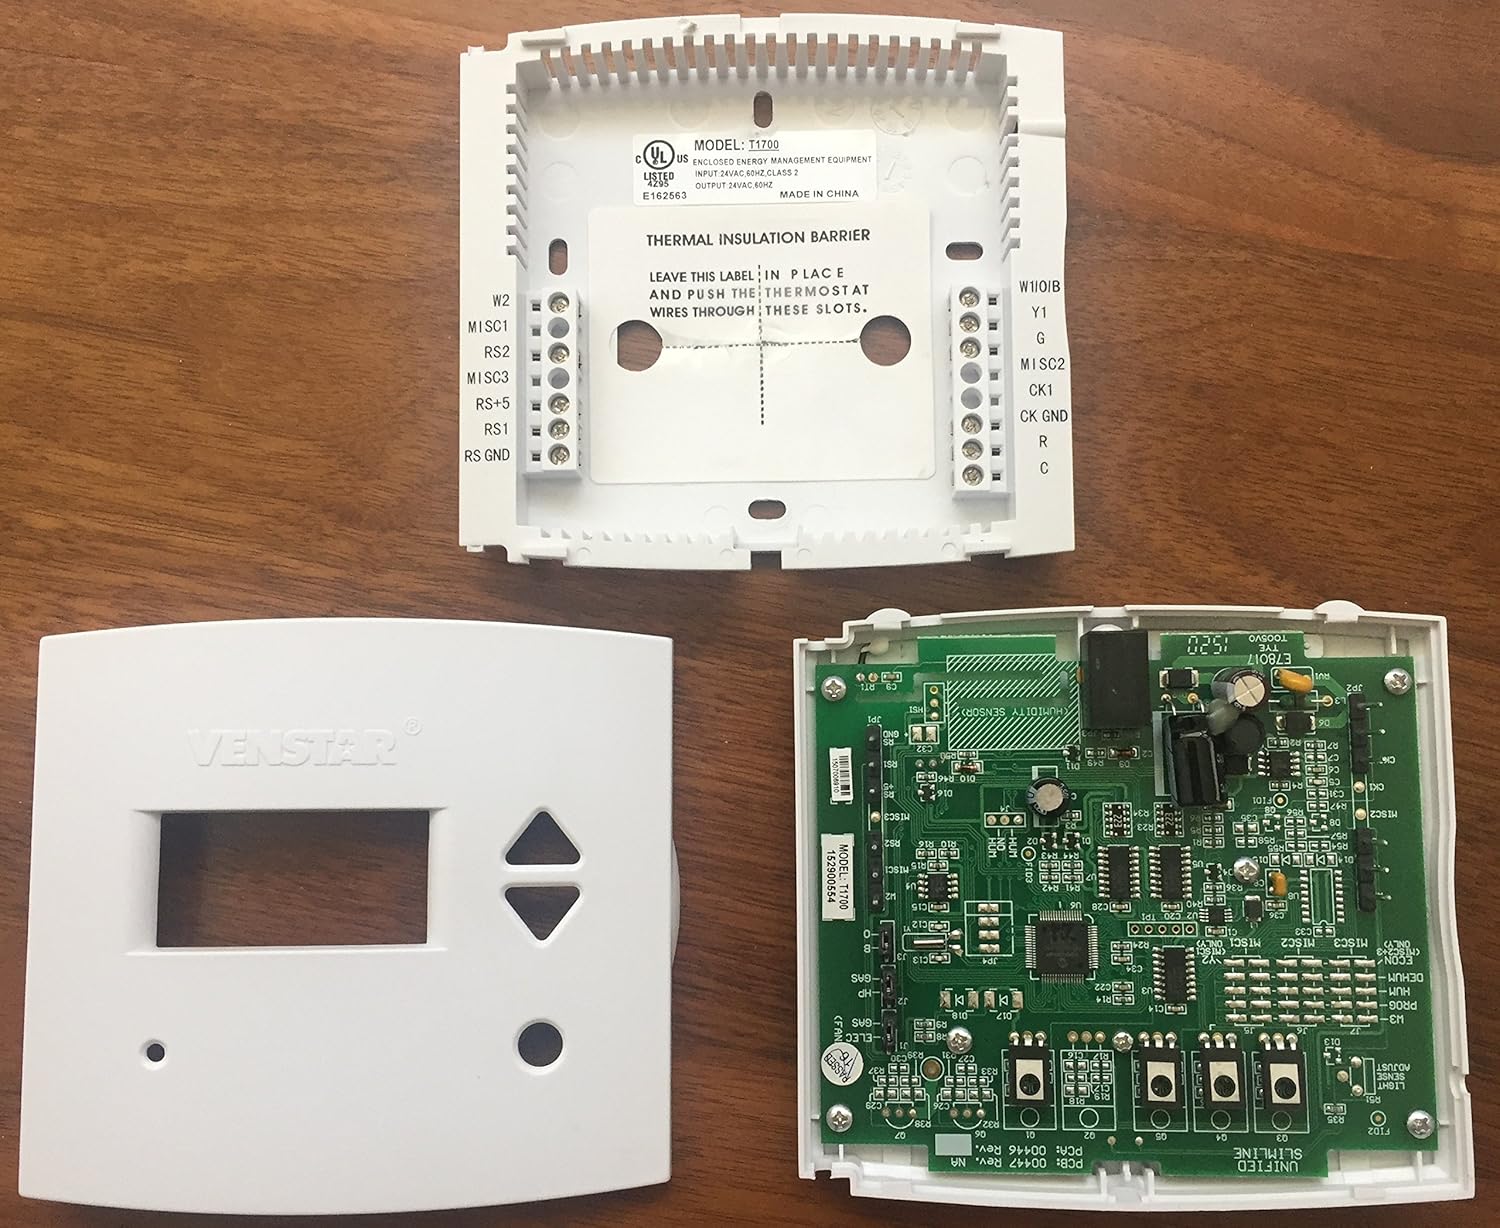
Figura 2: Interna view of the Venstar Platinum Slimline Thermostat, showing the backplate with wiring terminals and the circuit board.
- Match the wires from your HVAC system to the corresponding terminals on the thermostat backplate. Common terminals include R (24V power), C (24V common), G (fan), Y (cooling), W (heating).
- Assegureu-vos que totes les connexions siguin segures.
- Once wiring is complete, carefully attach the thermostat faceplate to the backplate.
3.4 Engegada inicial
After installation, restore power to your HVAC system at the circuit breaker. The thermostat display should illuminate. Follow any on-screen prompts for initial setup, such as setting the current time and day.
4. Instruccions de funcionament
4.1 Funcionament bàsic
- Configuració de la temperatura: Utilitza el UP i ABAIX botons de fletxa per ajustar la temperatura desitjada.
- Selecció del mode: Utilitza el MODE button (if present, or cycle through options) to select between Heat, Cool, Auto, or Off. The thermostat supports auto changeover.
- Control del ventilador: Utilitza el FAN button to select between Auto (fan runs only when heating/cooling) or On (fan runs continuously).
4.2 Calendari de programació
The thermostat features 1-day programming with up to 4 time periods. This allows you to set different temperatures for different times of the day (e.g., Wake, Day, Evening, Sleep).
- Access the programming menu (refer to the on-screen prompts or specific button combinations, typically a "Program" or "Set" button).
- Set the start time and desired temperature for each of the 4 periods.
- Save the program settings.
The thermostat can also be configured for non-programmable operation if a fixed temperature is preferred.
4.3 Mostra informació
The large backlit display shows the current room temperature, set temperature, operating mode, and fan status. LED indicators glow green for cooling and red for heating.
- Fahrenheit o Celsius: The display can be configured to show temperatures in Fahrenheit (°F) or Celsius (°C). Consult the advanced settings menu for this option.
4.4 Bloqueig del teclat
The thermostat features a keypad lock function to prevent unauthorized changes to settings. Refer to the advanced settings or specific button sequence in the full manual for activation and deactivation.
5. Manteniment
5.1 Neteja del termòstat
Per netejar el termòstat, netegeu suaument l'exterior amb un drap suau i sec.amp drap. No utilitzeu productes de neteja abrasius ni dissolvents. Assegureu-vos que no entri humitat als components interns.
5.2 Service Indicators
The thermostat includes indicators for service reminders:
- Service Filter: An indicator will appear when it's time to check or replace your HVAC system's air filter.
- Llum UV: If your system includes a UV light, an indicator will signal when it requires service or replacement.
Follow your HVAC system manufacturer's guidelines for filter and UV light maintenance. Reset the indicators after performing the service.
6. Solució De Problemes
| Problema | Causa possible | Solució |
|---|---|---|
| La pantalla del termòstat està en blanc. | No power to the thermostat; C-wire not connected or faulty. | Check circuit breaker for HVAC system. Ensure 24V C-wire is properly connected to the thermostat. Consult a qualified technician. |
| El sistema no respon a la configuració del termòstat. | Incorrect wiring; system mode incorrect; safety lockout. | Verify wiring connections. Ensure thermostat is in the correct mode (Heat/Cool/Auto). Wait a few minutes for system safety lockout to reset. |
| Temperature varies significantly from setpoint. | System cycling issues; thermostat placement; system deadband setting. | Ensure thermostat is not in direct sunlight or near heat sources/drafts. Some systems have a "deadband" (temperature differential) before activating. Consult advanced settings or a technician if variance is excessive. |
| Service Filter/UV Light indicator remains on after service. | L'indicador no s'ha reiniciat. | Refer to the thermostat's advanced settings or specific button sequence to reset the service indicator. |
For issues not listed here or if troubleshooting steps do not resolve the problem, please contact a qualified HVAC professional or Venstar customer support.
7. Especificacions
| Característica | Detall |
|---|---|
| Marca | Venstar |
| Número de model | CECOMINOD058081 (T1700) |
| Dimensions del producte | 6.25 x 4.63 x 2 polzades |
| Pes de l'article | 10.5 unces |
| Voltage | 24 Volts |
| Tipus de controlador | Pulsador |
| Característica especial | Programable |
| Tecnologia de connectivitat | Amb cable |
| Tipus de visualització | Retroil·luminat |
| Tipus de muntatge | Muntatge de paret |
| Font d'alimentació | Elèctric amb cable |
| Compatibilitat | 2-stagi calor, 1-stage cool (gas/electric, heat pump, electric & hydronic heat) |
8. Garantia i Suport
For information regarding the product warranty, please refer to the documentation included with your purchase or visit the official Venstar weblloc.
For technical support, troubleshooting assistance, or to inquire about replacement parts, please contact Venstar customer service directly.
Venstar Official Weblloc: www.venstar.com


