1. Producte acabatview
The Celestron LCD Digital Microscope II is a versatile biological microscope designed for educational, laboratory, and hobbyist use. It features a 3.5-inch full-color LCD screen that rotates 180 degrees, allowing for comfortable viewing and collaborative learning. Equipped with a 5MP digital camera, it can capture high-resolution still images and 30 fps video, saving directly to an included SD card. The microscope offers magnification from 40x to 1600x, utilizing 4x, 10x, and 40x objective lenses with a 10x digital eyepiece and an additional 4x digital zoom on the LCD. Its adjustable mechanical stage, dual LED illumination, and 6-position filter wheel provide precise control and enhanced specimen viewing. It can be powered by an AC adapter or 4 AA batteries for portability.

Figure 1: Celestron LCD Digital Microscope II.
2. Característiques clau
- 3.5" LCD Screen with 180° Rotation: Allows for comfortable, eyepiece-free viewing and easy sharing of observations.
- 5MP Digital Camera with Video Recording: Captures high-resolution still images and smooth 30 fps video directly to an SD card.
- Magnification up to 1600x: Features 4x, 10x, and 40x objective lenses, a 10x digital eyepiece, and 4x digital zoom on the LCD.
- Adjustable Mechanical Stage with Dual Illumination: Provides precise slide positioning and bright, adjustable top and bottom LED lighting for optimal viewing of various specimens.
- 2 GB SD Card and TV Output: Enables saving images/videos and displaying them on a TV or monitor via AV output.
- Opcions d'alimentació dual: Operates on 4 AA batteries (not included) for field use or via the included international AC adapter.
- Accessoris inclosos: Comes with 5 prepared slides, a dust cover, and a rugged canvas carrying case.
3. Guia de configuració
3.1 Desembalatge i contingut
Carefully remove all components from the packaging. The microscope comes securely packed in a canvas carrying case with a strap, protected by foam cushioning. Verify that all listed accessories are present.

Figure 2: Included accessories: microscope, carrying case, power adapter, USB cable, AV cable, dust cover, prepared slides, and SD card.
3.2 Powering the Microscope
The microscope can be powered using the included AC adapter or 4 AA batteries (not included). For continuous use, connect the AC adapter to the power input port on the microscope and plug it into a wall outlet. If using batteries, ensure they are correctly inserted into the battery compartment.
3.3 Encès inicial
Once powered, press the power button located on the back of the LCD screen to turn on the display. The screen will illuminate, and you should see the Celestron logo followed by the live view. Ensure the bottom light switch is also turned on for proper illumination of specimens.
Video 1: Official Celestron overview of the LCD Digital Microscope II, demonstrating setup and key features.
4. Instruccions de funcionament
4.1 Placing a Specimen Slide
Place a prepared slide onto the mechanical stage. Utilitzeu la stage adjustment knobs (located on the side) to center the specimen directly under the objective lens and above the bottom LED light. The mechanical stage allows for precise movement in X and Y directions.

Figure 3: Specimen slide placed on the mechanical stage.
4.2 Ajust de l'ampliació
Rotate the objective turret to select the desired magnification (4x, 10x, or 40x). For higher magnification, use the digital zoom buttons on the LCD screen. Adjust the coarse and fine focus knobs (located on the main body) to bring the specimen into sharp focus on the LCD screen.

Figure 4: Objective lenses and focus controls.
4.3 Capturing Images and Video
Insert the included 2GB SD card into the SD card slot on the side of the LCD unit. To capture a still image, press the dedicated capture button. To record video, press the video record button. The captured media will be saved directly to the SD card.

Figure 5: SD card slot and connectivity ports.
4.4 Connecting to External Displays
The microscope features AV and USB 2.0 output ports. Use the provided AV cable to connect the microscope to a television or monitor for large-scale viewing. Use the USB cable to connect to a computer for image transfer or live viewing (software may be required, refer to the full user manual PDF for details).
5. Cura i Manteniment
Proper care ensures the longevity and performance of your Celestron microscope. Always handle the instrument with care, as it is a precision optical device.
- After use, remove any specimens from the stage.
- Turn off the illuminator switch and the LCD monitor. Unplug the power cord if using AC power.
- Always place the plastic bag or dust cover over the microscope when not in use or when being stored.
- Guardeu el microscopi en un lloc sec i net.
- Avoid direct sunlight exposure to prevent damage.
- When moving, carry the microscope by the "arm" with one hand and support the base with the other.
- Clean outside surfaces (metal and plastics) with a moist cloth. Always unplug any cords before cleaning.
- Never clean optical surfaces with cloth or paper towels as they can scratch easily. Use a camel's hair brush or an air blower for dust.
- For fingerprints on optical surfaces, use a lens cleaning agent and tissue available at most photo outlets. Do not rub in circles; use gentle strokes.
- Never disassemble or clean internal optical surfaces. This should only be done by qualified technicians.
- Handle glass specimen slides with care as edges can be sharp.

Figure 6: Detailed care and maintenance guidelines.
6. Solució De Problemes
- No image on LCD screen:
- Ensure the microscope is properly powered (AC adapter or fresh AA batteries).
- Check that the LCD screen's power button (on the back) is pressed.
- Verify that the bottom illuminator switch is turned on.
- Adjust focus knobs to bring the image into view.
- Ensure a specimen slide is correctly positioned on the stage.
- Image is blurry or out of focus:
- Use the coarse and fine focus knobs to adjust clarity.
- Ensure the objective lens is correctly rotated into position.
- Check if the specimen slide is clean and free of smudges.
- "Low Battery" message appears:
- Replace the 4 AA batteries with new ones, or connect the AC adapter.
- Cannot capture images/video:
- Ensure an SD card is inserted into the slot.
- Check if the SD card has sufficient free space.
- Verify the SD card is not locked (read-only).
- No image on external TV/monitor:
- Ensure the AV cable is securely connected to both the microscope and the TV/monitor.
- Select the correct input source (e.g., AV1, Video) on your TV/monitor.
7. Especificacions tècniques
| Característica | Detall |
|---|---|
| Sensor d'imatge | 5MP CMOS, 10x magnification in lieu of eyepiece |
| Adaptador de CA | Input universal 100 to 240 volt, 50/60 Hz, 4 plug multi-country |
| Connexió USB | 2.0, 1.5 m cable included |
| Magnification (low power) | 40x |
| Magnification (high power) | 400x (1600 with digital zoom) |
| Continuous Video (VGA) | Yes, 30 fps |
| Accessoris inclosos | 1 GB SD memory card, Canvas Carrying Case, Dust Cover, 5 Prepared Slides, 4-Plug AC Adapter |
| Nasal objectiu | 3 position with click stop |
| Diàmetre de la lent objectiu | 3 achromatic - 4x, 10x, 40x |
| Condenser Lens | +HEADER+ 0.65 |
| Il·luminació | Upper and lower, built-in adjustable LEDs |
| Stage | Fully mechanical with metal clips, 88mm x 88mm (3.5" x 3.5") |
| Dimensions | 170 mm x 140 mm x 330 mm (6.7 "x 5.5" x 13") |
| Pes | 56 oz (1600 g) / 6.5 pounds |
| Pantalla LCD | High definition, 320 x 240 pixels resolution, 90mm (3.5") with 4x digital zoom, 262K colors |
| Roda de filtre | 6 position - red, blue, green, 1mm, 3mm, 6mm aperture |
| Course Focuser | Yes - smooth, single motion |
| Bateries | 4 AA (User supplied - up to 3 hours of use) |
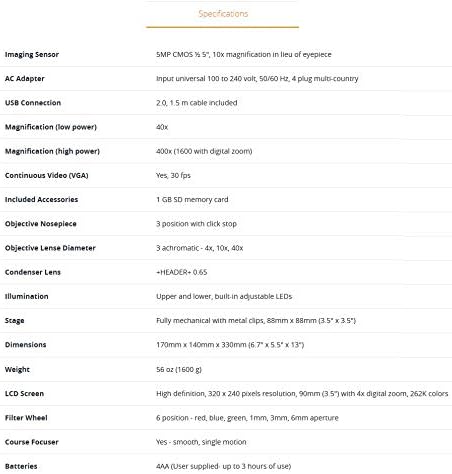
Figura 7: Especificacions tècniques detallades.
8. Garantia i Suport
Celestron provides a 2-Year US Warranty for this product, ensuring peace of mind with your purchase. Additionally, unlimited support is available from their team of US-based experts. For detailed warranty information, please refer to the official Warranty PDF document provided with your product or available on the Celestron weblloc.
For further assistance or to download the complete user manual, please visit the official Celestron support page or refer to the documents section on the product's Amazon listing.


