1. Introducció
The Technical Pro AX1200 is a powerful 1200 Watt 2-channel amplifier designed for professional audio applications, including DJ setups and rack installations. This manual provides essential information for the safe and efficient operation of your amplificador, que cobreix la configuració, el funcionament, el manteniment i la resolució de problemes.
Key features include 1200 Watts Peak Power, RCA inputs, and Banana binding post outputs, along with an iridescent blue LED meter for visual monitoring.
2. Instruccions de seguretat
Please read and understand all safety instructions before operating the ampConserveu aquest manual per a futures consultes.
- Font d'alimentació: Connecteu la unitat només a una presa de corrent de CA del volum especificat.tage (110V-60Hz). Ensure the power cord is not pinched or walked on.
- Ventilació: Do not block any ventilation openings. Ensure adequate airflow around the unit to prevent overheating. Avoid placing the ampLifer en espais tancats.
- Aigua i humitat: No exposeu la unitat a la pluja ni a la humitat. No col·loqueu objectes plens de líquids, com ara gerros, a sobre de la unitat.
- Calor: Mantingueu la unitat allunyada de fonts de calor com ara radiadors, registres de calor, estufes o altres aparells (inclosos amplificadors) que produeixen calor.
- Neteja: Desendolleu la unitat de la presa de corrent abans de netejar-la. Feu servir un drap sec per netejar-la.
- Manteniment: Do not attempt to service this product yourself. Refer all servicing to qualified service personnel. Opening the amplificador casing us pot exposar a volums perillosostage o altres perills.
- Col·locació: Col·loca el amplifier on a stable, level surface. This unit is designed for 2U rack mounting.
3. Contingut del paquet
En obrir el paquet, comproveu que tots els elements que s'enumeren a continuació hi són presents i que es troben en bon estat:
- Technical Pro AX1200 2-Channel Ampmés viu
- Cable d'alimentació de CA.
- User Instruction Manual (this document)

Figure 3.1: Technical Pro AX1200 Amplifier and Power Cable.

Figure 3.2: Included AC Power Cable.
4. Producte acabatview
4.1 Tauler frontal
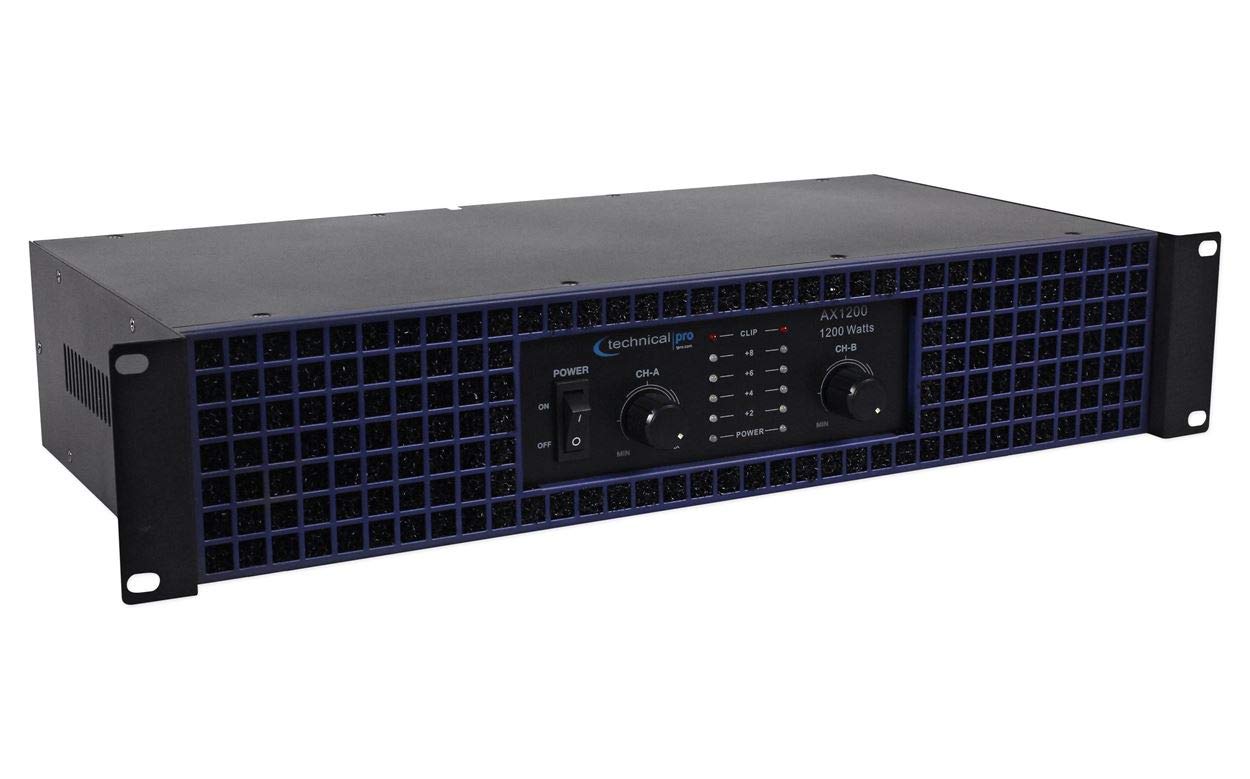
Figura 4.1: Controls i indicadors del panell frontal.
- Interruptor d'alimentació: Activa o desactiva amplifier's power ON or OFF.
- CH-A / CH-B Level Controls: Rotary knobs to adjust the output level for Channel A and Channel B independently.
- CLIP Indicators: LEDs that illuminate when the input signal is too high, indicating potential audio clipping and distortion. Reduce the input level if these light up consistently.
- Indicadors POWER: LEDs that illuminate when the respective channel is powered on.
- Iridescent Blue LED Meter: Visual display indicating the output level of each channel.
4.2 Panell posterior

Figura 4.2: Connexions del panell posterior.
- AUDIO INPUTS (RCA): Connecteu la font d'àudio (per exemple, el mesclador, el pre-amplifier) to these RCA jacks for Channel A and Channel B.
- CH A / CH B OUTPUTS (Banana Binding Post): Connect your speakers to these binding posts. Ensure correct polarity (+ to + and - to -) for optimal sound.
- Entrada d'alimentació CA: Connecteu aquí el cable d'alimentació de CA subministrat.
5. Configuració
Follow these steps to set up your Technical Pro AX1200 ampmés viu:
- Col·locació:
- Col·loca el amplifier in a well-ventilated area. Avoid direct sunlight or heat sources.
- The AX1200 is designed for 2U rack mounting. Ensure proper rack ventilation if installed in an equipment rack.
- Connexió d'entrada d'àudio:
- Using RCA cables, connect your audio source (e.g., DJ mixer, audio interface) to the AUDIO INPUTS (RCA) on the rear panel. Match Channel A to your left audio signal and Channel B to your right audio signal.
- Connexió de sortida de l'altaveu:
- Connecteu els vostres altaveus passius al CH A / CH B OUTPUTS (Banana Binding Post) al panell posterior.
- Ensure correct polarity: connect the positive (+) terminal of the amplifier to the positive (+) terminal of the speaker, and the negative (-) terminal of the amplifier to the negative (-) terminal of the speaker. Incorrect polarity can result in poor sound quality.
- Verify that your speakers' impedance is compatible with the amplifier's output capabilities (e.g., 2 ohms, 4 ohms, 8 ohms).
- Connexió d'alimentació:
- Assegureu-vos el amplifier's POWER switch is in the OFF position.
- Connect the supplied AC power cable to the Entrada d’alimentació de CA. on the rear panel of the ampmés viu.
- Plug the other end of the power cable into a standard 110V-60Hz AC wall outlet.
6. Instruccions de funcionament
Un cop el amplifier is properly set up, follow these steps for operation:
- Encès:
- Before powering on, ensure the CH-A / CH-B Level Controls on the front panel are set to their minimum (MIN) position.
- Gira el Interruptor d'alimentació to the ON position. The POWER indicators and iridescent blue LED meters should illuminate.
- Nivells d'ajust:
- Start playing audio from your source at a moderate level.
- Augmenta lentament el CH-A / CH-B Level Controls a la amplificador fins a assolir el volum desitjat.
- Monitoritzar el CLIP Indicators. If they light up frequently or stay lit, reduce the input level from your source or the amplifier's level controls to prevent distortion and potential speaker damage.
- Apagar:
- Before powering off, it is recommended to reduce the CH-A / CH-B Level Controls to their minimum position.
- Gira el Interruptor d'alimentació a la posició OFF.
7. Manteniment
Un manteniment adequat garanteix la longevitat i el rendiment òptim del vostre ampmés viu.
- Neteja:
- Desconnecteu sempre el fitxer amplifier from the power outlet before cleaning.
- Use a soft, dry cloth to wipe down the exterior surfaces. Do not use liquid cleaners, aerosols, or abrasive chemicals.
- Ventilació:
- Regularly check that the ventilation openings are clear of dust and debris. Blocked vents can lead to overheating.
- Ensure there is sufficient space around the amplifier for proper airflow, especially if rack-mounted.
- Connexions de cable: Periodically check all cable connections (power, input, output) to ensure they are secure and free from damage.
8. Solució De Problemes
If you encounter issues with your Technical Pro AX1200 amplifier, consulteu els següents problemes i solucions habituals:
| Problema | Causa possible | Solució |
|---|---|---|
| No hi ha alimentació / La unitat no s'encén. |
|
|
| Sense sortida de so. |
|
|
| Distorted sound / CLIP indicator lights up. |
|
|
| Amplifier gets hot. |
|
|
9. Especificacions
Technical specifications for the Technical Pro AX1200 2-Channel Ampmés viu:
| Característica | Detall |
|---|---|
| Número de model | AX1200 |
| Potència màxima | 1200 watts |
| Power @ 2 ohms | 465 watts |
| Power @ 4 ohms | 375 watts |
| Power @ 8 ohms | 210 watts |
| Resposta de freqüència | 20Hz - 20KHz |
| Relació senyal/soroll | 79 dB |
| Impedància d'entrada | 10 k ohm unbalanced |
| Entrades | RCA |
| Sortides | Banana binding post |
| Dimensions (L x A x A) | 19" x 3.5" x 8" |
| Mida del bastidor | 2U |
| Fabricant | Tècnic Pro |
10. Garantia i Suport
For warranty information and customer support, please refer to the warranty card included with your purchase or visit the official Technical Pro weblloc web. Conserveu el comprovant de compra per a qualsevol reclamació de garantia.
Technical Pro is committed to providing quality products and support. If you require further assistance, please contact their customer service department.


