1. Introducció
This manual provides essential instructions for the safe and efficient operation of your SINGER Start 1306 Sewing Machine. Please read it thoroughly before using the machine to ensure proper setup, usage, and maintenance. The SINGER Start 1306 is designed for home sewing projects, featuring 6 built-in stitches, easy threading, and a 4-step buttonhole function.

Imatge 1.1: Frontal view of the SINGER Start 1306 Sewing Machine.
2. Informació de seguretat
Seguiu sempre les precaucions de seguretat bàsiques quan utilitzeu aparells elèctrics per reduir el risc d'incendi, descàrrega elèctrica o lesions.
- Llegiu totes les instruccions abans d'utilitzar la màquina.
- Keep the machine away from water or wet surfaces.
- Unplug the machine from the electrical outlet when not in use, when servicing, or when changing accessories.
- Never operate the machine if it has a damaged cord or plug, if it is not working properly, or if it has been dropped or damaged.
- Mantingueu els dits allunyats de totes les parts en moviment. Es requereix una cura especial al voltant de l’agulla de la màquina de cosir.
- Utilitzeu només accessoris recomanats pel fabricant.
- No deixeu caure ni introduïu cap objecte a cap obertura.
3. Configuració
3.1 Desembalatge i contingut
Carefully remove the machine from its packaging. Retain all packaging materials for future transport or storage. Verify that all included components are present:
- All-Purpose Foot
- Peu de cremallera
- Peu d'ojal
- Placa de buir
- Pack of Needles
- Bobines
- Spool Pin Felts
- Needle Plate Screwdriver
- Seam Ripper / Lint Brush
- Vinyl Dust Cover
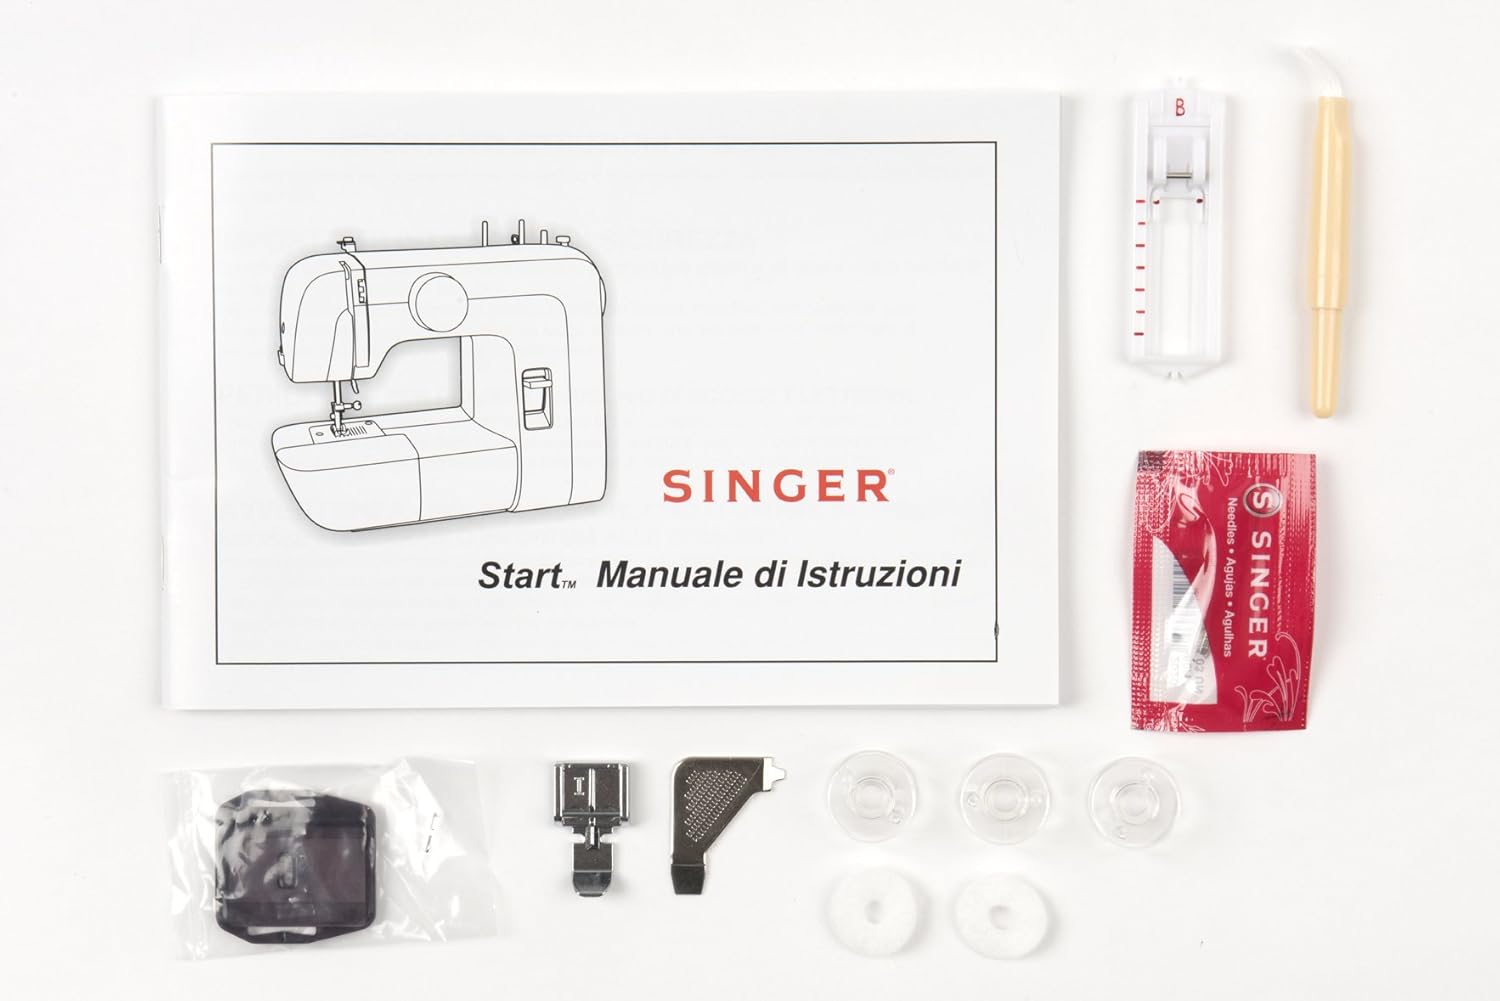
Image 3.1: Included accessories and instruction manual.
3.2 Connexió d'alimentació
Connect the power cord to the machine's power input socket and then plug it into a suitable electrical outlet (220V). Ensure the machine is switched off before connecting to power.

Imatge 3.2: posterior view showing power input and foot pedal connection.
3.3 Enfilar la màquina
Correct threading is crucial for proper stitch formation.
3.3.1 Enrotllament de la bobina
- Col·loqueu una bobina de fil al portacarret.
- Guieu el fil a través del guiafils superior.
- Wrap the thread clockwise around the bobbin winding tension disc.
- Insert the thread through the small hole in the bobbin from the inside out.
- Place the bobbin onto the bobbin winder spindle and push the spindle to the right.
- Hold the thread end and press the foot pedal. Wind a few turns, then trim the excess thread.
- Continue winding until the bobbin is full. The winder will stop automatically.
- Push the bobbin winder spindle to the left and remove the bobbin.
3.3.2 Inserting the Bobbin
- Obriu la placa de la coberta de la bobina.
- Insert the wound bobbin into the bobbin case with the thread unwinding counter-clockwise.
- Guide the thread into the tension spring slot and pull it firmly until it snaps into place.
- Tanqueu la placa de la coberta de la bobina.
3.3.3 Enfilat superior
- Puja l'agulla a la posició més alta amb el volant.
- Aixequeu el aixecador del peu premsador.
- Col·loqueu una bobina de fil al portacarret.
- Guieu el fil a través del guiafils superior.
- Bring the thread down through the right channel, then up through the left channel, ensuring it passes through the take-up lever.
- Enfileu l'agulla de davant a darrere.

Image 3.3: Illustration of the upper threading path.
3.4 Instal·lació de l'agulla
To install or replace a needle:
- Gireu el volant per aixecar l'agulla a la seva posició més alta.
- Afluixeu l'agulla clamp cargol.
- Traieu l'agulla vella.
- Insert the new needle with the flat side facing the back of the machine. Push it up as far as it will go.
- Apretar l'agulla clamp cargol de manera segura.

Image 3.4: Close-up of the needle and presser foot area.
4. Instruccions de funcionament
4.1 Selecció de puntades
The SINGER Start 1306 offers 6 built-in stitch patterns. Turn the stitch selector dial to choose your desired stitch. The available stitches include 4 basic, 1 decorative, and 1 buttonhole stitch.

Image 4.1: Stitch selector dial with various stitch patterns.
4.2 Conceptes bàsics de costura
4.2.1 Starting a Seam
- Place the fabric under the presser foot, aligning the edge with a seam guide on the needle plate.
- Baixeu el peu de premsa.
- Gireu el volant per baixar l'agulla a la tela al punt inicial.
- Press the foot pedal gently to begin sewing.
4.2.2 Acabar una costura
- Sew to the end of your seam.
- Press the reverse stitch lever to sew a few stitches backward to secure the seam.
- Aixequeu l'agulla a la seva posició més alta.
- Aixequeu el peu de premsa.
- Pull the fabric away from the machine, then cut the threads using the thread cutter on the machine.
4.3 4-Step Buttonhole Function
The machine features a 4-step buttonhole function for creating buttonholes. Refer to the markings on the stitch selector dial for each step (1, 2, 3, 4). Use the buttonhole foot for best results.
4.4 Zipper Insertion
Attach the zipper foot to the machine. This foot allows you to sew close to the zipper teeth, ensuring a neat finish. Follow standard zipper insertion techniques, adjusting the needle position as needed.
4.5 Free Arm Usage
The removable free arm provides access to difficult-to-reach areas such as collars, sleeves, cuffs, and pant hems. To use, slide off the accessory storage compartment to expose the free arm.
5. Manteniment
5.1 Neteja
Regular cleaning helps maintain machine performance. Always unplug the machine before cleaning.
- Eliminació de pelusses: Use the provided lint brush to remove lint and dust from the bobbin area and feed dogs.
- Neteja exterior: Netegeu les superfícies exteriors amb un drap suau i sec. No utilitzeu productes químics agressius ni netejadors abrasius.
5.2 Substitució de l'agulla
Replace needles regularly, especially when sewing different fabric types or if the needle becomes bent or dull. A damaged needle can cause skipped stitches or fabric damage. Refer to section 3.4 for needle installation instructions.
6. Solució De Problemes
Aquesta secció tracta els problemes habituals que podeu trobar. Per a problemes que no figuren aquí, poseu-vos en contacte amb l'atenció al client.
| Problema | Causa possible | Solució |
|---|---|---|
| Punts saltats | Agulla incorrecta, agulla doblegada, enfilat incorrecte. | Replace needle, re-thread machine, ensure correct needle type for fabric. |
| Trenca fil | Incorrect threading, tension too tight, damaged needle, poor quality thread. | Re-thread, adjust tension, replace needle, use good quality thread. |
| Bobbin Thread Jamming | Improperly wound bobbin, incorrect bobbin insertion, lint in bobbin case. | Re-wind bobbin, re-insert bobbin correctly, clean bobbin area. |
| La màquina no arrenca | Power cord not connected, machine switched off, foot pedal not connected. | Check power connections, ensure switch is ON, connect foot pedal. |
7. Especificacions
| Característica | Detall |
|---|---|
| Marca | CANTANT |
| Número de model | Inici 1306 |
| Pes de l'article | 4.3 kg |
| Dimensions del producte (LxWxH) | 35 x 18 x 29 cm |
| Voltage | 220 V |
| Wattage | 70 watts |
| Puntades incorporades | 6 (4 basic, 1 decorative, 1 buttonhole) |
| Tipus de trau | 4-step automatic |
| Material del marc | Heavy Duty Metal |
| Components inclosos | All Purpose Foot, Zipper Foot, Buttonhole Foot, Darning Plate, Pack of Needles, Bobbins, Spool Pin Felts, Needle Plate Screwdriver, Seam Ripper / Lint Brush, Vinyl Dust Cover |

Image 7.1: Product dimensions of the SINGER Start 1306 Sewing Machine.
8. Garantia i Suport
Your SINGER Start 1306 Sewing Machine comes with a manufacturer's warranty. Please refer to the warranty card included with your product for specific terms, conditions, and duration. For technical assistance, service, or to inquire about replacement parts, please contact SINGER customer support through their official weblloc web o la informació de contacte que es proporciona a la documentació de la garantia.


