1. Introducció
This manual provides essential instructions for the safe and efficient operation of your Panasonic SD-YR2500 Bread Maker. Please read all instructions carefully before using the appliance to ensure proper function and to prevent damage or injury. Keep this manual for future reference.
2. Instruccions de seguretat
Seguiu sempre les precaucions de seguretat bàsiques quan utilitzeu aparells elèctrics per reduir el risc d'incendi, descàrrega elèctrica i/o lesions a les persones.
- No submergiu l'aparell, el cable o l'endoll en aigua o altres líquids.
- Assegureu-vos que el voltage indicat a l'electrodomèstic correspon a la vostra xarxa local voltage abans de connectar.
- No feu servir cap aparell amb un cable o un endoll danyats, o després que l'aparell funcioni malament o s'hagi fet malbé de cap manera.
- És necessària una supervisió estreta quan qualsevol aparell és utilitzat per o a prop dels nens.
- Eviteu el contacte amb les peces mòbils.
- No col·loqueu-lo sobre o prop d'un cremador de gas o elèctric calent, ni en un forn calent.
- Connecteu sempre primer l'endoll a l'aparell i després el cable a la presa de corrent. Per desconnectar-lo, gireu qualsevol control a la posició "off" i, a continuació, retireu l'endoll de la presa de corrent.
- No utilitzeu l'aparell per a un altre ús que el previst.
- The bread pan and interior of the bread maker become very hot during and after operation. Use oven mitts when handling hot parts.
3. Components i característiques
The Panasonic SD-YR2500 Bread Maker is designed for ease of use and versatility, featuring automatic dispensers and multiple baking modes.
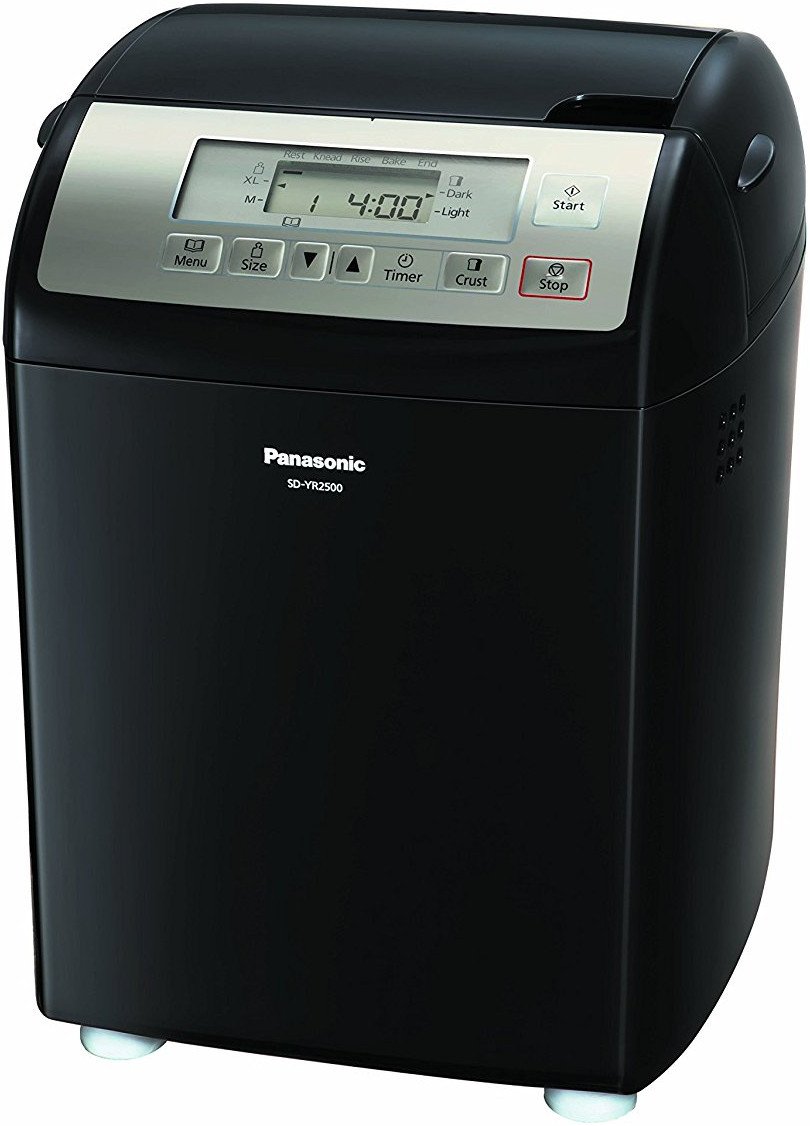
Figura 1: Davant view of the Panasonic SD-YR2500 Bread Maker, showcasinel seu elegant disseny negre i el panell de control.
Característiques principals:
- Automatic Dispensers: Smart dispensers for yeast, raisins, and nuts automatically release ingredients at the optimal time during the baking process.
- Gluten-Free Mode: A dedicated program for baking gluten-free bread.
- Multiple Menu Options: Eight distinct menu programs for various bread types.
- Temporitzador digital de 13 hores: Allows for delayed baking, so fresh bread is ready when you need it.
- Loaf Size and Crust Settings: Choose between medium or extra-large loaf sizes and light or dark crusts.
- Tauler de control intuïtiu: Large LCD display and touch-pad controls for easy program selection.

Figura 2: Close-up of the control panel with LCD display, menu, size, timer, and crust buttons, along with start/stop controls.

Figura 3: A dalt view of the bread maker, showing the lid and the automatic dispensers for yeast and other ingredients.
4. Configuració
- Desembalatge: Carefully remove the bread maker and all accessories from the packaging. Retain packaging for future transport or storage.
- Neteja inicial: Before first use, wash the bread pan, kneading blade, and any removable dispensers with warm, soapy water. Rinse thoroughly and dry completely. Wipe the exterior of the main unit with a damp tela.
- Col·locació: Col·loqueu la màquina de fer pa sobre una superfície estable, plana i resistent a la calor, allunyada de la llum solar directa i de fonts de calor. Assegureu-vos que hi hagi una ventilació adequada al voltant de l'aparell.
- Instal·leu la fulla per pastar: Insert the kneading blade onto the shaft inside the bread pan.
- Inseriu la safata de pa: Place the bread pan into the main unit, ensuring it clicks securely into place.
5. Instruccions de funcionament
5.1 Basic Bread Making
- Afegir ingredients: Add liquid ingredients first, followed by dry ingredients (flour, sugar, salt, etc.) into the bread pan. Create a small indentation in the flour for the yeast.
- Fill Dispensers: Place yeast in the yeast dispenser. If using, add raisins or nuts to the raisin/nut dispenser.
- Seleccioneu el menú: Premeu el botó Menú button to cycle through the available programs until your desired program is displayed on the LCD.
- Selecciona la mida del pa: Premeu el botó Mida button to choose between medium (M) or extra-large (XL) loaf sizes.
- Selecciona el color de la crosta: Premeu el botó Escorça button to select light or dark crust.
- Començar a coure: Premeu el botó Comença button. The bread maker will begin the baking cycle.
- Treure el pa: Once the cycle is complete, the bread maker will beep. Unplug the unit. Using oven mitts, carefully remove the bread pan. Invert the pan to release the bread onto a wire rack to cool.

Figura 4: Example of freshly baked bread, highlighting the gluten-free mode capability.
5.2 Gluten-Free Mode
The SD-YR2500 features a dedicated Gluten-Free mode. When using this mode, ensure all ingredients are certified gluten-free. Follow specific gluten-free recipes as gluten-free flours behave differently than wheat flours. Select the Gluten-Free program using the Menú botó.
5.3 Ús del temporitzador de retard
The 13-hour delay timer allows you to set the bread maker to finish baking at a later time.
- Add all ingredients to the bread pan and dispensers as usual.
- Select your desired menu, loaf size, and crust color.
- Premeu el botó Temporitzador button repeatedly to set the desired delay time. The display shows the total time until baking is complete.
- Premeu Comença. The timer will count down, and baking will begin automatically.
6. Manteniment i Neteja
Proper cleaning ensures the longevity and hygiene of your bread maker.
- Desconnecteu sempre l'aparell i deixeu-lo refredar completament abans de netejar-lo.
- Safata de pa i fulla per pastar: These parts are Rentat només a mà. Wash with warm, soapy water using a soft sponge. Do not use abrasive cleaners or metal scouring pads. Ensure the kneading blade is removed and cleaned thoroughly.
- Dispensadors: Remove and clean the yeast and raisin/nut dispensers with warm, soapy water. Rinse and dry completely before reattaching.
- Exterior: Netegeu l'exterior de la màquina de fer pa amb un drap suau i sec.amp tela. No utilitzeu productes químics o materials abrasius.
- Interior: Netegeu l'interior de la cambra de cocció amb anuncisamp drap per eliminar qualsevol molla o residu.

Figura 5: The non-stick inner pan with a stay-cool handle, designed for safe and easy bread removal.
7. Solució De Problemes
Si teniu problemes amb la vostra màquina de fer pa, consulteu els següents problemes i solucions habituals:
| Problema | Causa possible | Solució |
|---|---|---|
| El pa no puja | Llevat caducat, temperatura incorrecta de l'aigua, massa sal/sucre. | Check yeast expiration, use lukewarm water (38-43°C), ensure correct ingredient measurements. |
| El pa és massa dens | Too much flour, too little liquid, old yeast. | Measure ingredients precisely, ensure proper liquid-to-flour ratio, use fresh yeast. |
| Palets de pa a la paella | Pan not properly greased (if recipe requires), pan coating damaged. | Ensure pan is clean and undamaged. Allow bread to cool slightly before removing. |
| Dispensers not working | Ingredients stuck, dispenser mechanism blocked. | Ensure dispensers are clean and dry. Do not overfill. |
8. Especificacions
- Número de model: SD-YR2500
- Marca: Panasonic
- Color: Negre
- Material: Plàstic
- Nombre de programes: 8
- Voltage: 120 Volts
- Pes de l'article: Approximately 8 kg 160 g (18 Pounds)
- Dimensions de l'article (LxWxH): 26.7 x 33.7 x 36.8 centímetres
- Instruccions de cura del producte: Hand Wash Only (for removable parts)
- UPC: 885170251922, 759284085370, 063339952235
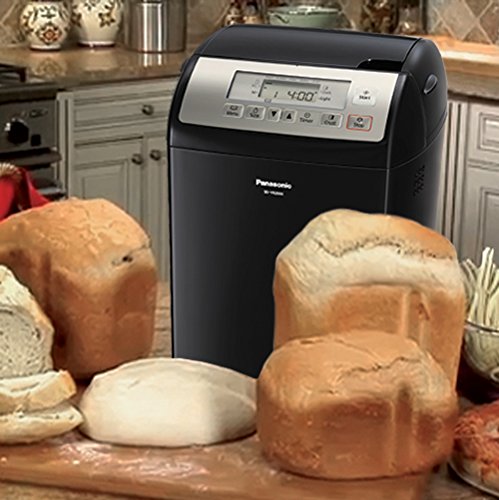
Figura 6: The Panasonic SD-YR2500 Bread Maker displayed with a selection of freshly baked loaves, demonstrating its versatility.
9. Garantia i Suport
The Panasonic SD-YR2500 Bread Maker typically comes with a limited 1-year warranty from the date of purchase. For detailed warranty terms, conditions, and service information, please refer to the warranty card included with your product or visit the official Panasonic support weblloc. No intenteu reparar l'aparell vosaltres mateixos; poseu-vos en contacte amb el personal de servei autoritzat per obtenir ajuda.


