1. Introducció
This manual provides detailed instructions for the installation, programming, and operation of your Kanlux 18721 JVT3 16 AS Digital Programmable Time Switch. Please read this manual thoroughly before installation and use to ensure proper function and safety. Keep this manual for future reference.
2. Producte acabatview
The Kanlux JVT3 16 AS is a digital programmable time switch designed for controlling electrical circuits based on a set schedule. It features a digital display, control buttons, and terminal connections for power and load. This device also includes an astronomical function for advanced scheduling.

Figura 2.1: Davant view of the Kanlux JVT3 16 AS Digital Programmable Time Switch. This image shows the device with its protective cover open, revealing the digital display, the 'ON' indicator, and control buttons labeled 'P', 'D+', 'H+', 'M+', 'RESET', and 'MANUAL'. Below the buttons are the terminal connections.

Figura 2.2: Davant view of the Kanlux JVT3 16 AS. This image displays the device with its protective cover closed, clearly showing the "Kanlux JVT3-16AS" branding and the CE mark.
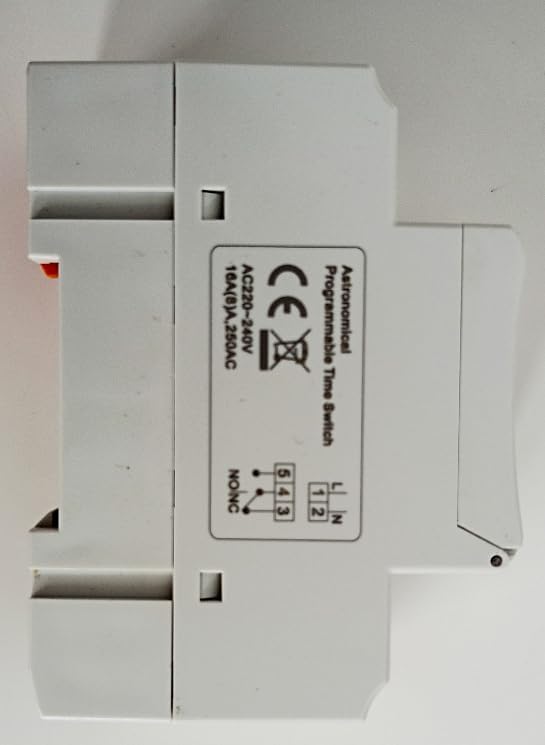
Figura 2.3: lateral view of the Kanlux JVT3 16 AS. This image shows the side of the timer with a label indicating "Astronomical Programmable Time Switch" and a wiring diagram for AC 220-240V, 16A (8)A, 250VAC connections (L, N, 1, 2, 3, 4, 5).
3. Informació de seguretat
- La instal·lació i el manteniment només els ha de dur a terme un electricista qualificat.
- Ensure the power supply is disconnected before any installation or wiring work.
- Do not exceed the maximum load ratings specified for the device.
- This device is designed for indoor use in dry environments. Avoid exposure to moisture or extreme temperatures.
- Verify all connections are secure to prevent electrical hazards.
4. Configuració i instal·lació
4.1 Muntatge
The Kanlux JVT3 16 AS is designed for DIN rail mounting. Securely attach the device to a standard DIN rail within an appropriate electrical enclosure.
4.2 Cablejat
Refer to the wiring diagram on the side of the device (Figure 2.3) and the following instructions:
- Connect the Live (L) and Neutral (N) power supply wires to the corresponding input terminals (typically labeled 1 and 2).
- Connect the load (e.g., light fixture, appliance) to the output terminals. The common terminal is usually 3, with normally open (NO) and normally closed (NC) contacts labeled 4 and 5 respectively. Consult the specific diagram on your device for exact terminal assignments.
- Ensure all connections are tight and correctly insulated.
4.3 Initial Power-Up and Time Setting
- After wiring, restore power to the circuit. The display should illuminate.
- If the display is blank, check power connections.
- Premeu el botó RESET button (small recessed button) using a pointed object (e.g., pen tip) to clear any previous settings and initialize the device.
- Set the current time and day:
- Premeu el botó P button repeatedly to cycle through day settings (e.g., MO, TU, WE...).
- Utilitza el H+ per configurar l'hora.
- Utilitza el M+ botó per configurar el minut.
5. Instruccions de funcionament
5.1 Programació de cicles d'encesa/apagada
El temporitzador permet diversos programes d'encesa/apagada. Segueix aquests passos per configurar un programa:
- Premeu el botó P Premeu el botó una vegada per entrar al mode de configuració del programa. La pantalla mostrarà "1 ON".
- Utilitza el D+ button to select the day(s) for this program (e.g., individual days, weekdays, weekends, all days).
- Utilitza el H+ per configurar l'hora d'encesa desitjada.
- Utilitza el M+ per ajustar els minuts d'encesa desitjats.
- Premeu P de nou. La pantalla mostrarà "1 OFF".
- Repeat steps 2-4 to set the desired OFF time for the first program.
- Continueu prement P to set additional ON/OFF programs (e.g., "2 ON", "2 OFF", etc.).
- Per sortir del mode de configuració del programa i tornar a la visualització de l'hora actual, premeu la tecla MANUAL botó.
5.2 Anulació manual
El MANUAL button allows you to override the programmed settings temporarily or permanently:
- Premeu MANUAL repeatedly to cycle through modes:
- AUTO ON: The timer is currently ON and will follow the next programmed OFF event.
- APAGAT AUTOMÀTIC: The timer is currently OFF and will follow the next programmed ON event.
- ACTIVITAT: The timer is forced ON, ignoring all programs.
- DESACTIVAT: The timer is forced OFF, ignoring all programs.
- Seleccioneu AUTO ON or AUTO DESACTIVAT to resume automatic operation based on your programs.
5.3 Astronomical Function
The JVT3 16 AS includes an astronomical function, which can automatically adjust ON/OFF times based on sunrise and sunset times for your geographical location. Refer to the device's specific programming menu for setting up the astronomical function, which typically involves inputting your latitude and longitude or selecting a predefined region. This feature allows for energy-efficient control of lighting or other applications.
6. Manteniment
- Neteja: Netegeu el dispositiu amb un drap suau i sec. No utilitzeu productes de neteja abrasius ni dissolvents.
- Bateria: The device typically contains an internal battery to maintain settings during power outages. This battery is usually non-replaceable by the user and has a long lifespan. If the display frequently resets or loses time during power interruptions, the internal battery may need servicing by a qualified technician.
- Inspecció: Comproveu periòdicament les connexions del cablejat per comprovar si estan ben ajustades i si hi ha signes de desgast.
7. Solució De Problemes
- El dispositiu no s'encén:
- Check the main power supply to the circuit.
- Verify that the Live (L) and Neutral (N) wires are correctly connected to the input terminals.
- Load not switching ON/OFF as programmed:
- Ensure the device is in "AUTO ON" or "AUTO OFF" mode (not forced ON/OFF).
- Review els horaris d'encesa/apagada programats per a més precisió.
- Check the current time and day setting on the timer.
- Verify the load wiring (terminals 3, 4, 5) is correct and secure.
- Confirm the load is not exceeding the maximum current rating of the timer.
- La pantalla està en blanc o parpelleja:
- Comproveu la font d'alimentació.
- If power is stable, the internal battery may be low or faulty. Contact a qualified technician.
8. Especificacions
| Característica | Especificació |
|---|---|
| Marca | Kanlux |
| Número de model | 18721 (JVT3 16 AS) |
| Color | Blanc |
| Voltage | 230 Volts (AC 220-240V) |
| Valoració actual | 16A (8)A, 250VAC |
| Pes de l'article | 120 g |
| Dimensions del paquet | 30 x 20 x 20 cm |
| Fabricant | Kanlux |
| Funció | Digital Programmable Time Switch with Astronomical Function |
9. Garantia i Suport
Information regarding specific warranty terms and customer support contacts for the Kanlux 18721 JVT3 16 AS Digital Programmable Time Switch is not available in the provided product data. Please refer to the product packaging or the official Kanlux weblloc web per obtenir detalls de la garantia i informació de contacte d'assistència.


