1. Introducció
This manual provides detailed instructions for the setup, operation, and maintenance of your Excelvan EHD11 Mini LED Projector. Please read this manual thoroughly before using the projector to ensure proper operation and to extend the product's lifespan. Keep this manual for future reference.
2. Instruccions de seguretat importants
To prevent fire or electric shock, do not expose this appliance to rain or moisture. Observe the following safety precautions:
- Do not block any ventilation openings. Ensure adequate space around the projector for proper airflow.
- No col·loqueu el projector sobre un carro, suport o taula inestable.
- Do not operate the projector near water or moisture.
- Utilitzeu només accessoris/accessoris especificats pel fabricant.
- Unplug this projector during lightning storms or when unused for long periods.
- Demaneu tot el servei a personal de servei qualificat.
- Eviteu mirar directament a la lent del projector quan lamp està activat.
3. Contingut del paquet
Si us plau, comproveu que tots els elements siguin presents i en bon estat:
- Excelvan EHD11 Projector
- Cable d'alimentació
- Control remot
- Cable AV
- Manual d'usuari
4. Producte acabatview
4.1 Projector Front and Top View

Imatge 4.1: Frontal i superior view of the Excelvan EHD11 projector, showing the lens, ventilation, and control buttons (Source, Menu).
4.2 Projector Rear View i Ports

Imatge 4.2: posterior view of the Excelvan EHD11 projector, highlighting the dual built-in speakers and various input/output ports including USB, HDMI, VGA, AV, and audio out.
4.3 Opcions de connectivitat

Image 4.3: Diagram illustrating the wide range of devices compatible with the projector, such as PCs, smartphones, USB storage, TV set-top boxes, game consoles, DVD players, digital cameras, and external speakers.
5. Configuració
5.1 Placement and Projection Distance
Position the projector on a stable, flat surface. The projection distance directly affects the screen size. Refer to the diagram below for recommended distances and corresponding screen sizes.

Image 5.1: Chart detailing the relationship between projection distance (in meters) and screen size (in inches) for a 16:9 aspect ratio, ranging from 32 inches at 1.2 meters to 200 inches at 6 meters.
5.2 Connexió d'alimentació
Connect the power cable to the projector's power input and then to a power outlet. The power indicator light will illuminate.
5.3 Connexió de fonts d'entrada
The projector supports multiple input sources. Connect your desired device (e.g., PC, DVD player, game console, USB drive) to the corresponding port on the rear of the projector using the appropriate cable (HDMI, VGA, AV, USB).
5.4 Ajust de l'enfocament i la distorsió trapezoidal
After powering on, adjust the focus ring around the lens until the image is clear. If the image appears trapezoidal, use the keystone correction dial to square the image. The projector supports a ±15° keystone adjustment.
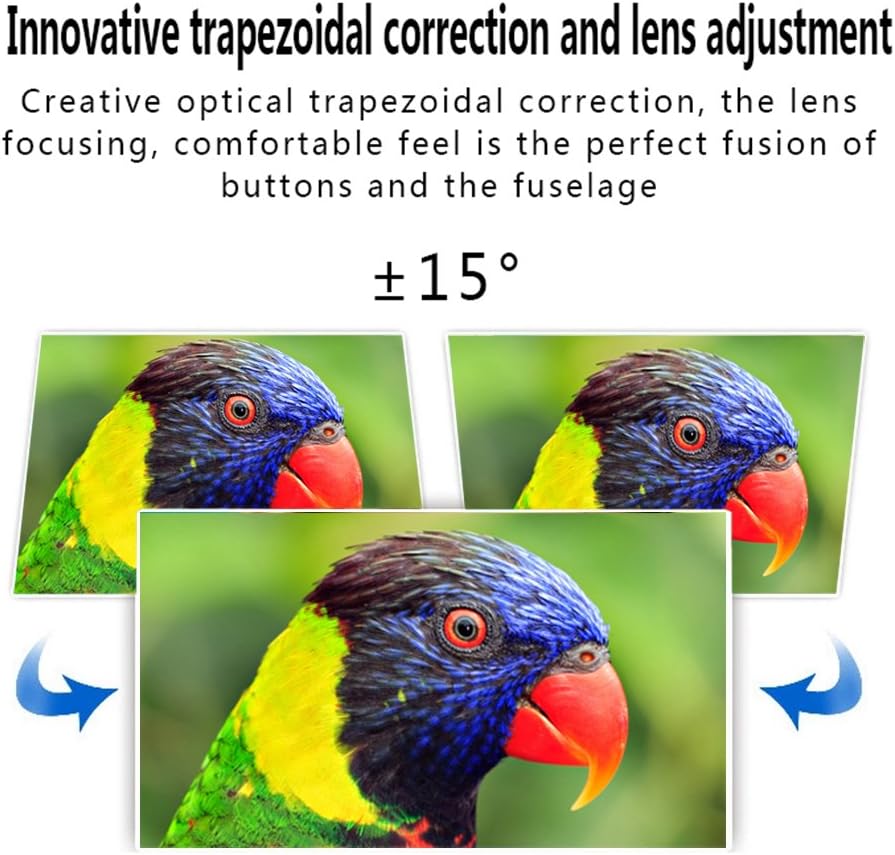
Image 5.4: Visual representation of the ±15° trapezoidal correction and lens adjustment feature, showing how to correct distorted images.
6. Instruccions de funcionament
6.1 Encès/Apagat
Premeu el botó d'engegada del projector o del comandament a distància per encendre o apagar la unitat.
6.2 Selecció de la font
Press the 'Source' button on the projector or remote control to cycle through available input sources (HDMI1, HDMI2, USB1, USB2, VGA, AV, YPbPr, TV/DTV). Select the input corresponding to your connected device.
6.3 Navegació de menús
Press the 'Menu' button to access the projector's settings. Use the arrow keys on the projector or remote to navigate, and 'OK' or 'Enter' to confirm selections. Adjust settings such as picture mode, aspect ratio, sound mode, and language.
6.4 Sortida d'àudio
The projector features built-in speakers. For enhanced audio, connect external speakers to the 'Audio Out' port using a 3.5mm audio cable.
7. Manteniment
7.1 Neteja de lents
Use a soft, lint-free cloth and a specialized lens cleaning solution to gently wipe the projector lens. Avoid abrasive materials or excessive pressure.
7.2 Ventilació
Regularly check that the projector's ventilation openings are clear of dust and debris. Blocked vents can lead to overheating and affect performance. Do not place the projector on soft surfaces that may obstruct airflow.
8. Solució De Problemes
| Problema | Causa possible | Solució |
|---|---|---|
| No hi ha imatge a la pantalla | Power cable disconnected; Incorrect input source selected; Input device not powered on or connected properly. | Check power connection; Select correct input source; Ensure input device is on and cables are secure. |
| La imatge és borrosa | Enfocament no ajustat. | Ajusteu l'anell de focus de la lent del projector. |
| La imatge està distorsionada (trapezoïdal) | Clave trapezoidal no ajustada. | Ajusteu el dial de correcció de la distorsió trapezoidal. |
| Sense so | Volume too low; Audio cables not connected; Incorrect audio output selected on source device; External speakers not connected or powered. | Increase volume; Check audio cable connections; Ensure source device is outputting audio; Connect external speakers if desired. |
| Input source needs to be set every time | Projector defaults to a specific input or does not save last setting. | Manually select the desired input source after powering on. Check menu settings for an 'Auto Source' or 'Last Input' option if available. |
9. Especificacions
- Marca: Excelvan
- Model: EHD11 (FBA_151224-F6)
- Tipus de visualització: LCD
- Resolució de visualització: 1920 x 1080 (Full HD supported)
- Tecnologia de connectivitat: HDMI, USB, VGA, AV
- Característica especial: 3D-Ready, Portable
- Pes de l'article: 6.49 lliures
- Dimensions del paquet: 16.9 x 13.1 x 8.5 polzades
- Fabricant: Excelvan
- Data de primera disponibilitat: 8 de novembre de 2014
10. Garantia i Suport
Per obtenir informació sobre la garantia o assistència tècnica, consulteu la documentació proporcionada en el moment de la compra o poseu-vos en contacte amb el vostre distribuïdor. Conserveu el rebut de compra com a comprovant de compra.


