1. Introducció
This manual provides detailed instructions for the installation, operation, and maintenance of your TMEZON 8-Channel 1080N 5-in-1 Security Recorder. Please read this manual thoroughly before using the product to ensure proper functionality and to prevent damage.
2. Producte acabatview
2.1 Tauler frontal
The front panel of the TMEZON DVR features indicator lights for power (PWR) and hard disk drive activity (HDD). The TMEZON logo and "Digital Video Recorder" are also displayed.

Imatge: Frontal view of the TMEZON 8-Channel DVR unit.
2.2 Connexions del panell posterior
The rear panel provides all necessary ports for connecting cameras, monitors, audio devices, and network cables.
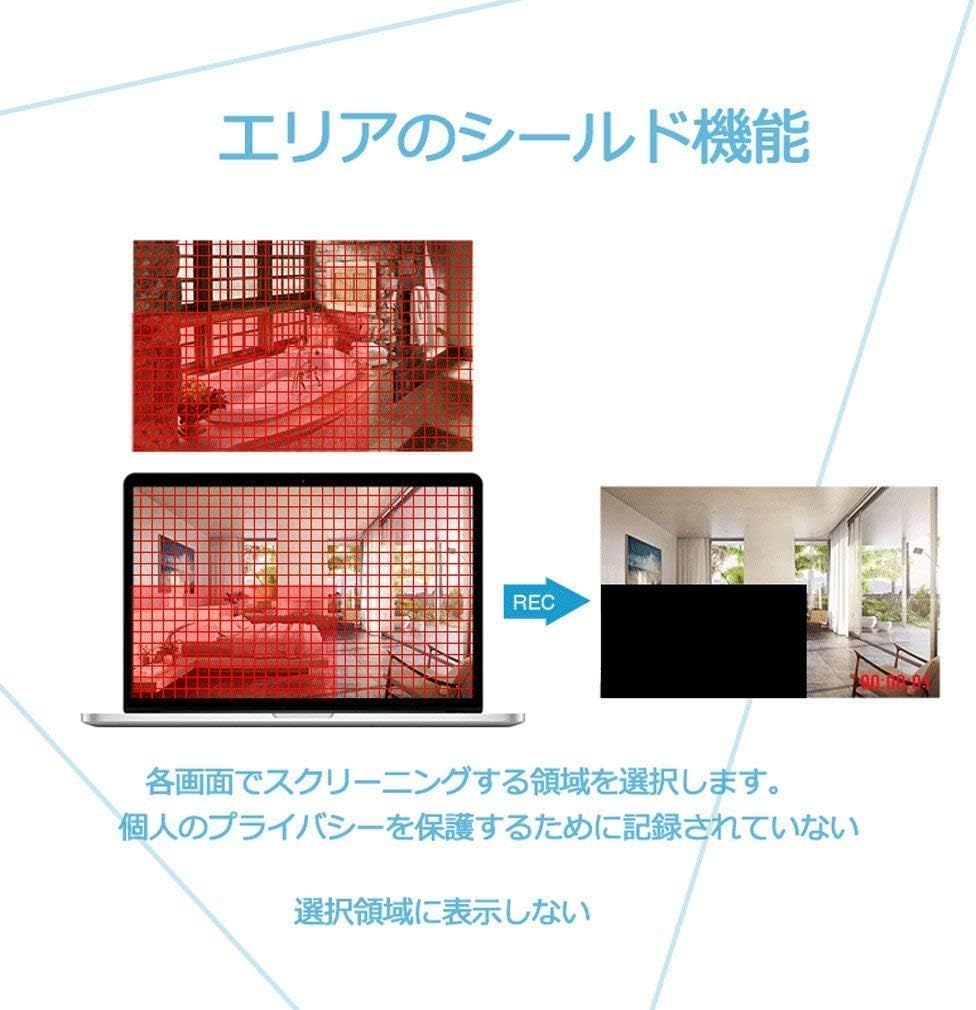
Image: Rear panel showing video input (8 channels), video output (HDMI, VGA), audio input/output, network port, USB ports, and power input.

Image: Illustrates compatibility with 3K/5MP TVI, 4MP AHD, 4MP CVI, CVBS, and 6MP IP cameras. SDI cameras are not supported.
2.3 Dimensions
The DVR unit measures approximately 26.5 cm (length) x 22 cm (width) x 4.2 cm (height).
3. Característiques clau
- Compatibilitat 5 en 1: Supports traditional analog (CVBS), AHD, TVI, CVI, and IP cameras for broad system integration.
- Advanced Recording: Utilizes H.264 video compression for efficient storage of high-resolution footage over extended periods. Supports a single internal 3.5-inch SATA HDD up to 6TB (HDD not included).
- Detecció de moviment: Configurable motion detection zones with immediate email notifications upon detecting unusual activity.
- Monitorització remota: Access live and recorded video from anywhere using a smartphone (iPhone/Android), tablet, or PC.
- Enmascarament de privadesa: Allows users to define specific areas on the screen that will not be recorded, protecting personal privacy.
- Compressió H.265+: Offers enhanced video compression for longer recording times and smoother video playback compared to H.264.
4. Guia de configuració
4.1 Instal·lació de maquinari
- Instal·lació del disc dur: If not already installed, open the DVR casing and securely mount a 3.5-inch SATA hard drive. Connect the SATA data and power cables.
- Connexions de la càmera: Connect your surveillance cameras to the corresponding video input ports on the rear panel. Ensure secure connections.
- Connexió del monitor: Connect a monitor or TV to the DVR using either the HDMI or VGA output port.
- Connexions d'àudio: If using external audio, connect microphones to the audio input ports and speakers to the audio output port.
- Connexió de xarxa: Connect an Ethernet cable from the DVR's network port to your router or network switch.
- Connexió d'alimentació: Connect the power adapter to the DVR's power input and then plug it into an electrical outlet.
4.2 Engegada inicial
Upon first power-up, the system may guide you through an initial setup wizard. Follow the on-screen prompts to configure basic settings such as language, date/time, and network parameters. It is recommended to set a strong password for the administrator account.
5. Instruccions de funcionament
5.1 Modes d'enregistrament
The DVR supports various recording modes, including continuous recording and motion-triggered recording. These settings can be configured through the system menu.
5.2 Motion Detection Setup
To configure motion detection:
- Navigate to the motion detection settings in the DVR menu.
- Select the camera channel you wish to configure.
- Define specific detection zones within the camera's view.
- Set sensitivity levels and specify actions upon detection, such as recording, email alerts, or mobile notifications.

Image: Illustration of motion detection with customizable areas and notification options.
5.3 Enmascarament de privadesa
Privacy masking allows you to block out specific areas in the camera's view from being recorded, ensuring privacy for sensitive locations.
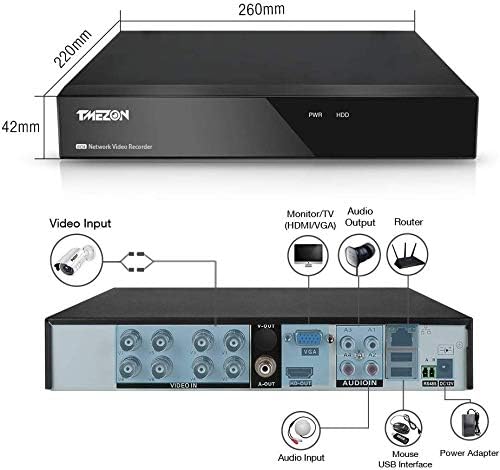
Image: Demonstrates how to select and mask areas on the screen to prevent recording of private spaces.
5.4 Remote Access (Mobile App)
To set up remote monitoring via a mobile device:
- Download the official TMEZON mobile application from your device's app store.
- Ensure your DVR is connected to the internet via an Ethernet cable to your router.
- Engegueu el DVR.
- Open the app and follow the instructions to add your device, typically by scanning a QR code displayed on the DVR's monitor or entering the device ID manually.

Image: Step-by-step guide for mobile app setup, including app download, network connection, power-up, and QR code scanning.

Image: Depicts a home layout with cameras connected to the DVR, accessible remotely.

Image: Shows various smartphones displaying live surveillance feeds, indicating remote access capabilities.
5.5 Reproducció de vídeo
Accés gravat footage through the DVR's menu interface or via the mobile application. You can search for recordings by date, time, and event type (e.g., motion detection).

Image: A smartphone screen showing video playback from the DVR, with a timeline for navigation.
5.6 Compressió de vídeo
The DVR supports H.265+ video compression, which optimizes storage space and network bandwidth while maintaining video quality. This allows for longer recording durations compared to older H.264 compression.

Image: Visual comparison demonstrating that H.265+ compression allows for more recording time than H.264 for the same storage capacity.
6. Manteniment
- Neteja regular: Keep the DVR unit free from dust and debris to ensure proper ventilation. Use a soft, dry cloth for cleaning.
- Actualitzacions de firmware: Reviseu periòdicament el fabricant weblloc web per a actualitzacions de firmware per garantir un rendiment i una seguretat òptims.
- Estat del disc dur: Monitor the health of your hard drive through the DVR's system settings. Replace the HDD if any issues are detected to prevent data loss.
- Font d'alimentació: Ensure a stable power supply to the DVR. Use a surge protector to prevent damage from power fluctuations.
7. Solució De Problemes
- Sense sortida de vídeo: Check all video cable connections (HDMI/VGA) to the monitor. Ensure the monitor is set to the correct input source. Try adjusting the DVR's display resolution if the monitor does not support the current setting.
- Sense gravació: Verify that a hard drive is properly installed and formatted. Check recording schedules and ensure motion detection settings are correctly configured if using that mode.
- Problemes d'accés remot: Ensure the DVR is connected to the internet and has a stable network connection. Check firewall settings on your router. Verify that the mobile app is correctly configured with the device ID.
- Bloqueig/retard del sistema: Ensure adequate ventilation for the DVR. Check hard drive health. Reduce video quality or frame rate if necessary.
- Restabliment de la contrasenya: Refer to the online electronic manual or contact customer support for password reset procedures.
8. Especificacions
| Característica | Especificació |
|---|---|
| Marca | TMEZON |
| Número de model | MZ-AHD-1208H |
| Canals | 8 |
| Entrada de vídeo | CVBS, AHD, TVI, CVI, IP |
| Sortida de vídeo | HDMI, VGA |
| Compressió de vídeo | H.264, H.265+ |
| Suport de disc dur | 1 x 3.5-inch SATA HDD (up to 6TB, not included) |
| Dimensions del producte | 26.5 x 22 x 4.2 cm |
| Pes del producte | 1.2 kg |
| UPC | 763769066976 |
9. Garantia i Suport
This product comes with a 1-year warranty and a 30-day money-back guarantee. For any questions or issues regarding the use of this product, please contact customer support.
Correu electrònic: tmezoncctvsystem@yahoo.com
An electronic version of the instruction manual is available for download at: https://yahoo.jp/box/9ps3fN


