1. Introducció
This manual provides detailed instructions for the installation, operation, and maintenance of your Focal FPX1.1000 Class D Mono Amplificador. Llegiu atentament aquest manual abans d'intentar la instal·lació o el funcionament per garantir el funcionament correcte i la seguretat. Conserveu aquest manual per a futures consultes.
2. Instruccions de seguretat
Observeu les següents precaucions de seguretat per evitar lesions o danys a la amplifier and vehicle:
- Instal·lació professional recomanada: Installation of car audio equipment can be complex. It is highly recommended that a qualified professional install this ampmés viu.
- Desconnecta la bateria: Desconnecteu sempre el terminal negatiu de la bateria del vehicle abans de començar qualsevol treball elèctric per evitar curtcircuits.
- Cablejat adequat: Use appropriate gauge wiring for power, ground, and speaker connections as specified in the installation section. Incorrect wiring can cause overheating, fire, or damage to components.
- Ventilació: Assegureu-vos el amplifier is mounted in a location with adequate ventilation to prevent overheating. Do not block cooling fins.
- Eviteu la humitat: No exposar el ampvitalitzador a la humitat o a l'aigua.
- Muntatge segur: Muntar el ampfixar el salvavides de manera segura per evitar que es desprengui durant el funcionament del vehicle, cosa que podria causar lesions o danys.
- Protecció de fusibles: Always use an external fuse on the main power wire, close to the battery, with the recommended amperage.
3. Producte acabatview
3.1 Característiques clau
- CEA Power (4 Ohms): 1×420 Wrms
- Maximum Power (2 Ohms): 1×700 Wrms
- Maximum Power (1 Ohm): 1×1000 Wrms
- Bandwidth: 15Hz–250Hz
- Integrated Protections: Short Circuit, low impedance, reversal of polarity, DC, power drop, heat protection.
- Mono classe D Amplifier design for high power and efficiency.
3.2 Què hi ha a la caixa
- Focal FPX1.1000 Mono Ampmés viu
- Manual d'usuari (aquest document)
- Ferramenteria de muntatge (cargols, etc.)
4. Instal·lació i configuració
Proper installation is crucial for optimal performance and safety. Consult a professional installer if you are unsure about any steps.
4.1 Ubicació de muntatge
Trieu una ubicació de muntatge que sigui:
- Dry and free from moisture.
- Well-ventilated to allow for heat dissipation.
- Secure and protected from physical damage.
- Away from fuel lines, brake lines, and electrical wiring harnesses.
Common locations include under a seat, in the trunk, or behind a panel.
4.2 Connexions de cablejat
Abans de fer qualsevol connexió, desconnecteu el terminal negatiu de la bateria del vehicle.
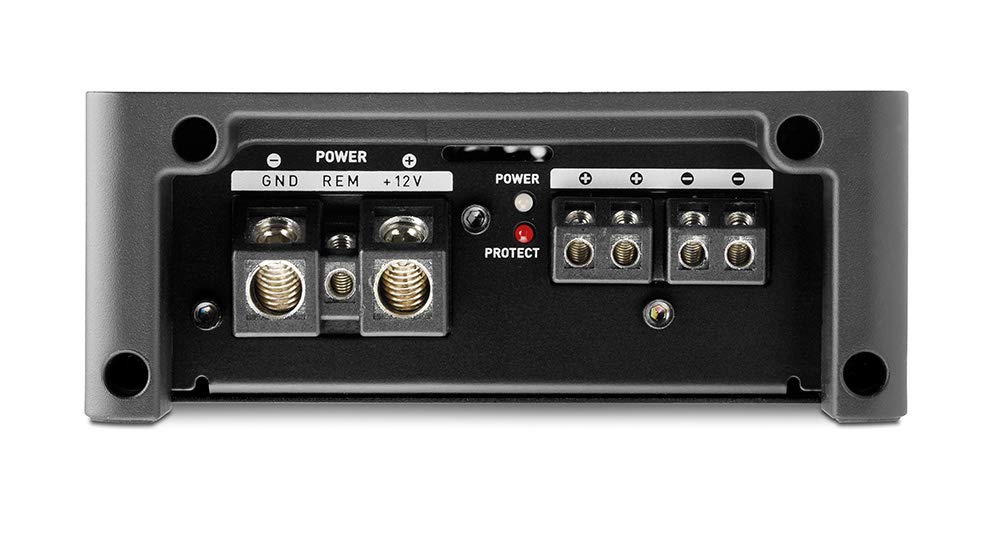
Image 1: Power and Speaker Terminal Connections. This image displays the rear panel of the amplifier, highlighting the power input terminals (GND, REM, +12V) and the speaker output terminals. A red 'PROTECT' indicator light is also visible.
- Cable d'alimentació (+12V): Run a heavy-gauge power wire (e.g., 4 AWG or larger, depending on total system power) directly from the positive terminal of the vehicle's battery to the +12V terminal on the amplifier. Install an inline fuse holder with the appropriate fuse (refer to specifications for recommended fuse size) within 18 inches (45 cm) of the battery.
- Cable de terra (GND): Connect a heavy-gauge ground wire (same gauge as power wire) from the GND terminal on the amplifier to a clean, unpainted metal surface on the vehicle's chassis. Ensure a good electrical connection by scraping away any paint or rust. The ground wire should be as short as possible, ideally less than 3 feet (1 meter).
- Cable d'encesa remota (REM): Connecteu un cable de calibre més petit (per exemple, 18 AWG) des del terminal REM del amplifier to the remote turn-on output of your head unit or other switched 12V source. This wire turns the ampengegueu i apagau l'activador amb el vostre sistema d'àudio.
- Sortida de l'altaveu: Connect your subwoofer(s) to the speaker output terminals. Ensure correct polarity (+ to + and - to -). This is a mono amplifier, designed for a single subwoofer or multiple subwoofers wired to present a 1-ohm or 2-ohm load. Refer to your subwoofer's specifications for impedance matching.
- Entrada RCA: Connect RCA cables from the subwoofer output of your head unit to the INPUT CH1/CH2 RCA jacks on the ampmés viu.

Image 2: Input and Control Panel. This image shows the front panel of the amplifier, featuring RCA input and output jacks, a remote port, and various control knobs for Gain, Subsonic filter, Bass Boost, Phase, and Low Pass Filter (LPF).
5. Instruccions de funcionament
Un cop instal·lat, ajusteu el ampConfiguració del lificador per a un rendiment so òptim.
5.1 Control Panel Adjustments
- GAIN (Input Sensitivity): Aquest control coincideix amb el amplifier's input sensitivity to the output level of your head unit. Start with the gain at minimum (Min) and slowly increase it until you hear distortion, then back off slightly. Do not use the gain control as a volume knob.
- SUBSÒNIC: This filter removes extremely low frequencies that are inaudible and can waste amplifier power or damage subwoofers. Adjust it to a frequency below your subwoofer's resonant frequency or port tuning frequency (typically 15-30Hz).
- INTENSIFICACIÓ DELS SONS MÉS GREUS: This control provides an increase in bass output at a specific frequency. Use sparingly to avoid distortion and potential damage to subwoofers.
- FASE: This control adjusts the phase of the subwoofer output relative to the main speakers (0° to 180°). Adjust for the best blend and impact with your front speakers.
- LPF (filtre de pas baix): This filter allows only frequencies below the set point to pass through to the subwoofer. Adjust it to blend smoothly with your main speakers, typically between 50Hz and 80Hz.
5.2 Power and Protection Indicators
- Indicador d'alimentació: S'il·lumina quan el ampEl transformador rep alimentació i funciona normalment.
- Protect Indicator: S'il·lumina quan el amplifier detects a fault (e.g., short circuit, overheating, low impedance). If this light comes on, turn off your audio system immediately and troubleshoot the issue.
6. Manteniment
The Focal FPX1.1000 ampEl lificador requereix un manteniment mínim. Seguiu aquestes pautes per garantir-ne la longevitat:
- Neteja: Netegeu periòdicament el ampl'exterior del purificador amb un drap suau i sec. No utilitzeu productes químics agressius ni netejadors abrasius.
- Ventilació: Ensure that the cooling fins remain free of dust and debris. Use compressed air to gently clear any blockages if necessary.
- Connexions: De tant en tant, comproveu totes les connexions del cablejat per assegurar-vos que estiguin ben fixades i que no presentin corrosió.
7. Solució De Problemes
Si teniu problemes amb el vostre amplificador, consulteu la taula següent abans de sol·licitar serveis professionals:
| Problema | Causa possible | Solució |
|---|---|---|
| Sense alimentació / Ampel lifier no s'encén |
|
|
| Protect light is on |
|
|
| Sense so |
|
|
| So distorsionat |
|
|
8. Especificacions
| Característica | Detall |
|---|---|
| Número de model | FPX1.1000 |
| Marca | Focal |
| Potència CEA (4 ohms) | 1×420 Wrms |
| Maximum Power (2 Ohms) | 1×700 Wrms |
| Maximum Power (1 Ohm) | 1×1000 Wrms |
| Ample de banda | 15Hz – 250Hz |
| Proteccions | Short Circuit, low impedance, reversal of polarity, DC, power drop, heat protection |
| Dimensions del producte | 11.81 x 11.81 x 11.81 polzades; 6 lliures |
| Tipus de muntatge | Muntatge en superfície |
| Voltage | 10 Volts, 14.4 Volts, 5 Volts (Operating Voltagrang e) |
9. Garantia i Suport
Focal products are designed and manufactured to high quality standards. This product is covered by a limited warranty against defects in materials and workmanship. The specific terms and duration of the warranty may vary by region and retailer. Please retain your proof of purchase for warranty claims.
For technical support, warranty service, or further assistance, please contact your authorized Focal dealer or visit the official Focal weblloc per obtenir informació de contacte.


