1. Introducció
This manual provides detailed instructions for the installation, operation, and maintenance of your MSI B250M GAMING PRO micro-ATX motherboard and the included MSI DS B1 Gaming Mouse. Please read this manual thoroughly before beginning installation.
2. Contingut del paquet
Verifiqueu que tots els elements siguin presents al vostre paquet:
- MSI B250M GAMING PRO Motherboard
- MSI DS B1 Gaming Mouse
- Cables i connectors
- Guia de configuració ràpida
3. Placa mare per sobreview
The MSI B250M GAMING PRO is a micro-ATX motherboard designed for 7th/6th Gen Intel Core/Pentium/Celeron processors with an LGA 1151 socket. It supports DDR4-2400 Memory and features Gaming LAN with LAN Protect.

Image: MSI B250M GAMING PRO Motherboard and DS B1 Gaming Mouse, shown with product packaging.
Característiques principals:
- Supports 7th/6th Gen Intel Core/Pentium/Celeron processors for LGA 1151 socket
- Supports DDR4-2400 Memory
- Gaming LAN with LAN Protect
- Easy Debug LED
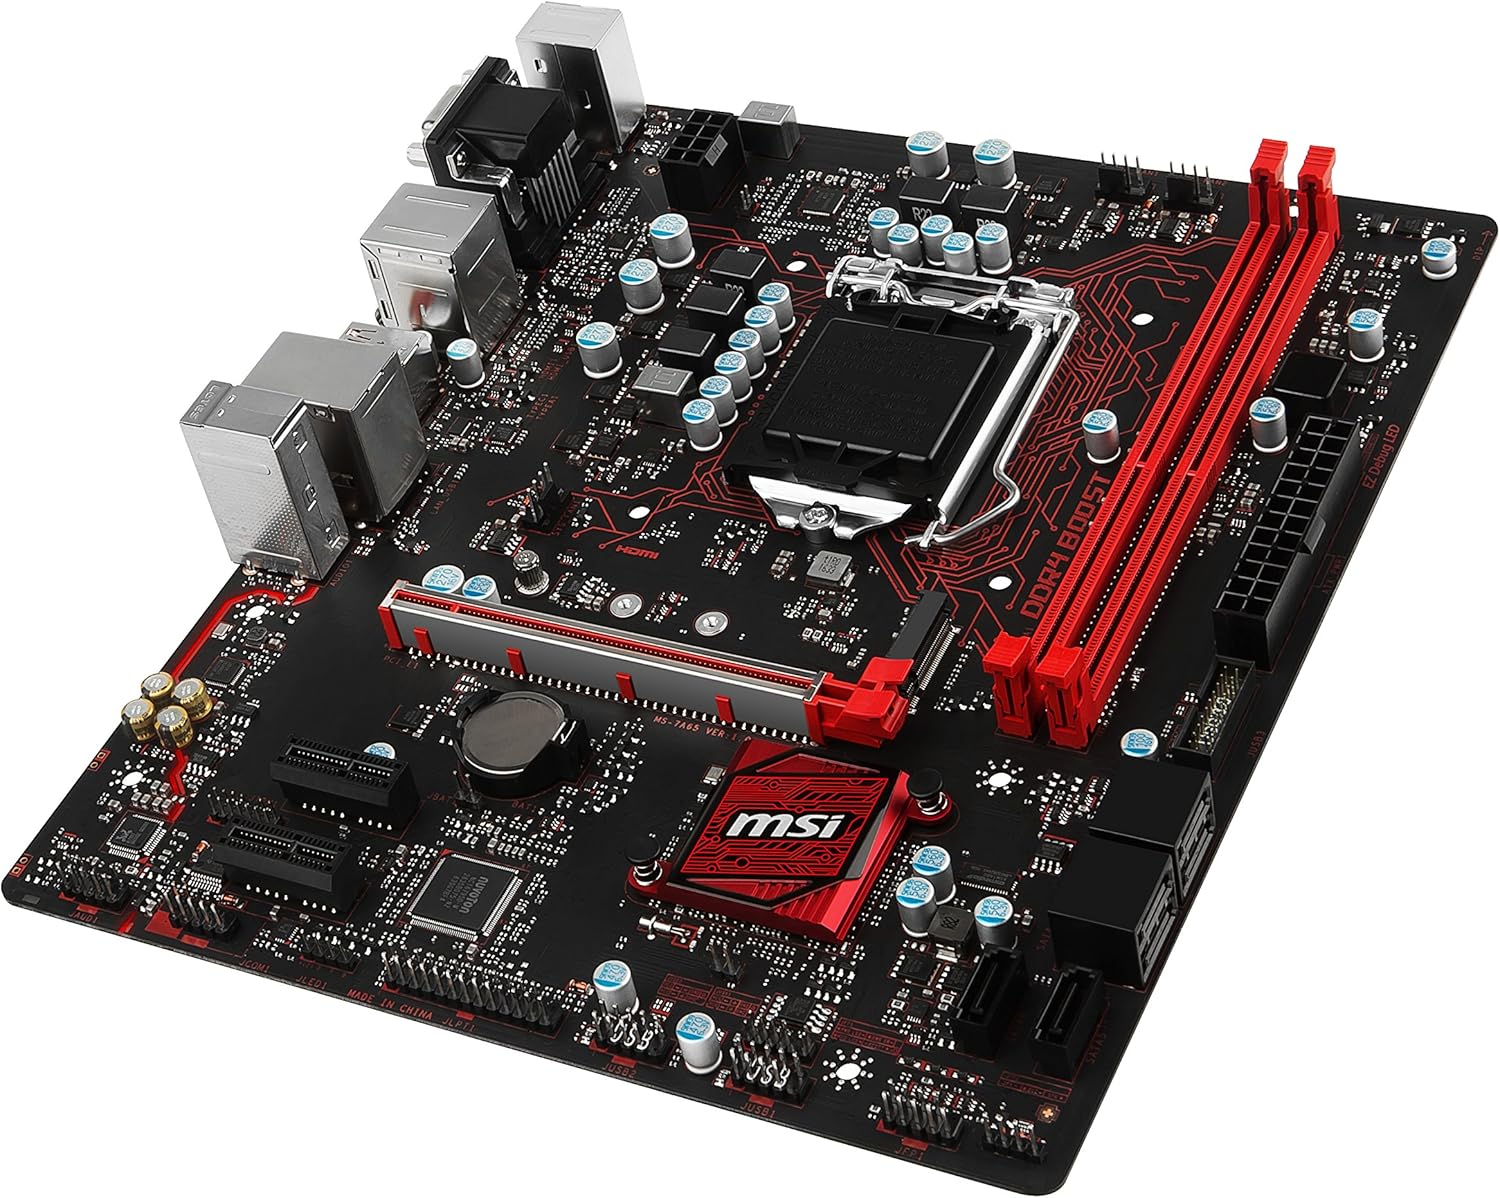
Imatge: De dalt a baix view of the MSI B250M GAMING PRO Motherboard, highlighting the CPU socket, RAM slots, and PCIe slots.

Imatge: Anglesa view of the MSI B250M GAMING PRO Motherboard, showing various connectors and heatsinks.
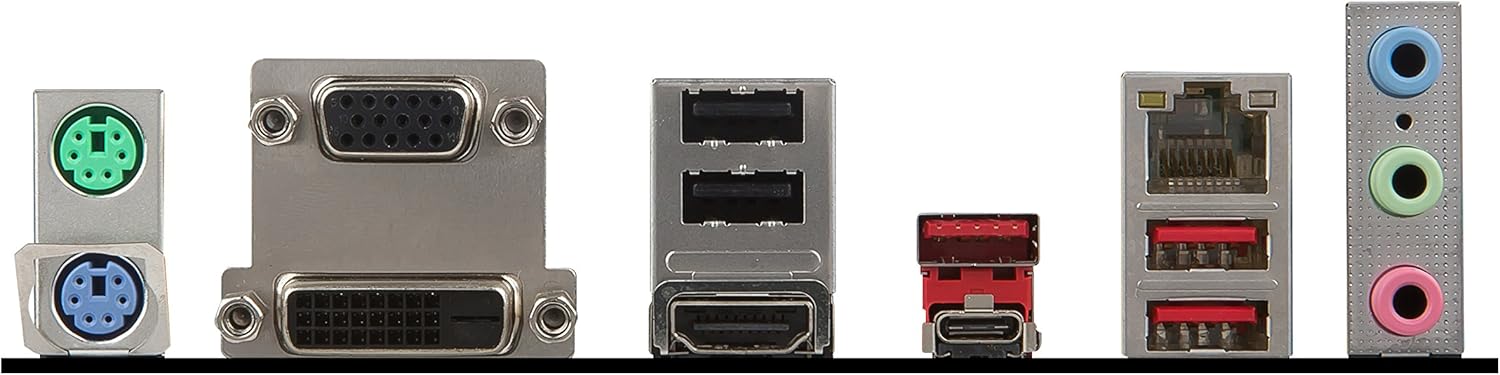
Image: Close-up of the rear I/O panel of the MSI B250M GAMING PRO Motherboard, displaying ports such as PS/2, DVI, HDMI, USB, LAN, and audio jacks.
4. DS B1 Gaming Mouse Overview
The MSI DS B1 Gaming Mouse is included with your motherboard. It features a gaming-grade optical sensor and adjustable weights for personalized control.
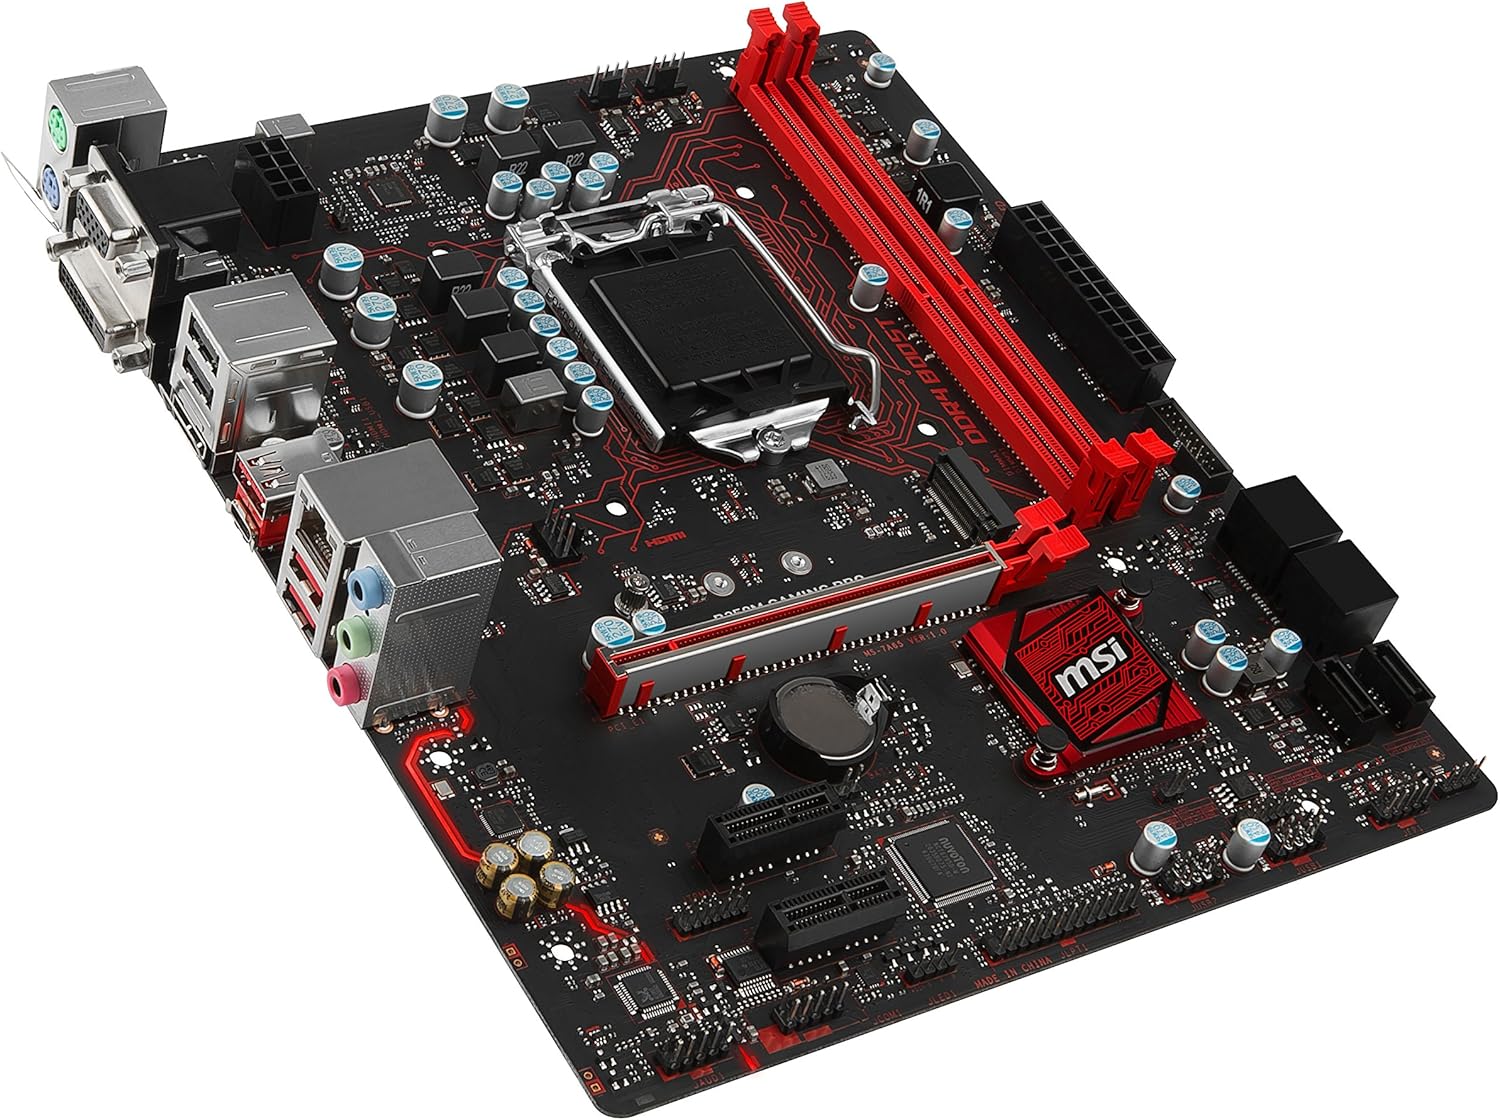
Image: The MSI DS B1 Gaming Mouse, featuring an ergonomic design and red accents.
Característiques:
- Gaming-grade optical sensor
- Eight 2-gram adjustable weights
- Disseny ergonòmic
5. Configuració
5.1 Instal·lació de la placa base
- Preparar el cas: Ensure your computer case is compatible with micro-ATX motherboards. Install standoffs in the appropriate locations.
- Instal·leu la CPU: Open the CPU socket lever, align the CPU with the socket (match the golden triangle on the CPU to the triangle on the socket), gently place the CPU, and close the lever.
- Instal·leu el refrigerador de la CPU: Seguiu les instruccions del fabricant del refrigerador per instal·lar-lo. Connecteu el cable del ventilador de la CPU al capçal "CPU_FAN" de la placa base.
- Instal·lació de la memòria RAM: Open the clips on the DDR4 memory slots. Align the memory modules with the slots and press down firmly until the clips snap into place. Refer to the motherboard manual for recommended dual-channel configurations.
- Muntar la placa base: Col·loca amb cura la placa base a la carcassa, alineant els forats dels cargols amb els separadors. Fixa la placa base amb cargols.
- Connectar l'alimentació: Connect the 24-pin ATX power connector and the 8-pin (or 4-pin) CPU power connector from your power supply to the motherboard.
- Connectar dispositius d'emmagatzematge: Connect SATA data cables from your storage drives (HDDs/SSDs) to the SATA ports on the motherboard. Connect SATA power cables from your power supply to the drives. If using an M.2 SSD, install it into the M.2 slot and secure it with the provided screw.
- Connecteu els cables del panell frontal: Connect the power button, reset button, HDD LED, power LED, and front USB/audio cables from your case to the corresponding headers on the motherboard. Refer to the motherboard manual for exact pin layouts.
- Instal·leu les targetes d'expansió: If using a dedicated graphics card or other PCIe expansion cards, insert them into the appropriate PCIe slots and secure them. Connect any necessary PCIe power cables from your power supply.
5.2 DS B1 Gaming Mouse Connection
Connect the USB cable of the DS B1 Gaming Mouse to an available USB port on your computer. The mouse is plug-and-play and does not require additional drivers for basic functionality.
6. Funcionament
6.1 Arrencada inicial i configuració de la BIOS
- Encès: After connecting all components and peripherals, power on your computer.
- Accés a la BIOS: Durant l'inici, premeu repetidament la tecla DEL clau per entrar a la utilitat de configuració de la BIOS/UEFI.
- Configura l'ordre d'arrencada: In the BIOS, navigate to the boot section and set your preferred boot device (e.g., USB drive for OS installation, SSD/HDD).
- Guardar i sortir: Desa els canvis i surt de la BIOS. El sistema es reiniciarà.
6.2 Instal·lació del sistema operatiu
Insert your operating system installation media (USB drive or DVD) and follow the on-screen instructions to install your preferred OS. After installation, install the latest drivers for your motherboard components from the MSI weblloc.
6.3 DS B1 Gaming Mouse Usage
The DS B1 Gaming Mouse operates immediately upon connection.
- Ajust de DPI: Use the dedicated DPI button (if present) to cycle through different sensitivity settings.
- Ajust de pes: The mouse features a compartment for eight 2-gram weights. Open the compartment, add or remove weights to achieve your desired feel, and close the compartment.
7. Manteniment
7.1 Neteja general
- Eliminació de pols: Regularly clean dust from the motherboard and case fans using compressed air. Ensure the system is powered off and unplugged before cleaning.
- Mouse Cleaning: Feu servir un drap suau i sec per netejar l'exterior del ratolí. Per al sensor òptic, feu servir un bastonet de cotó lleugerament humit.ampamb alcohol isopropílic.
7.2 Actualitzacions de controladors i BIOS
Periodically check the official MSI website for updated drivers and BIOS versions for your motherboard. Keeping drivers and BIOS up-to-date can improve system stability and performance. Follow the instructions provided by MSI for updating the BIOS.
8. Solució De Problemes
- Sense alimentació/Sense arrencada:
- Assegureu-vos que tots els cables d'alimentació (ATX de 24 pins, CPU de 8 pins) estiguin connectats correctament.
- Comproveu que la font d'alimentació estigui encesa.
- Verifiqueu la connexió del botó d'engegada del panell frontal.
- Utilitzeu el Easy Debug LED on the motherboard to identify the component causing the boot failure (CPU, DRAM, VGA, BOOT).
- Sense pantalla:
- Ensure the monitor is connected to the correct video output (motherboard or graphics card).
- Torneu a col·locar els mòduls de la targeta gràfica i de la RAM.
- Perifèrics no detectats:
- Try connecting the peripheral (e.g., mouse, keyboard) to a different USB port.
- Ensure drivers are installed for specific peripherals if required.
- Inestabilitat/Avaries del sistema:
- Comproveu les temperatures de la CPU i la GPU.
- Assegureu-vos que els mòduls de RAM estiguin correctament col·locats.
- Actualitzeu els controladors i la BIOS a les versions més recents.
- Executeu eines de diagnòstic de memòria.
9. Especificacions
9.1 MSI B250M GAMING PRO Motherboard
| Característica | Especificació |
|---|---|
| Socket de CPU | LGA 1151 |
| Processadors compatibles | 7th/6th Gen Intel Core/Pentium/Celeron |
| Chipset | Intel B250 |
| Tipus de memòria | SDRAM DDR4 |
| Velocitat de memòria | Fins a 2400 MHz |
| Factor de forma | micro-ATX |
| Dimensions (LxWxH) | 11.02 x 10.71 x 2.56 polzades |
| Ports USB 2.0 | 6 |
9.2 MSI DS B1 Gaming Mouse
- Tipus de sensor: Òptic
- Peses ajustables: Eight 2-gram weights
- Connectivitat: USB
10. Garantia i Suport
For warranty information and technical support, please refer to the warranty card included with your product or visit the official MSI weblloc.


