1. Producte acabatview
The Beat-Sonic Dolphin Antenna TYPE-9 FDX9N is a high-sensitivity FM/AM antenna designed to replace your vehicle's standard antenna. Its sleek, unpainted dolphin-fin design enhances vehicle aesthetics while maintaining excellent radio reception. This product utilizes Beat-Sonic's proprietary helical coil antenna technology for optimal performance.
2. Informació i precaucions de seguretat
- Incorrect installation, connection, or usage of this product may cause damage to vehicle equipment or result in injury. The manufacturer is not responsible for such incidents.
- Installation on illegally modified or poorly maintained vehicles is not supported, and warranty claims will not be honored.
- Exercise extreme caution during installation. Pulling cables excessively may cause them to break, leading to malfunction.
- The manufacturer is not liable for any accidents, malfunctions, damages, or injuries to users, third parties, or vehicles resulting from the use of this product.
- For vehicles with body coating, the double-sided tape may not adhere sufficiently. Mask areas outside the antenna's contact surface and remove only the body coating from the contact surface using a commercially available fine compound before adhesion.
- Ensure the product, its accessories, and cables are securely fixed and connected. Insufficient fixation or connection may lead to malfunction or detachment.
- Do not install the dolphin antenna if its adhesive surface overlaps with solar panels, sunroof rails, grooves, or steps, as this will reduce adhesion strength.
- When installing this product, there is a possibility of denting the vehicle body. Proceed with caution.
- This product offers reception sensitivity comparable to genuine parts, but sensitivity is not guaranteed under all conditions. Reception may decrease depending on environmental conditions. This also applies to FM-VICS reception (excluding navigation systems that do not use a radio antenna).
3. Contingut del paquet
Please verify that all the following items are included in the package:
- Cos de l'antena
- M6/M5/M4 Screws (set)
- Alcohol Cleaner
- Plantilla d'instal·lació
4. Especificacions
| Marca | Beat-Sonic |
| Nom del model | FDX9N |
| Color | Sense pintar |
| Freqüències de recepció | FM (76.0MHz - 90.0MHz), AM (530KHz - 1,710KHz) |
| Tipus d'antena | Helical Coil Type (Beat-Sonic proprietary technology) |
| Mètode de muntatge | Surface Adhesion (Double-sided tape) |
| Dimensions externes (L x A x A) | 158 x 84 x 70 mm |
| Compatible Screw Poles | M6/M5/M4 screws |
| Pes del producte | 240 g |
Detailed Dimensions:

Image: Detailed dimensions of the antenna, showing height, width, and length.

Image: Detailed dimensions of the antenna, including an illustration of the internal helical antenna.
5. Guia d'instal·lació
Follow these steps for proper installation of your Beat-Sonic Dolphin Antenna:
- Prepare the Installation Surface: Ensure the vehicle's roof surface where the antenna will be mounted is clean, dry, and free of wax, grease, or dirt. Use the provided alcohol cleaner to thoroughly clean the area. For vehicles with body coating, refer to the safety information regarding surface preparation.
- Remove Existing Antenna: Carefully remove your vehicle's existing pole antenna.
- Posició de l'antena: Use the provided template to accurately mark the position for the new dolphin antenna. Ensure it does not overlap with solar panels, sunroof rails, grooves, or steps.
- Connect the Antenna Cable: Connect the cable from the dolphin antenna to the vehicle's antenna input using the appropriate M6, M5, or M4 screw. Ensure a secure connection.
- Secure the Antenna Body: Remove the protective film from the double-sided tape on the bottom of the dolphin antenna. Carefully align the antenna with the marked position and press firmly to ensure strong adhesion. Apply pressure evenly for several minutes.
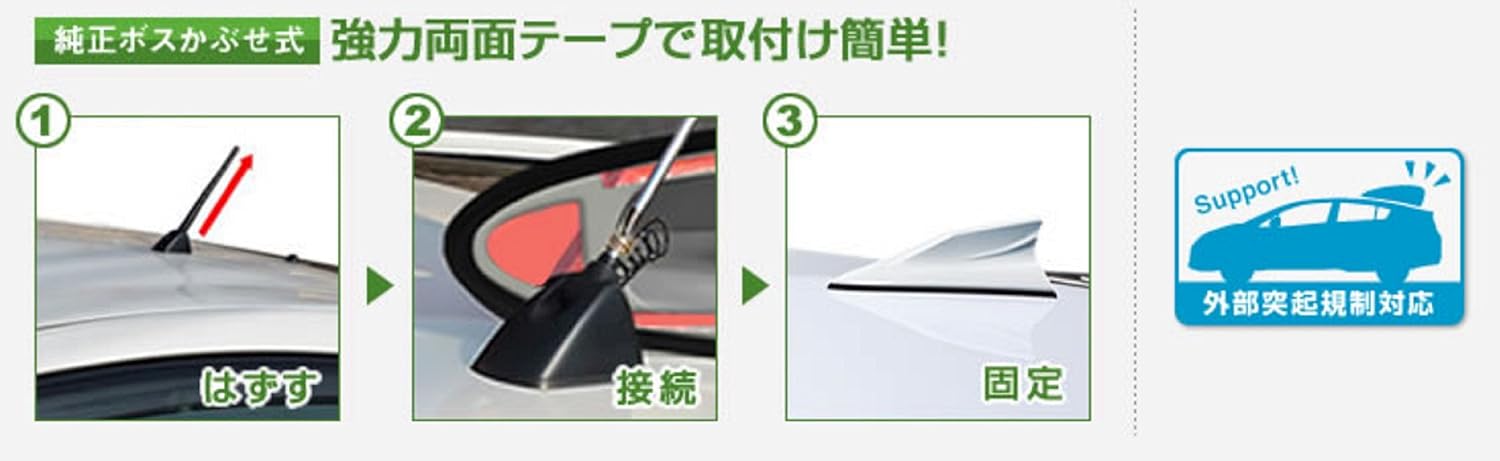
Image: Visual guide for antenna installation: 1. Remove original antenna, 2. Connect new antenna, 3. Fix new antenna.

Image: Before and after installation comparison, showing the replacement of a standard pole antenna with the design antenna.

Image: Another visual guide for antenna installation: 1. Remove original antenna, 2. Connect new antenna, 3. Fix new antenna.
6. Funcionament
Once installed, the Beat-Sonic Dolphin Antenna TYPE-9 FDX9N operates passively. It receives FM and AM radio signals without requiring any further user interaction. The antenna is designed to be compatible with automatic car washes and parking garages, eliminating the need for removal.

Image: The antenna is compatible with parking garages and car washes, indicated by 'OK' when attached.

Image: The antenna design complies with external protrusion regulations.
7. Manteniment
To ensure optimal performance and longevity of your antenna:
- Periodically inspect the antenna for secure attachment to the vehicle roof.
- Clean the antenna with a soft cloth and mild car soap or detergent as needed. Avoid using abrasive cleaners or harsh chemicals that could damage the antenna's surface.
- If the antenna shows signs of wear or damage, consider replacing it to maintain reception quality.
8. Solució De Problemes
- Mala recepció de ràdio:
- Check all cable connections to ensure they are secure and properly seated.
- Verify that the antenna is firmly adhered to a clean, flat surface on the vehicle roof. Re-clean and re-adhere if necessary, especially for coated vehicles.
- Note that radio reception can be affected by environmental factors such as terrain, buildings, and weather conditions.
- Antenna Detachment:
- If the antenna detaches, thoroughly clean both the antenna's adhesive surface and the vehicle's roof surface. Ensure no residue remains.
- Reapply the antenna, ensuring firm and even pressure for strong adhesion. Consider using new double-sided automotive-grade tape if the original tape's adhesive properties are compromised.
9. Garantia i Suport
For detailed warranty information, terms, and conditions, please refer to the official Beat-Sonic website or contact Beat-Sonic customer service directly. Keep your purchase receipt as proof of purchase.
For technical assistance or inquiries not covered in this manual, please reach out to Beat-Sonic customer support.


