1. Introducció
The Bionik Tetra Power is a compact charging dock designed for Nintendo Switch Joy-Con controllers. It allows for simultaneous charging of up to four Joy-Con controllers, providing a convenient and organized charging solution. This manual provides essential information for the proper setup, operation, and maintenance of your Tetra Power charging dock.

Image 1.1: Bionik Tetra Power Charging Dock in its retail packaging. The packaging highlights its ability to charge four Joy-Con controllers and its compatibility with Nintendo Switch.
Característiques principals:
- Disseny compacte: Unique cross formation allows simultaneous charging of up to four Joy-Con controllers without occupying excessive space.
- Gestió integrada de cables: Features a built-in system for adjusting and storing the charging cable, promoting a tidy setup.
- LED Charge Status Indicators: Provides clear visual feedback on the charging status of each connected Joy-Con controller.
- Integració estètica: Designed to complement the visual style of the Nintendo Switch console.
2. Instruccions de configuració
- Desempaquetar el dispositiu: Carefully remove the Bionik Tetra Power charging dock from its packaging.
- Connecteu-vos a l'alimentació: The charging dock features a built-in USB cable. Connect this USB cable to an available USB port on your Nintendo Switch dock or to a compatible USB power adapter (not included).

Image 2.1: The Bionik Tetra Power charging dock viewed from the side, showing its integrated USB cable for power connection.
- Gestió de cables: Utilize the built-in cable management system located at the base of the dock to adjust the cable length and store any excess, ensuring a neat setup.
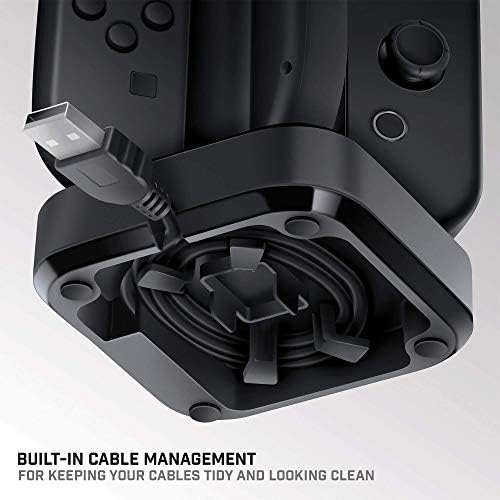
Image 2.2: The underside of the Tetra Power dock, illustrating the integrated cable management system for organizing the USB cable.
- Col·locació: Place the charging dock on a stable, flat surface near your Nintendo Switch console for convenient access.
3. Instruccions de funcionament
Charging Joy-Con Controllers:
- Ensure the Tetra Power charging dock is connected to a power source.
- Align a Joy-Con controller with one of the four charging slots on the dock. Gently slide the Joy-Con downwards until it clicks into place and makes contact with the charging pins.
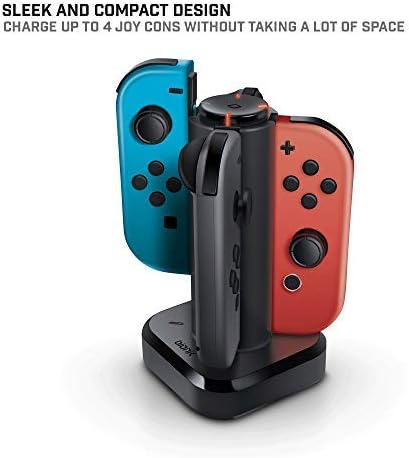
Image 3.1: The Tetra Power charging dock with two Nintendo Switch Joy-Con controllers inserted into their respective charging slots.
- Repeat for additional Joy-Con controllers, up to a maximum of four.
LED Charge Status Indicators:
Each charging slot is equipped with an LED indicator to display the charging status of the connected Joy-Con controller:
- LED vermell: Indicates that the Joy-Con controller is currently charging.
- LED verd: Indicates that the Joy-Con controller is fully charged.
- Sense LED: Indicates no Joy-Con is connected or the dock is not receiving power.
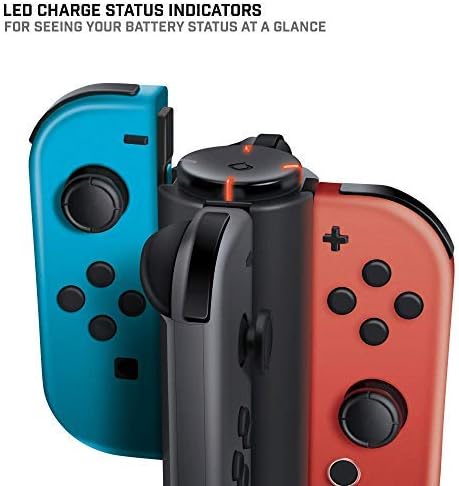
Imatge 3.2: Un primer pla view of the LED charge status indicators on the Tetra Power dock, showing the illuminated status lights.
4. Manteniment
- Neteja: Disconnect the charging dock from its power source before cleaning. Use a soft, dry cloth to wipe the exterior surfaces. Avoid using abrasive cleaners, solvents, or harsh chemicals.
- Emmagatzematge: Quan no l'utilitzeu durant períodes prolongats, guardeu la base de càrrega en un lloc fresc i sec, allunyat de la llum solar directa i de temperatures extremes.
- Manipulació: Manipuleu el dispositiu amb cura. Eviteu deixar-lo caure ni sotmetre'l a impactes forts, ja que podrien danyar els components interns.
5. Solució De Problemes
- Joy-Con not charging:
- Ensure the charging dock is properly connected to a powered USB port.
- Verify that the Joy-Con controller is correctly seated in the charging slot and making full contact with the charging pins.
- Check if the USB cable is securely connected to both the dock and the power source.
- Try connecting the dock to a different USB port or power adapter.
- LED indicator not lighting up:
- Confirm the charging dock is receiving power.
- Ensure a Joy-Con controller is properly inserted into the slot.
- If the Joy-Con is fully charged, the LED will be green. If no Joy-Con is present, the LED will be off.
6. Especificacions
| Número de model | BNK-9019 |
| Marca | Bionik |
| Dimensions del producte | 6.1 x 4.1 x 3.9 polzades |
| Pes de l'article | 6.4 unces |
| Dispositius compatibles | Nintendo Switch Joy-Con Controllers |
| Tipus de connector | Mini USB (integrated cable) |
| Entrada Voltage | 5.4 Volts |
| Ampedat | 5 Amps |
| Ports USB totals | 4 (for Joy-Cons) |
| Característica especial | Fast Charging, LED Charge Status Indicators, Cable Management |
7. Garantia i Suport
Bionik products are manufactured with quality and reliability in mind. For specific warranty information, product support, or to register your product, please visit the official Bionik weblloc web o contacteu directament amb el seu servei d'atenció al client. Conserveu el rebut de compra com a comprovant de compra per a qualsevol reclamació de garantia.
Fabricant: Bionik
Weblloc: bionikgaming.com

Image 7.1: The back of the Tetra Power retail box, displaying multilingual features, specifications, and manufacturer contact details including the weblloc.


