1. Introducció
Gràcies per la compraasing the Makita 14.4V Cordless Driver Drill MDF347DS. This manual provides essential information for the safe and efficient operation, maintenance, and troubleshooting of your tool. Please read this manual thoroughly before use and keep it for future reference.
2. Instruccions de seguretat
Seguiu sempre les precaucions de seguretat bàsiques per reduir el risc d'incendi, descàrrega elèctrica i lesions personals. Mantingueu la vostra zona de treball neta i ben il·luminada. No feu servir eines elèctriques en atmosferes explosives, com ara en presència de líquids, gasos o pols inflamables. Mantingueu els nens i els vianants allunyats mentre feu servir una eina elèctrica.
2.1. Seguretat elèctrica
- Eviteu el contacte corporal amb superfícies connectades a terra com ara canonades, radiadors, estufes i neveres.
- No exposar les eines elèctriques a la pluja o a condicions humides. L'entrada d'aigua en una eina elèctrica augmentarà el risc de descàrrega elèctrica.
2.2. Seguretat personal
- Always wear eye protection and hearing protection when operating the tool.
- Vesteix-te correctament. No porteu roba solta ni joies. Mantingueu els cabells, la roba i els guants allunyats de les parts mòbils.
- Estigueu alerta, observeu el que feu i feu servir el sentit comú quan utilitzeu una eina elèctrica.
2.3. Ús i cura de les eines elèctriques
- No forceu l'eina elèctrica. Utilitzeu l'eina elèctrica adequada per a la vostra aplicació.
- Desconnecteu la bateria de l'eina elèctrica abans de fer qualsevol ajust, canviar accessoris o emmagatzemar eines elèctriques.
- Guardeu les eines elèctriques inactivas fora de l'abast dels nens i no permeteu que les persones que no estiguin familiaritzades amb l'eina elèctrica o aquestes instruccions l'utilitzin.
2.4. Ús i cura de l'eina de la bateria
- Recarregueu només amb el carregador especificat pel fabricant.
- Utilitzeu eines elèctriques només amb paquets de bateries específicament designats.
- Quan la bateria no estigui en ús, manteniu-la lluny d'altres objectes metàl·lics que puguin connectar-se d'un terminal a un altre.
3. Producte acabatview
The Makita MDF347DS is a 14.4V cordless driver drill designed for both drilling and screwdriving applications. It features a durable construction, a 2-speed mechanical gear, a 16-stage clutch plus direct drive, and a keyless chuck for easy bit changes.

Figure 3.1: Main Components of the Driver Drill
This diagram illustrates the key components of the Makita MDF347DS driver drill, including the Tightening Force Adjustment Ring (Clutch Ring), Drill Chuck, Trigger Switch, Battery, Speed Change Lever, and Forward/Reverse Rotation Change Lever.
3.1. Components
- Tightening Force Adjustment Ring (Clutch Ring): Used to select the desired torque setting for screwdriving or the drill mode for drilling.
- Portabroca: Holds the drill bits or screwdriver bits securely. Features a keyless design for quick changes.
- Interruptor d'activació: Activates the tool and controls the rotational speed (variable speed).
- Bateria: Provides power to the tool. This model uses a 14.4V slide-type Li-ion battery.
- Palanca de canvi de velocitat: Allows selection between high-speed and low-speed modes.
- Forward/Reverse Rotation Change Lever: Controls the direction of rotation (forward for tightening, reverse for loosening).
4. Contingut del paquet
En obrir el paquet, assegureu-vos que tots els elements hi siguin presents i que no estiguin danyats:
- Makita 14.4V Cordless Driver Drill MDF347DS Unit
- 1.5Ah Lithium-ion Battery (BL1415G type)
- Carregador de bateria
- Maleta de transport
- +Bit 2-65 (Screwdriver bit)
- Manual d'instruccions (aquest document)
5. Configuració
5.1. Instal·lació i extracció de la bateria
To install the battery, align the battery pack with the grooves in the tool's handle and slide it in until it clicks into place. To remove, press the release button on the battery pack and slide it out.
5.2. Carregant la bateria
Insert the battery pack into the charger. The charging indicator light on the charger will show the charging status. Refer to the charger's instruction manual for detailed charging procedures and indicator meanings.
5.3. Bit Installation and Removal (Keyless Chuck)
To install a bit, rotate the chuck counter-clockwise to open the jaws. Insert the bit fully into the chuck, then rotate the chuck clockwise to tighten the jaws securely around the bit. Ensure the bit is centered and firmly held. To remove, rotate the chuck counter-clockwise to loosen the jaws and pull the bit out.
6. Instruccions de funcionament
6.1. Power Switch (Trigger Switch)

Figure 6.1: Trigger Switch
The trigger switch controls the power and speed of the drill. Pressing the trigger switch activates the tool. The speed is variable; pressing the trigger further increases the rotational speed.
The tool is equipped with a variable speed trigger switch. The rotational speed increases as you press the trigger further. Release the trigger to stop the tool. For safety, always ensure the forward/reverse rotation switch is in the neutral position when not in use or when changing bits.
6.2. Rotació endavant/enrere
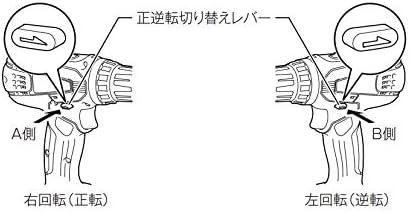
Figure 6.2: Forward/Reverse Rotation Change Lever
This diagram illustrates the positions of the forward/reverse rotation change lever. Pushing the lever to the 'A Side' (left) sets the tool for right rotation (forward), used for tightening screws. Pushing it to the 'B Side' (right) sets it for left rotation (reverse), used for loosening screws.
The forward/reverse rotation change lever is located above the trigger switch. Push the lever from the left side for forward rotation (clockwise, for tightening screws). Push the lever from the right side for reverse rotation (counter-clockwise, for loosening screws). When the lever is in the center position, the trigger switch is locked, preventing accidental startup.
6.3. Selecció de velocitat

Figure 6.3: Speed Change Lever
This diagram shows the speed change lever. Position '1' is for low speed, suitable for heavy-duty applications or larger screws. Position '2' is for high speed, ideal for faster drilling or smaller screws.
The speed change lever is located on top of the tool. Slide the lever to position '1' for low speed (0-400 RPM) or to position '2' for high speed (0-1,400 RPM). Always ensure the tool has come to a complete stop before changing the speed setting to prevent gear damage.
6.4. Torque Adjustment (Clutch)
The tightening force adjustment ring (clutch ring) allows you to select from 16 torque settings plus a drill mode. Rotate the ring to align the desired number with the arrow on the tool body. Lower numbers indicate lower torque, suitable for smaller screws or softer materials. Higher numbers provide more torque. The drill symbol (drill bit icon) bypasses the clutch for maximum torque, ideal for drilling applications.
6.5. Drilling and Screwdriving
- For Screwdriving: Select a low-speed setting and an appropriate clutch setting. Start with a lower torque setting and increase if necessary to avoid overtightening or stripping the screw.
- For Drilling: Select the drill mode on the clutch ring and choose either high or low speed depending on the material and drill bit size. Use high speed for smaller holes and softer materials, and low speed for larger holes and harder materials. Apply steady, even pressure.
7. Manteniment
7.1. Neteja
Netegeu regularment les obertures de ventilació de l'eina per evitar el sobreescalfament. Feu servir un drap suau i sec.amp cloth to wipe down the tool. Do not use strong detergents or solvents. Ensure the battery terminals are clean and free of debris.
7.2. Emmagatzematge
Store the tool and battery in a cool, dry place, away from direct sunlight and moisture. Ensure the battery is partially charged (not fully discharged or fully charged) for long-term storage. Keep out of reach of children.
7.3. Cura de la bateria
Avoid fully discharging the battery frequently. Recharge the battery before it is completely depleted. Do not store the battery in extreme temperatures. If the battery is not used for an extended period, charge it periodically to maintain its lifespan.
8. Solució De Problemes
| Problema | Causa possible | Solució |
|---|---|---|
| L'eina no s'inicia | Battery not charged or improperly installed; Forward/reverse lever in neutral position. | Charge battery and ensure proper installation; Move forward/reverse lever to forward or reverse position. |
| Potència o velocitat reduïdes | Battery charge low; Overload; Incorrect speed setting. | Recharge battery; Reduce load; Select higher speed setting if appropriate. |
| Bit wobbles or falls out | Bit not properly tightened in chuck; Damaged chuck. | Retighten bit firmly; If problem persists, chuck may need replacement. |
9. Especificacions
| Característica | Especificació |
|---|---|
| Número de model | MDF347DS |
| Voltage | DC 14.4V |
| Tipus de bateria | Lithium-ion (1.5Ah) |
| Tipus Chuck | Chuck sense clau |
| Capacitat del mandril | 0.8 - 10 mm |
| Max Torque | 30 N·m |
| Velocitat sense càrrega (alta) | 0 - 1,400 rpm |
| Velocitat sense càrrega (baixa) | 0 - 400 rpm |
| Capacitat de perforació (acer) | 10 mm |
| Capacitat de perforació (fusta) | 25 mm |
| Screw Tightening Capacity (Wood Screw) | φ5.1 x 63 mm |
| Screw Tightening Capacity (Small Screw) | M6 |
| Dimensions (L x A x A) | 198 x 83 x 235 mm |
| Pes net (amb bateria) | 1.4 kg |
| Accessoris inclosos | +Bit 2-65, Battery, Charger, Case |
10. Garantia i Suport
Warranty information for the Makita MDF347DS Cordless Driver Drill is not provided in the product details. For specific warranty terms, service, or technical support, please contact your local Makita authorized service center or the retailer where the product was purchased.
You can find contact information for Makita support on their official weblloc: Makita Oficial Weblloc


