1. Introducció
This manual provides instructions for the setup, operation, maintenance, and troubleshooting of the Polycom VVX 411 Business Media Phone. The VVX 411 is a 12-line VoIP phone designed for business environments, offering high-quality audio and advanced communication features.
2. Contingut del paquet
Verifiqueu que tots els elements que s'enumeren a continuació s'inclouen al vostre paquet. Si falta algun element o està malmès, poseu-vos en contacte amb el vostre proveïdor.

Descripció de la imatge: Una sobrecàrrega view of the Polycom VVX 411 phone system components. This includes the main phone unit, handset, coiled handset cord, phone stand, AC power adapter, and an Ethernet cable, all laid out on a flat surface.
- Polycom VVX 411 Phone Unit
- Telèfon
- Cable de l'auricular
- Suport d'escriptori
- AC Power Adapter (if not using Power over Ethernet - PoE)
- Cable de xarxa (Ethernet)
3. Sobrecàrrega físicaview
3.1 Davant View
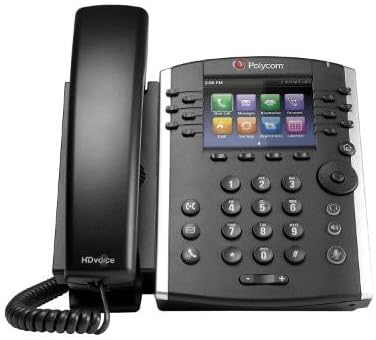
Descripció de la imatge: Un angle frontal view of the Polycom VVX 411 Business Media Phone. The phone is black and silver, featuring a color display screen, a standard numeric keypad, and various function buttons including navigation keys, soft keys, and dedicated call control buttons. The handset is cradled on the left side of the phone unit.
The front of the VVX 411 features a color display, a numeric keypad, and several dedicated function keys for easy navigation and call management. Soft keys below the display provide context-sensitive options.
3.2 Darrera View i Ports

Descripció de la imatge: The rear panel of the Polycom VVX 411 phone, showing various connection ports and regulatory labels. Visible ports include Ethernet ports (LAN and PC), a handset port, a headset port, and a power input jack. The phone stand attachment points are also visible.
El panell posterior proporciona tots els ports de connexió necessaris:
- Port del telèfon: Connects the coiled handset cord.
- Port dels auriculars: For connecting an optional headset.
- LAN Port (Network): Connects the phone to your network switch or router.
- Port de PC: Allows a computer to share the network connection through the phone.
- Port d'alimentació: For connecting the AC power adapter (if not using PoE).
- Port AUX: For connecting expansion modules (e.g., VVX Expansion Module).
4. Configuració
4.1 Fixació del suport d'escriptori
- Alineeu les pestanyes del suport d'escriptori amb les ranures de la part posterior del telèfon.
- Slide the stand upwards until it clicks into place.
4.2 Connexió del telèfon
- Connecteu un extrem del cable en espiral del auricular al auricular.
- Connect the other end of the coiled handset cord to the handset port on the rear of the phone unit.
4.3 Connexió a la xarxa i a l'alimentació
The VVX 411 can be powered either by an AC power adapter or Power over Ethernet (PoE).

Descripció de la imatge: Un primer pla view of the Polycom AC power adapter. The adapter is black with the Polycom logo and various electrical specifications printed on its surface. The DC output cable with its barrel connector is visible.
- Connexió de xarxa: Connect one end of the Ethernet cable to the LAN port on the rear of the phone. Connect the other end to a network switch or router.
- Power Connection (Choose one):
- PoE: If your network switch supports PoE, the phone will power on automatically once connected to the LAN port. No separate power adapter is needed.
- Adaptador de corrent altern: If PoE is not available, connect the AC power adapter to the power port on the rear of the phone, then plug the adapter into a wall outlet.
- Optional PC Connection: If you wish to connect a computer through the phone, connect an Ethernet cable from your computer to the PC port on the rear of the phone.
The phone will begin its boot-up sequence and attempt to connect to your network and provisioning server. This process may take a few minutes.
5. Instruccions de funcionament
5.1 Funcions de trucada bàsiques
- Fer una trucada:
- Pick up the handset, press the Speakerphone button, or press a Line key.
- Marqueu el número amb el teclat.
- Premeu el botó Marqueu soft key or wait for the call to connect.
- Respondre una trucada:
- Agafa l'auricular.
- Premeu el botó Altaveu.
- Premeu el botó Respon tecla suau.
- Finalització d'una trucada:
- Pengeu l'auricular.
- Press the Speakerphone button (if on speakerphone).
- Premeu el botó Finalitzar la trucada tecla suau.
5.2 Funcions de gestió de trucades
- Manteniu: Durant una trucada activa, premeu Aguanta tecla programable. Per reprendre, premeu la tecla Currículum tecla suau.
- Transferència: Durant una trucada activa, premeu Transferència soft key. Dial the new number, then press Transferència again (blind transfer) or wait for the party to answer and then press Transferència (consultative transfer).
- Conferència: Durant una trucada activa, premeu Conferència soft key. Dial the number of the third party, and once connected, press Conferència de nou per unir-se a tots els partits.
- Correu de veu: Premeu el botó Missatges button (envelope icon) and follow the audio prompts.
5.3 Control de volum
Utilitza el Volum buttons located below the keypad to adjust the volume of the handset, speakerphone, or ringer, depending on the phone's current state.
6. Manteniment
6.1 Neteja del telèfon
- Utilitzeu un drap suau i sense pelusa lleugerament dampened with water to clean the phone's surfaces.
- No utilitzeu netejadors abrasius, ceres ni dissolvents.
- Eviteu ruixar líquids directament sobre el telèfon.
- Ensure the phone is unplugged from power before cleaning.
6.2 Atenció general
- Mantingueu el telèfon allunyat de la llum solar directa, de fonts de calor i de la humitat excessiva.
- Eviteu deixar caure el telèfon o sotmetre'l a impactes forts.
- No intenteu obrir ni reparar el telèfon vosaltres mateixos. Demaneu ajuda a personal de servei qualificat.
7. Solució De Problemes
| Problema | Causa possible | Solució |
|---|---|---|
| El telèfon no s'encén. | No hi ha connexió elèctrica o la font d'alimentació és defectuosa. |
|
| Sense to de marcatge. | Network connection issue or phone not registered. |
|
| No es poden fer ni rebre trucades. | Network issues, service provider issues, or incorrect configuration. |
|
| La pantalla està en blanc o congelada. | Software issue or power problem. |
|
For advanced troubleshooting or network configuration issues, please contact your IT department or VoIP service provider.
8. Especificacions
| Característica | Detall |
|---|---|
| Número de model | 2200-48450-001 |
| Marca | Polycom |
| Tipus de telèfon | Corded Business Media Phone (VoIP) |
| Línies compatibles | 12 |
| Font d'alimentació | Corded Electric (AC Adapter) or Power over Ethernet (PoE) |
| Material | Plàstic |
| Color | Negre, plata |
| Pes de l'article | 2.9 lliures (1.3 kg) |
| Dimensions del paquet | 11.73 x 7.95 x 3.94 polzades (29.8 x 20.2 x 10 cm) |
| Capacitat de trucades de conferència | Bàsica |
| Dispositius compatibles | VoIP services, UC applications, PSTN/ISDN networks, other Polycom devices |
9. Garantia i Suport
This Polycom VVX 411 phone is offered as an Amazon Renewed product. It has been professionally inspected and tested to function and appear like new. As such, it is backed by the Garantia renovada d'Amazon, which provides for replacement or refund if you are not satisfied with your purchase within 90 days.
For technical support or further assistance with your device's configuration, please contact your VoIP service provider or the seller from whom you purchased this renewed product.