Introducció
The Fluidmaster 703AP4 Specialty Toilet Fill Valve is designed as a direct replacement for old or inefficient fill valves in Glacier Bay and Niagara Flapperless Toilets. This valve optimizes your toilet's refill performance, ensuring fast and efficient operation. It is built with corrosive-resistant materials for durability and offers a cost-effective solution for common toilet fill problems.

Image: Packaging for the Fluidmaster 703AP4 Specialty Toilet Fill Valve, showing two units.
Informació de seguretat
- Always turn off the water supply to the toilet before beginning any installation or maintenance.
- Wear appropriate personal protective equipment, such as gloves and eye protection, when handling plumbing components.
- Assegureu-vos que totes les connexions estiguin ben fixades per evitar fuites.
- Mantingueu les peces petites allunyades dels nens.
- Si no esteu segurs de cap pas, consulteu un lampista qualificat.
Producte acabatview i Components
The Fluidmaster 703AP4 fill valve consists of several key components designed for efficient water flow and level control within your toilet tank.

Imatge: Una imatge detallada view of the Fluidmaster 703AP4 fill valve, showing the main body and the float arm mechanism.

Image: Another perspective of the Fluidmaster 703AP4 fill valve, highlighting its compact design.
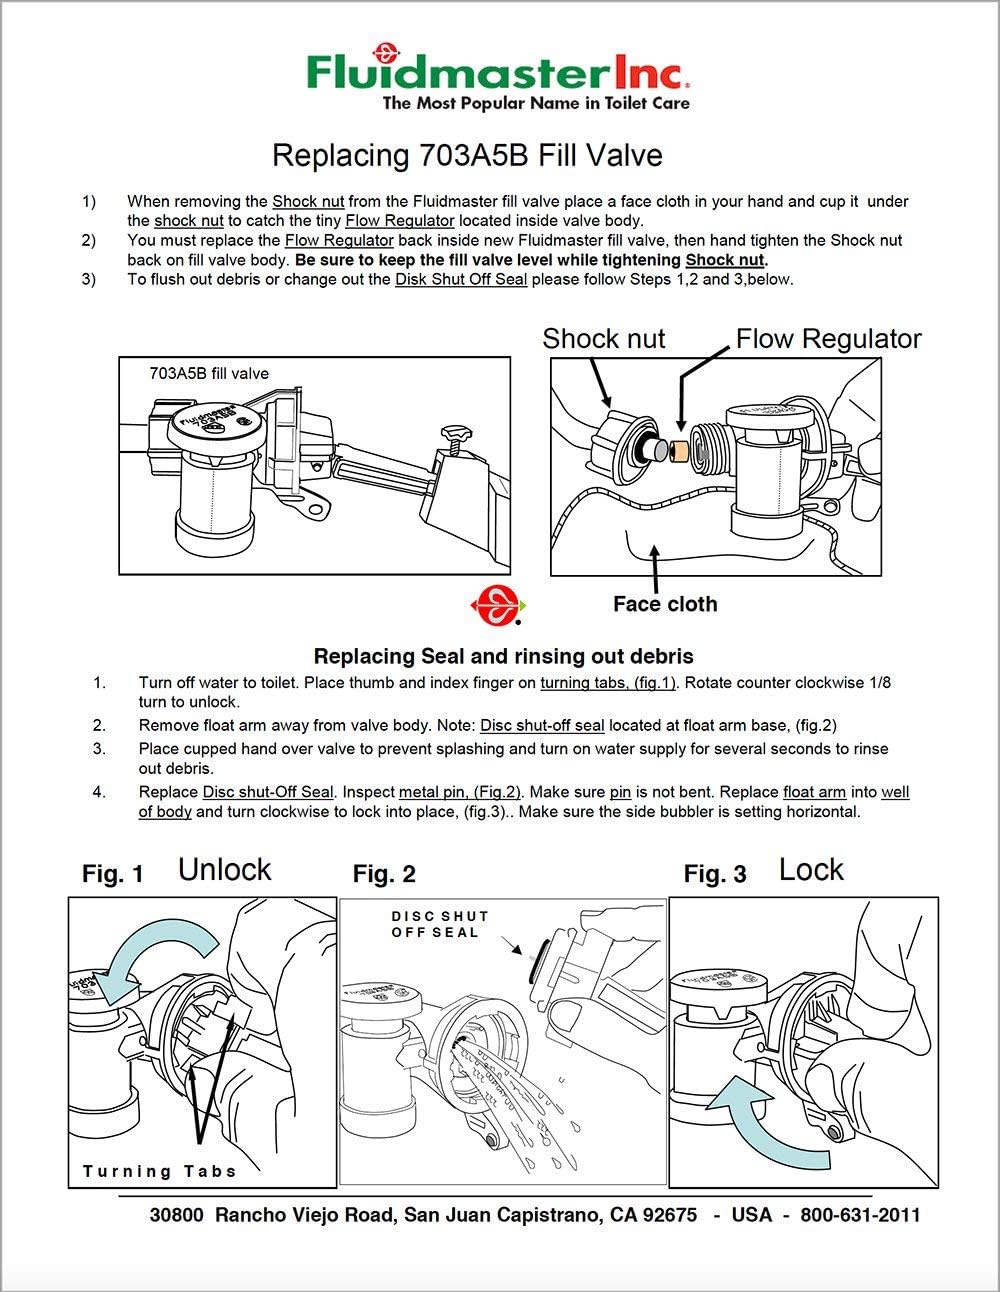
Image: An illustrative diagram showing the Fluidmaster fill valve correctly installed inside a toilet tank, with water level indicated.
Instruccions d'instal·lació
Follow these steps for a quick and easy installation of your new Fluidmaster 703AP4 fill valve.
- Tanqueu el subministrament d'aigua: Locate the water supply valve behind or near the toilet and turn it clockwise until the water flow stops. Flush the toilet to empty the tank.
- Remove Old Fill Valve: Disconnect the water supply line from the bottom of the old fill valve. Unscrew the mounting nut holding the old fill valve in place and carefully remove it from the tank.
- Clean Tank Base: Clean any debris or mineral buildup from the hole at the bottom of the toilet tank where the fill valve sits.
- Install New Fill Valve: Insert the new Fluidmaster 703AP4 fill valve into the hole at the bottom of the tank. Ensure the shank washer is properly seated on the outside of the tank.
- Secure Fill Valve: Hand-tighten the mounting nut onto the threaded shank of the new fill valve from underneath the tank. Do not overtighten.
- Connectar el subministrament d'aigua: Reconnect the water supply line to the bottom of the new fill valve. Hand-tighten, then use a wrench to tighten an additional quarter turn. Do not overtighten.
- Activeu el subministrament d'aigua: Slowly turn the water supply valve counter-clockwise to restore water flow to the toilet tank. Check for leaks.
- Adjust Water Level (if necessary): The valve is designed to optimize refill. If adjustment is needed, refer to the diagram below for components like the shock nut and flow regulator.

Image: A visual three-step guide illustrating the installation process: 1. Flush out dump tank, 2. Remove old fill valve, 3. Install new fill valve.
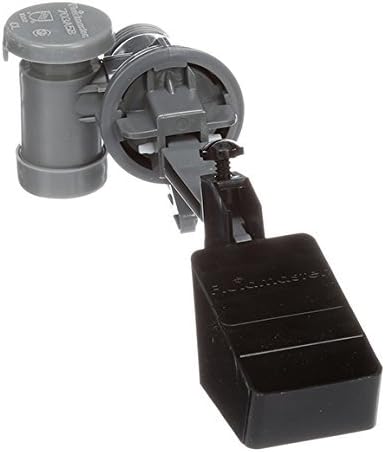
Image: A detailed diagram showing the components of the 703A5B fill valve, including the shock nut and flow regulator, and instructions for replacing the seal and rinsing out debris.
Instruccions de funcionament
The Fluidmaster 703AP4 fill valve operates automatically to refill your toilet tank after each flush. Once installed, it will maintain the proper water level for optimal flushing performance.
- After flushing, the water level in the tank will drop, causing the fill valve to activate.
- The valve will quickly refill the tank to the predetermined water line.
- Once the desired water level is reached, the valve will automatically shut off the water flow.
Manteniment
Regular maintenance can extend the life of your fill valve and ensure optimal performance. If you notice slow refilling or continuous running, the valve may need cleaning.
Replacing Seal and Rinsing Out Debris:
Refer to the diagram in the Installation section (Image: Diagram for replacing Fluidmaster 703A5B fill valve) for visual guidance.
- Tanqueu l'aigua: Tanqueu el subministrament d'aigua al vàter.
- Unlock Valve: Turn the top of the fill valve counter-clockwise 1/8 turn to unlock it.
- Remove Float Arm: Remove the float arm assembly from the valve body.
- Rinse Debris: Place a cup over the top of the valve and turn on the water supply for several seconds to flush out any debris.
- Inspeccionar el segell: Inspect the disc shut-off seal for any damage or wear. Replace if necessary.
- Torneu a muntar: Reinsert the float arm and turn the valve top clockwise to lock it back into place. Ensure the side bubbler is set horizontally.
Resolució de problemes
Aquí teniu alguns problemes comuns i les seves possibles solucions:
| Problema | Causa possible | Solució |
|---|---|---|
| El vàter funciona contínuament | Water level too high, debris in valve, worn seal | Adjust water level, clean valve (see Maintenance), replace seal. |
| Reompliment lent del dipòsit | Low water pressure, debris in valve, kinked supply line | Check water supply pressure, clean valve (see Maintenance), ensure supply line is not kinked. |
| Toilet does not flush properly | Nivell d'aigua massa baix | Adjust water level higher. |
| Leaking at base of valve | Loose mounting nut, damaged shank washer | Tighten mounting nut, inspect and replace shank washer if damaged. |
Especificacions
| Atribut | Detall |
|---|---|
| Marca | Fluidmaster |
| Número de model | 703AP4 (also 745839830632) |
| Material | Metall, plàstic |
| Mida de la connexió d'entrada | 2 polzades |
| Tipus de connexió d'entrada | Omplir |
| Tipus de vàlvula | Vàlvula de flotació |
| Pes de l'article | 6.9 unces |
| Dimensions del paquet | 9.17 x 7.83 x 2.56 polzades |
| Compatibilitat | Glacier Bay and Niagara Flapperless Toilets |
Garantia i Suport
Informació de la garantia:
The Fluidmaster 703AP4 Specialty Toilet Fill Valve comes with a 1 any de garantia des de la data de compra. Aquesta garantia cobreix els defectes de materials i de fabricació en condicions d'ús i manteniment normals.
Atenció al client:
For technical assistance, troubleshooting, or warranty claims, please visit the official Fluidmaster website or contact their customer service department. You can often find detailed FAQs and support resources online.
Fluidmaster Official Weblloc: www.fluidmaster.com
When contacting support, please have your product model number (703AP4) and proof of purchase readily available.


