Introducció
This manual provides instructions for the Armor3 Party Kit, an accessory bundle designed for the Nintendo Switch. The kit enhances your gaming experience by providing various attachments and protective gear for your console and Joy-Cons. It includes silicone skins, Pro handle attachments, racing wheels, thumb grips, a screen protector, and a crystal case.

Image: The complete Armor3 Party Kit, showcasing the packaging and all included accessories: silicone skins, Pro handle attachments, racing wheels, thumb grips, screen protector, and crystal case, alongside a Nintendo Switch console for scale (console not included).
Què s'inclou
The Armor3 Party Kit contains the following items:
- 2 x Silicone Skins (1 Red, 1 Blue)
- 2 x Pro Handle Attachments (1 Red, 1 Blue)
- 2 x Racing Wheels (1 Red, 1 Blue)
- 4 x Thumb Grips (2 Red, 2 Black)
- 1 x Crystal Case (3 pieces for console)
- 2 x Screen Protectors
Configuració i instal·lació
1. Installing Silicone Skins
The silicone skins provide a comfortable grip and protection for your Joy-Cons.
- Identify the left (blue) and right (red) Joy-Con silicone skins.
- Carefully slide each Joy-Con into its corresponding silicone skin, ensuring all buttons and analog sticks are aligned with the skin's openings.

Image: A red and a blue Nintendo Switch Joy-Con, illustrating the controllers for which the silicone skins are designed.
2. Attaching Pro Handle Attachments
These attachments provide a more ergonomic grip for individual Joy-Cons, ideal for single-Joy-Con gameplay.
- Select a Pro handle attachment (red or blue).
- Align the Joy-Con with the slot in the handle attachment.
- Slide the Joy-Con into the attachment until it clicks securely into place. Ensure the shoulder buttons are accessible.

Image: A red and a blue Pro handle attachment, designed to provide a more substantial grip for Nintendo Switch Joy-Cons.
3. Using Racing Wheels
The racing wheels are designed for an immersive driving experience in racing games.
- Choose a racing wheel (red or blue).
- Open the central slot of the racing wheel.
- Insert a Joy-Con into the slot, ensuring the analog stick and buttons are correctly positioned within the wheel's cutouts. Close the slot to secure the Joy-Con.
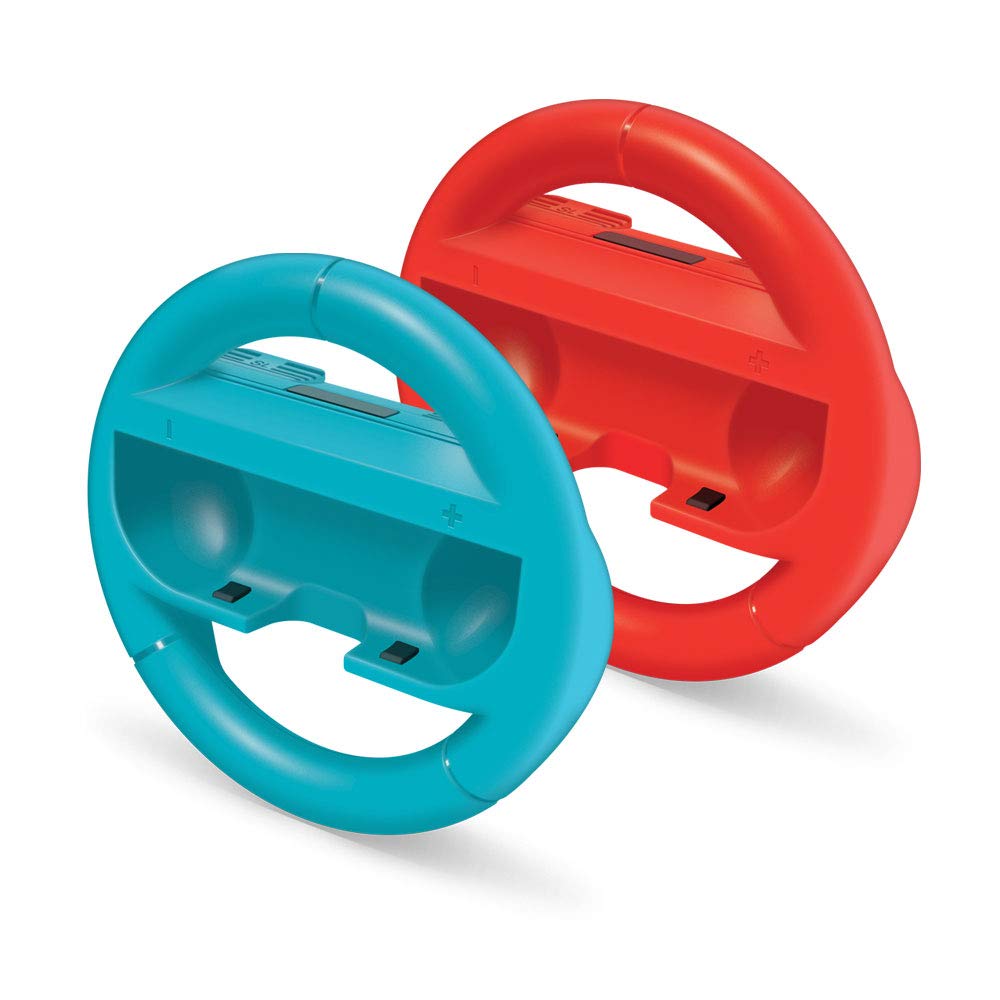
Image: A red and a blue racing wheel attachment, designed to hold Nintendo Switch Joy-Cons for an enhanced racing game experience.
4. Applying Thumb Grips
Thumb grips enhance control and protect the analog sticks of your Joy-Cons.
- Select a thumb grip (red or black).
- Carefully stretch the thumb grip over the analog stick of a Joy-Con.
- Ensure the grip is fully seated and centered on the analog stick.

Image: Four thumb grips in red and black, designed to fit over the analog sticks of game controllers for improved grip and protection.
5. Installing Screen Protector
The screen protector safeguards your Nintendo Switch screen from scratches and dust.
- Clean the Nintendo Switch screen thoroughly using a microfiber cloth to remove any dust or smudges.
- Carefully peel back a small portion of the protective film from the screen protector.
- Align the screen protector with the top edge of the Switch screen.
- Slowly lower the protector onto the screen, using a card or soft cloth to smooth out any air bubbles as you go.
- Once applied, gently peel off the remaining protective film.

Image: A screen protector being applied to the screen of a Nintendo Switch console, with a cleaning cloth visible.
6. Attaching Crystal Case
The crystal case provides clear, hard-shell protection for your Nintendo Switch console.
- Ensure your Nintendo Switch console is clean and free of dust.
- Separate the three pieces of the crystal case.
- Carefully snap the main body piece onto the back of the Nintendo Switch console.
- Attach the two smaller pieces to the Joy-Cons while they are attached to the console, or attach them to the Joy-Cons before sliding them onto the console. Ensure all ports and vents are unobstructed.

Image: A Nintendo Switch console with its Joy-Cons attached, representing the device for which the crystal case provides protection.
Instruccions de funcionament
Once installed, the accessories are ready for use with your Nintendo Switch. The silicone skins, Pro handle attachments, and racing wheels are designed to enhance grip and comfort during gameplay. The thumb grips provide additional control and protection for the analog sticks. The screen protector and crystal case offer continuous protection for your console during use and transport.
No specific operational steps are required beyond the installation. The accessories function passively by providing physical enhancements and protection.
Manteniment
Proper maintenance ensures the longevity and performance of your Armor3 Party Kit accessories.
- Cleaning Silicone Skins, Pro Handles, Racing Wheels, and Thumb Grips: Esborra amb anunciamp cloth and mild soap if necessary. Allow to air dry completely before reattaching to Joy-Cons.
- Cleaning Crystal Case: Use a soft, dry cloth to wipe away dust and fingerprints. For stubborn marks, a slightly damp cloth can be used. Avoid abrasive cleaners.
- Cleaning Screen Protector: Use a microfiber cloth specifically designed for electronics screens. Do not use harsh chemicals or abrasive materials.
- Emmagatzematge: Store accessories in a clean, dry place away from direct sunlight and extreme temperatures when not in use.
Resolució de problemes
This section addresses common issues you might encounter with the Armor3 Party Kit accessories.
| Problema | Causa possible | Solució |
|---|---|---|
| Accessory does not fit Joy-Con/Console properly. | Alineació incorrecta o restes. | Ensure the Joy-Con or console is correctly aligned with the accessory. Check for any obstructions or debris in the slots or on the device. Reattempt installation carefully. |
| Screen protector has air bubbles. | Partícules de pols o aplicació desigual. | Lift the nearest edge of the screen protector gently and use a soft card (like a credit card) wrapped in a microfiber cloth to push the air bubbles towards the edge. Ensure the screen is clean before reapplication. |
| Accessories feel loose after some use. | Normal wear and tear or improper initial fit. | Re-seat the accessory firmly. If the issue persists due to material stretching over time, replacement may be considered. |
Especificacions
| Característica | Detall |
|---|---|
| Nom del producte | Armor3 Party Kit for Nintendo Switch |
| Número de model | M07361 |
| Marca | Armor3 |
| Compatibilitat | Nintendo Switch Joy-Cons and Console |
| Pes de l'article | Aproximadament 1.25 lliures (0.57 kg) |
| Data de llançament | 9 de novembre de 2018 |
Garantia i Suport
For information regarding warranty coverage and customer support for your Armor3 Party Kit, please refer to the manufacturer's official website or contact their customer service directly. Details are typically provided with the product packaging or on the manufacturer's support page.

