Producte acabatview
The Kreg ACS3000 Adaptive Cutting System is a versatile tool designed to make a wide range of precise, clean, and splinter-free cuts safely and easily without a table saw or miter saw. It offers a mobile and foldable work table solution for various carpentry tasks.

Image: The Kreg ACS3000 Adaptive Cutting System, featuring the plunge saw, 62-inch guide track, and foldable project table.
Característiques principals:
- Tall versàtil: Capable of making straight, accurate, smooth, and splinter-free cuts in plywood, solid-wood boards, and other sheet goods.
- Mesura precisa: Features integrated guides, stops, and measuring systems for accurate positioning and cuts.
- Powerful Plunge Saw: Equipat amb un 12-amp, 120-volt motor, retracting blade, 62" Guide Track, and electronic brake for clean cuts.
- Safe Mobile Workbench: The portable project table folds and rolls for easy transport, incorporating safety features and anti-kickback protection.
- Eines Kreg Premium: Designed to help users achieve professional woodworking results.

Image: The Kreg Plunge Saw in action, demonstrating its capability for straight, accurate, smooth, and splinter-free cuts.

Image: The Kreg Adaptive Cutting System table in its folded, portable configuration, being easily rolled for transport or storage.
Guia de configuració
This section provides detailed instructions for setting up your Kreg ACS3000 Adaptive Cutting System Project Table and Guide Track. For a visual guide, please refer to the official setup video below.
Official Kreg video: Setting up the Adaptive Cutting System (Duration: 10:44). This video demonstrates the complete assembly and calibration process for the project table, guide track, and plunge saw.
1. Installing Hinge Mounting Plates
Begin by installing the hinge mounting plates onto the table. Slide two hex bolts into the extrusion at one end of the table. Place a third bolt into the plate itself. Then, slide the plate onto the bolts. Ensure the tab on the mounting plate fits into the notch in the table. Slide the mounting plate towards the center of the table and install one of the T-knobs on the inner bolt. You do not need to fully tighten it yet. On the outer bolt, slip on a hinge support bracket, then add the T-knob. Repeat this process for the mounting plate on the opposite end of the table.
2. Installing Track Hinges on Guide Track
Lay the 62-inch guide track face down on the table with the anti-chip strip (which should already be trimmed) facing towards the center. The outfeed end (without the cord manager) should be on your left. Measure 2.5 inches from the outfeed end of the track and make a mark. Slide one hinge onto the track, ensuring the hinge knuckles are facing up. Use a square to position the hinge precisely on your mark and tighten it down using the included hex wrench.
3. Attaching Track to Table
Position the track with the mounted hinge so that the hinge is on the outfeed end of the table (the end with wheels). The anti-chip strip should face the edge of the table. Attach the hinge to the mounting plate by slipping the hinge over the tabs on the plate, pushing it all the way up, and securing it with a washer and star knob. Next, install the other hinge on the infeed end of the track. First, remove the cord manager. Ensure the hinge flaps are in the up or open position and pointed towards the end of the track. Slide the hinge into the track and position it on the mounting plate so the hinge is raised all the way up. Tighten the star knob completely. Test both hinges to ensure the track swings easily into the down position.
4. Aligning the Track
To ensure the track sits at exactly 90 degrees to the holes in the table, swing the track into the down position and lower the hinges completely. Install one of the tall Versa-Stops into the calibration hole in the tabletop. You will likely see a gap between the stop and the anti-chip strip. Loosen the outer T-knobs on the hinge mounting plate and slide the mounting plate over until the anti-chip strip touches the stop. Re-tighten the knobs. Repeat this process for the other end of the table. Double-check that both stops are touching the track, then remove the stops. Finally, reinstall the cord manager.
5. Cutting the Kerf in the Table
The next step is to cut a kerf in the table. This kerf will be aligned with the track and perpendicular to the holes in the table. To do this, place a 48-inch long piece of 3/4-inch plywood under the track, with a bit of it sticking out, and swing the track down. Set the cutting depth of the saw to approximately 1 inch to cut a kerf about 1/4 inch deep into the table, but not through it. Place the saw on the track, lock in the anti-kickback, and make the cut. The splinter guard will ride against the wood, and the riving knife will follow the saw blade. Once the kerf is cut, remove the cut-off piece and the plywood. The kerf in the table shows where the edge of the saw blade will always be, serving as your permanent cut line.
Instruccions de funcionament
1. Calibrating Measuring Rules
The kerf you just cut in the table is crucial for calibrating your measuring rules. There are two types of measuring rules: one starts at 8 inches, and the other at 0 inches. One of each goes into the aluminum extrusions in the table. Just slide the rule in from the end; a small tab at the end locks the rule in place. The rule that starts at 0 inches goes into the adjacent slot. To calibrate each rule, hook a tape measure into the saw kerf and extend it out. Align the 10-inch mark on the tape measure with the 10-inch mark on the first rule (the one starting at 8 inches). Move the rule in the table back or forward until the marks align. Then, move the tape measure to the other rule and align the 10-inch mark on the tape with the 0-inch mark on that rule. The rules will stay in place once set.

Image: Kreg saw blades, highlighting the precision and accuracy built into the system for consistent results.
2. Calibrating Repetitive Stops
To calibrate the repetitive stops, slide one repetitive stop (with the knob facing toward the track) into the extrusion. Align the indicator with the 10-inch mark on the rule. Then, slide the other repetitive stop into place and align it with the 10-inch mark as well. These stops are designed for cuts up to 25 inches wide or long. For wider or longer cuts, use the 48-inch extension, which slides into the extrusion and locks in place. Just align the measurement on the extension bar with the indicator mark on the rule.
3. Calibrating Miter Guide
To calibrate the miter guide, start by removing one of the repetitive stops. Then, slide the miter guide into that same slot. The miter guide has an indicator to show angles from 0 to 60 degrees. To ensure the angles are correct, install the two tall Versa-Stops into two adjacent holes in the table (these are positioned at exactly 45 degrees). Slide the miter guide against the stops, lock down the knobs, and then position the indicator so it aligns exactly with the 45-degree mark. Once calibrated at 45 degrees, the miter guide will be accurate for every angle shown on its scale.
4. Making a Test Cut
To verify your setup, install the track on the mounting plates and make a test cut in a scrap piece of plywood. Butt the scrap piece against the repetitive stops. Make sure the cut depth of the saw is set correctly, and then make the cut. Swing the track up and remove the piece from underneath. Check its width using a tape measure; it should be exactly 10 inches wide if you used the 10-inch mark for calibration.

Imatge: Un primer pla view of the Kreg Plunge Saw cutting, demonstrating the smooth and clean finish achieved with the system.
Informació de seguretat
The Kreg ACS3000 Adaptive Cutting System is designed with multiple safety features to ensure user protection during operation. Always familiarize yourself with these features before use.
- Anti-Kickback Protection: The system includes an Anti-Kickback switch to prevent the saw from kicking back during cuts.
- Riving Knife: A riving knife is integrated to prevent the material from pinching the blade and causing kickback.
- Fully-Shrouded Blade: The saw blade is fully shrouded for maximum protection.
- Electronic Blade Brake: An electronic brake quickly stops the blade after the cut is complete, reducing exposure to the moving blade.
- Splinter Guard: The saw's splinter guard and the table's sacrificial surface work together to provide clean, splinter-free cuts and enhance safety.
Always wear appropriate personal protective equipment (PPE), including safety glasses, hearing protection, and a dust mask, when operating power tools.
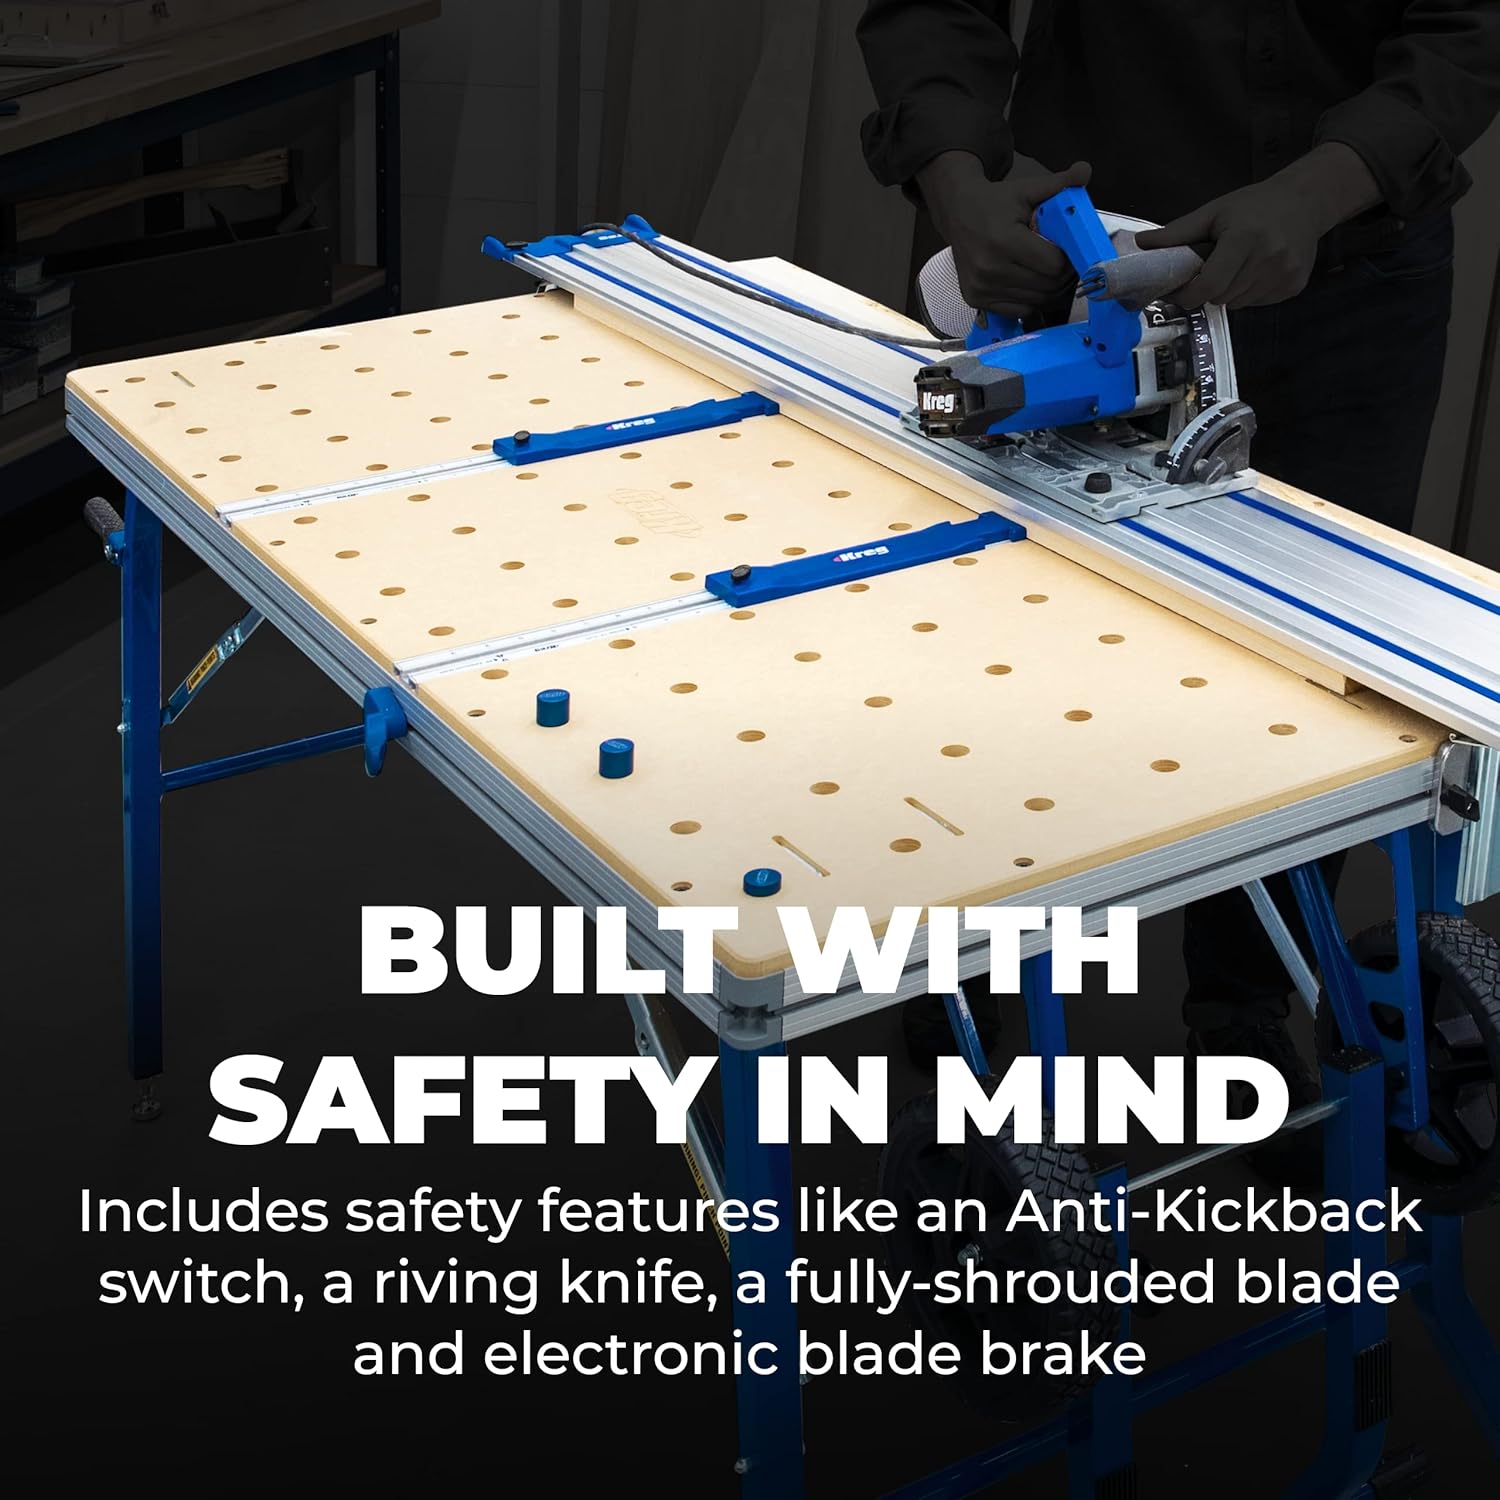
Image: A user operating the Kreg Plunge Saw, emphasizing the built-in safety features for secure woodworking.
Manteniment
Regular maintenance ensures the longevity and optimal performance of your Kreg ACS3000 Adaptive Cutting System.
- Neteja: Keep the guide tracks, table surface, and saw free from dust and debris. Use a dry cloth or brush for cleaning.
- Inspecció de la fulla: Regularly inspect the saw blade for sharpness and damage. Replace dull or damaged blades promptly.
- Track Lubrication: Periodically apply a dry lubricant to the guide tracks to ensure smooth saw movement.
- Comprovació de fixació: Ensure all knobs, bolts, and fasteners are securely tightened before each use.
- Anti-Chip Strip: The anti-chip strip is a sacrificial component. Replace it when it becomes worn or damaged to maintain splinter-free cuts.
Resolució de problemes
If you encounter issues with your Kreg ACS3000 Adaptive Cutting System, refer to the following common troubleshooting tips:
- Talls inexactes:
- Verify that the measuring rules are correctly calibrated as per the "Operating Instructions" section.
- Ensure the guide track is properly aligned and secured to the table.
- Check the saw blade for any wobble or damage.
- Saw Sticking or Rough Movement:
- Clean the guide tracks and the saw's base plate thoroughly.
- Apply a suitable dry lubricant to the guide tracks.
- Ensure no debris is obstructing the saw's movement along the track.
- Excessive Splintering:
- Check if the anti-chip strip is worn and needs replacement.
- Ensure the saw blade is sharp and appropriate for the material being cut.
- Verify the cutting depth is set correctly.
- Dificultats de muntatge:
- Refer to the detailed setup video and instructions. Some users have noted that initial assembly can be lengthy; take your time and follow each step carefully.
- Ensure all components are oriented correctly as shown in the diagrams and video.
Especificacions del producte
| Atribut | Detall |
|---|---|
| Marca | KREG |
| Número de model | ACS3000 |
| Color | Multicolor |
| Material de la fulla | Acer d'alta velocitat |
| Font d'alimentació | Elèctric amb cable |
| Voltage | 120 Volts |
| Valoració actual | 12 Amps |
| Wattage | 1440 watts |
| Dimensions del producte | 55 cm de llargada x 29 cm d'amplada x 3 cm d'alçada |
| Pes de l'article | 53 lliures |
| Longitud de la fulla | 48 Inches (Guide Track) |
| Nombre de dents | 48 (Carbide-tipped blade) |
| Angle de tall | 90 Degrees (Bevel cutting from -1° to 47°) |
| Components inclosos | Kreg ACS-SAW Plunge Saw, Kreg ACS-TTOP Project Table Top, Kreg ACS-TBASE Project Table Base, Kreg ACS-430 62'' Guide Track with Cord Manager, 48-tooth carbide-tipped blade, Dust collection bag, 2 Track Hinges and Mounting Plates, 4 Versa-Stops, 2 Material Stops, Joining Bar to connect Material Stops, Protractor Miter Guide, 48'' Extension Stop, 2 Primary Rulers, 2 Secondary Rulers, Owner's Manual |
| Especificació Met | OSHA |
Garantia i Suport
The Kreg ACS3000 Adaptive Cutting System comes with a Limited Warranty or Full Warranty (as specified at the time of purchase). For detailed warranty information, claims, or technical support, please refer to the owner's manual included with your product or visit the official Kreg weblloc.
For customer support, you may also refer to the contact information provided by the seller or manufacturer.


