1. Producte acabatview
The ANENG Q1 is a 9999 counts True RMS digital multimeter designed for accurate measurement of various electrical parameters. It features an EBTN black screen with a large, backlit LCD for clear readability in diverse lighting conditions. This device supports both automatic and manual ranging, offering flexibility for different measurement needs. It includes an analog bar graph display for quick visual indication of readings.
Característiques principals:
- Mesurament RMS real: Proporciona lectures precises per a formes d'ona no sinusoïdals.
- NCV (vol sense contacte).tage) Detecció: For safe identification of live wires without direct contact.
- Rang automàtic/manual: User-selectable measurement range for convenience and precision.
- Analog Bar Graph: Visual representation of measurement trends.
- Large Backlit LCD: Visibilitat millorada en entorns amb poca llum.
- Protecció de sobrecàrrega: Ensures safety across all measurement ranges.
- Indicació de bateria baixa: Alertes quan cal substituir la bateria.
- Funció de retenció de dades: Congela la lectura mostrada per facilitar el registre.
- Apagat automàtic: Conserva la durada de la bateria.
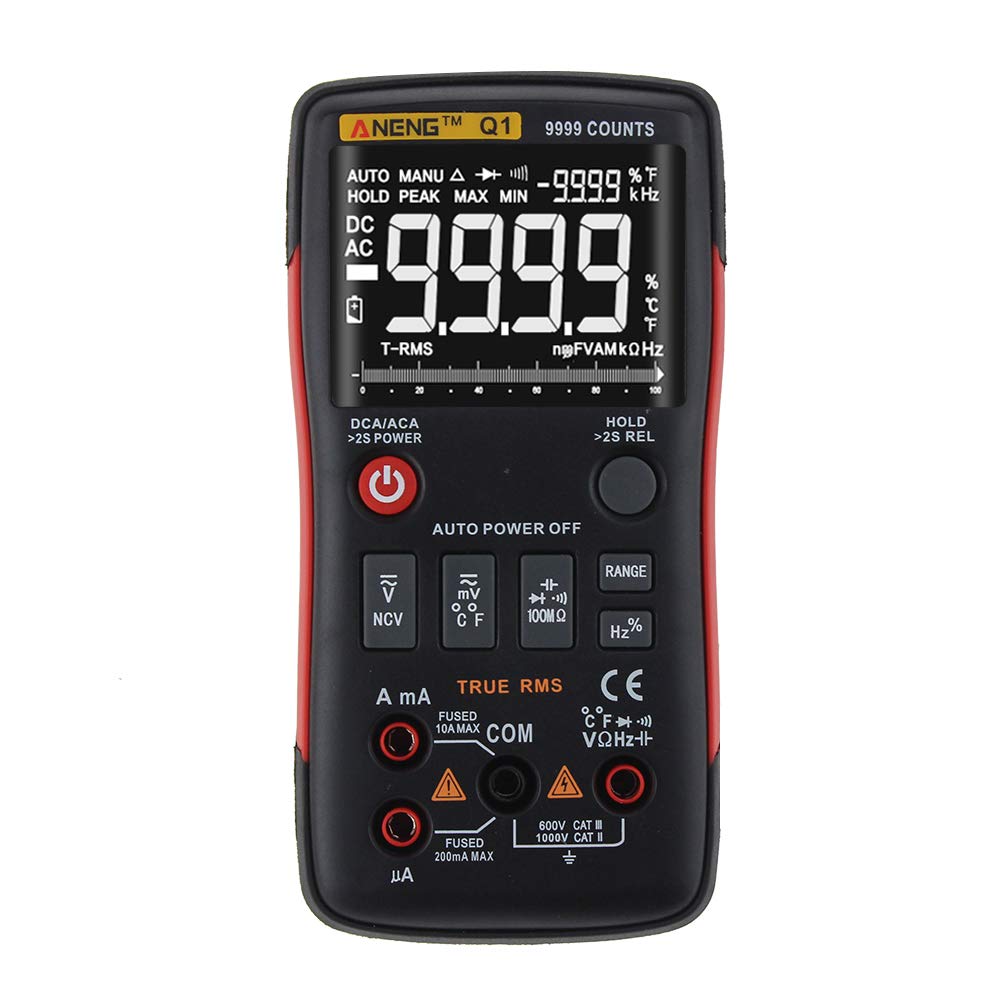
Figure 1: ANENG Q1 Digital Multimeter with its display and function buttons.
2. Informació de seguretat
Always observe basic safety precautions when using this multimeter to prevent personal injury or damage to the device. Read and understand all safety information before operation.
- No supereu els valors d'entrada màxims per a cap funció.
- Tingueu precaució quan treballeu amb voltagper sobre de 30 V CA RMS, 42 V pic o 60 V CC. Aquests voltagsuposen un risc de xoc.
- Before measuring current, ensure the circuit is de-energized and the multimeter is connected in series.
- Always disconnect test leads from the circuit before changing functions.
- Inspeccioneu els cables de prova per detectar danys a l'aïllament o metall exposat abans d'utilitzar-los. Substituïu-los si estan danyats.
- Do not operate the multimeter if the battery cover is not properly closed.
- Canvieu les piles immediatament quan aparegui l'indicador de bateria baixa per garantir lectures precises.
- Complir els codis de seguretat locals i nacionals.
3. Configuració
3.1 Instal·lació de la bateria
- Assegureu-vos que el multímetre estigui apagat.
- Localitzeu el compartiment de la bateria a la part posterior del dispositiu.
- Desenrosqueu la tapa del compartiment de la bateria i traieu-la.
- Insert two 1.5V AA batteries, observing the correct polarity (+/-).
- Substituïu la tapa de la bateria i fixeu-la amb el cargol.
3.2 Connexió dels cables de prova
The multimeter comes with a set of test leads. Always connect the black lead to the 'COM' (Common) jack. Connect the red lead to the appropriate input jack based on the measurement function:
- VΩHz+ Jack per a Voltage, Mesures de resistència, freqüència, capacitança, díode i continuïtat.
- mA jack for current measurements up to 999.9mA.
- 10A jack for current measurements up to 10A.

Figure 2: Included test leads and probes.

Figure 3: Complete ANENG Q1 Multimeter kit with accessories.
4. Instruccions de funcionament
The ANENG Q1 multimeter offers both automatic and manual ranging. Press the 'RANGE' button to switch between auto and manual modes. In manual mode, press 'RANGE' repeatedly to cycle through available ranges.
4.1 Encès/Apagat
Press the red power button to turn the multimeter on or off. The device features an auto power-off function to conserve battery life after a period of inactivity.
4.2 Mesurar AC/DC Voltage (V)
- Connect the black test lead to the 'COM' jack and the red test lead to the 'VΩHz+' jack.
- Seleccioneu el voltage measurement function (AC V or DC V) using the function button.
- Connecteu les sondes de prova en paral·lel a través del circuit o component que s'ha de mesurar.
- Llegeix el voltage valor a la pantalla.
4.3 Measuring AC/DC Current (A/mA/µA)
- Important: Ensure the circuit is de-energized before connecting the multimeter for current measurement.
- Connect the black test lead to the 'COM' jack. Connect the red test lead to the 'mA' jack for currents up to 999.9mA, or to the '10A' jack for currents up to 10A.
- Select the current measurement function (AC A or DC A).
- Open the circuit and connect the multimeter in series with the load.
- Re-energize the circuit and read the current value on the display.
4.4 Mesura de la resistència (Ω)
- Connect the black test lead to 'COM' and the red test lead to 'VΩHz+'.
- Select the resistance measurement function.
- Assegureu-vos que el circuit o component estigui desenergitzat abans de mesurar la resistència.
- Connecteu les sondes de prova a través del component.
- Llegiu el valor de resistència a la pantalla.
4.5 Measuring Capacitance (F)
- Connect the black test lead to 'COM' and the red test lead to 'VΩHz+'.
- Select the capacitance measurement function.
- Ensure the capacitor is fully discharged before measurement to prevent damage to the multimeter.
- Connecteu les sondes de prova als terminals del condensador.
- Llegiu el valor de la capacitat a la pantalla.
4.6 Measuring Frequency (Hz) and Duty Cycle (%)
- Connect the black test lead to 'COM' and the red test lead to 'VΩHz+'.
- Select the frequency/duty cycle measurement function.
- Connecteu les sondes de prova a la font de senyal.
- Llegiu el valor de freqüència o cicle de treball a la pantalla.
4.7 Mesura de la temperatura (°C/°F)
- Connect the temperature probe to the appropriate input jacks (usually 'COM' and 'VΩHz+' or dedicated temperature jacks if available).
- Select the temperature measurement function.
- Place the tip of the temperature probe on or near the object whose temperature is to be measured.
- Llegiu el valor de la temperatura a la pantalla.
4.8 Prova de díodes
- Connect the black test lead to 'COM' and the red test lead to 'VΩHz+'.
- Select the diode test function.
- Connecteu la sonda vermella a l'ànode i la sonda negra al càtode del díode.
- La pantalla mostrarà el volum d'avançtage drop. Reverse the probes; an open circuit (OL) indicates a good diode.
4.9 Prova de continuïtat
- Connect the black test lead to 'COM' and the red test lead to 'VΩHz+'.
- Seleccioneu la funció de prova de continuïtat.
- Connecteu les sondes de prova a través del circuit o component.
- A continuous beep indicates a low resistance path (continuity).
4.10 NCV (Volum sense contacte)tage) Detecció
- Select the NCV function.
- Bring the top of the multimeter close to the conductor or outlet.
- The device will indicate the presence of AC voltage through an audible alarm and/or visual indicator.
5. Manteniment
5.1 Neteja
Netegeu el cas amb l'anunciamp cloth and mild detergent. Do not use abrasives or solvents. Ensure the device is completely dry before use.
5.2 Emmagatzematge
When not in use for extended periods, remove the batteries to prevent leakage. Store the multimeter in a cool, dry place, away from direct sunlight and extreme temperatures. The recommended storage conditions are -20°C to 60°C (-4°F to 140°F) with humidity less than 80% RH.
6. Solució De Problemes
- Sense pantalla: Comproveu la instal·lació de les piles i assegureu-vos que no estiguin esgotades. Substituïu-les si cal.
- Lectures incorrectes: Verify that the correct function and range are selected. Ensure test leads are properly connected and not damaged. Check battery level.
- Pantalla 'OL' (sobrecàrrega): The measured value exceeds the selected range or the maximum input limit. Switch to a higher range or ensure the input is within the device's specifications.
- Sense bip de continuïtat: Check if the circuit is truly continuous and has very low resistance. Ensure test leads are making good contact.
7. Especificacions
7.1 Especificacions elèctriques

Figure 4: Electrical Specifications - DC and AC Voltage.

Figure 5: Electrical Specifications - DC and AC Current, and Resistance.

Figure 6: Electrical Specifications - Capacitance, Frequency, and Duty Cycle.

Figure 7: Electrical Specifications - Temperature, Diode, Continuity, and NCV.
7.2 General, Mechanical, and Environmental Specifications

Figure 8: General, Mechanical, and Environmental Specifications.
| Paràmetre | Valor |
|---|---|
| Mostra | LCD de 9999 recomptes |
| Variant | Automàtic/Manual |
| Material | ABS+TPE |
| Taxa d'actualització | 3 vegades/segon |
| RMS veritable | Sí |
| Retenció de dades | Sí |
| Llum de fons | Sí |
| Indicació de bateria baixa | Sí |
| Apagat automàtic | Sí |
| Paràmetre | Valor |
|---|---|
| Dimensió | 146 * 74 * 34 mm |
| Pes | 125 g |
| Tipus de bateria | 2 pila AA d'1.5 V (no inclosa) |
| Paràmetre | Valor |
|---|---|
| Temperatura de funcionament | 0~40°C |
| Humitat de funcionament | <75% HR |
| Temperatura d'emmagatzematge | -20~60°C |
| Humitat d'emmagatzematge | <80% HR |
8. Garantia i Suport
8.1 Garantia
This ANENG Q1 Digital Multimeter comes with a garantia d'un any from the date of purchase, covering manufacturing defects. This warranty does not cover damage caused by misuse, accident, unauthorized modification, or normal wear and tear. Please retain your proof of purchase for warranty claims.
8.2 Atenció al client
For technical assistance, troubleshooting, or warranty inquiries, please contact the retailer or manufacturer's customer service. Refer to your purchase documentation for specific contact details.


